
Note
If you are a Prophesee customer, you can access datasheets and user manuals in our Knowledge Center after requesting an account. This page provides additional details on the sensor’s biases, focusing on how to configure them with the SDK.
Biases
Prophesee sensors provide a set of adjustable settings, which allow the sensor performance to be tuned for different application requirements and conditions (higher speed, lower background activity, higher contrast sensitivity threshold, etc.). These sensor settings are called biases.
See also
In order to properly understand how biases can affect the behaviour of the sensors, you may want to watch our Bias Tuning and Region of Interest video and also Training Video on Event-Based Vision Sensor as it includes an overview of concepts mentioned in this page like contrast sensitivity, background noise and pixel latency.
Table of Contents
Available Biases
There are five generally useful biases:
Contrast sensitivity threshold biases (bias_diff_on, bias_diff_off)
The pixels of an event sensor are triggered by a change in illumination of a certain contrast. The minimum contrast to produce an event, measured in %, is called the contrast threshold. These biases control the contrast threshold - the sensitivity of the sensor to contrast changes.
bias_diff_on: adjusts the contrast threshold for ON events. This determines the ON contrast threshold, the factor by which the pixel must get brighter, before an ON event occurs for that pixel. It is usually adjusted when the user wants to change how many events are output during a big change in illumination, or else to change the sensitivity to small positive light changes.
bias_diff_off: adjusts the contrast threshold for OFF events. This determines the OFF contrast threshold, the factor by which the pixel must get darker, before an OFF event occurs for that pixel. It is usually adjusted when the user wants to change how many events are output during a big change in illumination, or else to change the sensitivity to small negative light changes.
Note
On IMX636 and GenX320 sensors, it is possible to get a symmetry between bias_diff_off and bias_diff_on. By setting those two bias parameters to the same value, we could end up with the same number of ON and OFF events generated when using a dedicated light stimulus. To do so, kindly note that a main condition to respect in the pixel illuminance point of view, is going from the same initial state in both cases. For example: 20 lux => 30 lux to generate ON events and 20 lux => 10 lux to generate OFF events.
Additionally, with EVKs based on IMX636 sensor, you may notice a “tail effect” on OFF events in low-light conditions. Further information on this topic can be found in this FAQ section.
Bandwidth biases (bias_fo, bias_hpf) control the pixel low-pass and high-pass filters.
bias_fo: adjusts the low-pass filter. This changes how rapidly fluctuating light is filtered out. It determines the maximum rate of change of illumination that can be detected. It is often used to remove flickering and noise in the scene, but doing so will also increase the latency of the sensor.
bias_hpf: adjusts the high-pass filter. This determines how slow illumination change is filtered out. It determines the minimum rate the light must change, for the pixel to output an event. It is often used to remove the background of the scene and show only fast moving objects, or to reduce the background noise.
Dead time bias (bias_refr) controls the pixel “refractory period”.
bias_refr: adjusts the refractory period. This determines the duration for which the pixel is blind after each event. It can be used to change the number of events during a big illumination change, without changing the sensitivity or the bandwidth. It is often used to make each big light change produce only one event. To get the mapping of this bias to microseconds, you can refer to your sensor datasheet or leverage the get_pixel_dead_time() method from
I_Monitoringclass as shown in metavision_hal_showcase sample.
All biases affect both the range of signals which can be detected, and the rate of noise background events observed. Reducing the noise is always possible, but also reduces in some way the range of useful signals which can be detected.
Note
There is an extra bias (bias_pr) that drives the photoreceptor bandwidth by controlling the front-end part of the pixel. We don’t recommend changing this bias, except in very specific conditions. For Gen4.1, IMX636 and GenX320 sensors, this bias is not available anymore (neither via API nor in our players).
Bias Tuning
The different models of Prophesee sensors use different units and scales to configure the biases. For example, a given biases configuration for a Gen3.1 can not be used on an Gen4.1. Even the default biases configuration can not really be considered equivalent from one model to another because the pixel and overall sensor technology and architecture varies.
The main differences are:
Between Gen3.1 and Gen4.0/Gen4.1/IMX636, some biases are expressed in opposite ways
In IMX636, biases are expressed as relative offsets
In the following table we describe how biases should be tuned depending on the sensor model:
Bias Name |
Gen3, Gen3.1 |
Gen4, Gen4.1 |
IMX636 |
GenX320 |
|---|---|---|---|---|
All biases |
All the biases are expressed in mV |
All the biases are expressed as a positive digital number |
All the biases are expressed as a positive or negative digital number, as relative offsets around the default value. The default bias is always 0 |
All the biases are expressed as a positive digital number |
bias_diff_on |
The contrast threshold is defined by the difference of bias_diff_on above bias_diff. To increase the contrast threshold, increase bias_diff_on. |
The contrast threshold is defined by the difference of bias_diff_on above bias_diff. To increase the contrast threshold, increase bias_diff_on. |
The contrast threshold is defined by the bias_diff_on setting. To increase the contrast threshold, increase bias_diff_on. |
The contrast threshold is defined by the bias_diff_on setting. To increase the contrast threshold, increase bias_diff_on. |
bias_diff_off |
The contrast threshold is defined by the difference of bias_diff_off below bias_diff. To increase the contrast threshold, decrease bias_diff_off. |
The contrast threshold is defined by the difference of bias_diff_off below bias_diff. To increase the contrast threshold, decrease bias_diff_off. |
The contrast threshold is defined by the bias_diff_off setting. To increase the contrast threshold, increase bias_diff_off. |
The contrast threshold is defined by the bias_diff_off setting. To increase the contrast threshold, increase bias_diff_off. |
bias_fo |
Decrease bias_fo to widen the bandwidth |
Increase bias_fo to widen the bandwidth Note: in Gen4 bias_fo is called bias_fo_n |
Increase bias_fo to widen the bandwidth |
Increase bias_fo to widen the bandwidth |
bias_hpf |
Increase bias_hpf to widen the bandwidth and make the sensor sensitive to slower light changes. |
Decrease bias_hpf to widen the bandwidth and make the sensor sensitive to slower light changes. |
Decrease bias_hpf to widen the bandwidth and make the sensor sensitive to slower light changes. |
Decrease bias_hpf to widen the bandwidth and make the sensor sensitive to slower light changes. |
bias_refr |
Decrease bias_refr to decrease the refractory period after each event |
Increase bias_refr to decrease the refractory period after each event |
Increase bias_refr to decrease the refractory period after each event |
Increase bias_refr to decrease the refractory period after each event |
Note
For IMX636 sensor, the rationale behind the bias values management by offset is that default values for the biases may vary slightly from sensor to sensor depending on factory trimming. In order for a given sensor tuning to result in the closest possible performance when applied to another sensor, the user-tunable values in our API and tools are now an offset relative to the default bias values.
However, it is possible to read absolute bias values of a given sensor. First, you need to set the logging level to Trace. Then, launch Metavision Studio in the same terminal window. Now, when setting a bias parameter inside studio, the absolute value of that bias parameter will be displayed in the terminal. Below is an example with an IMX636 of output after setting bias_fo and bias_hpf from 0 to 8 and 12 respectively:
[SERVER] - stderr - [SDK][STUDIO] Building from: {"type":"setBias","payload":{"bias":"bias_fo","value":8},"meta":{"scope":"local"}} size: 82 cmd: setBias
[HAL][TRACE] register name: bias_fo , factory default: 81 , current value: 81 , diff: 0 , value range: [ -35 ,  55 ]
[HAL][TRACE] register name: bias_fo , factory default: 81 , current value: 89 , diff: 8 , value range: [ -35 ,  55 ]

[SERVER] - stderr - [SDK][STUDIO] Building from: {"type":"setBias","payload":{"bias":"bias_hpf","value":12},"meta":{"scope":"local"}} size: 84 cmd: setBias
[HAL][TRACE] register name: bias_hpf , factory default: 0 , current value: 0 , diff: 0 , value range: [ 0 ,  120 ]
[HAL][TRACE] register name: bias_hpf , factory default: 0 , current value: 12 , diff: 12 , value range: [ 0 ,  120 ]
There is no one fits all approach to tune the biases as it depends on multiple parameters (e.g. objects in the scene, light condition etc.). Nevertheless, those steps are considered valid in many scenarios are a good starting point:
first update bias_fo to reduce impacts of rapidly fluctuating light (high frequencies),
then update bias_hpf to reduce background noise (low frequencies),
finally you can adjust bias_diff_on and bias_diff_off to adapt the Contrast Sensitivity to your application.
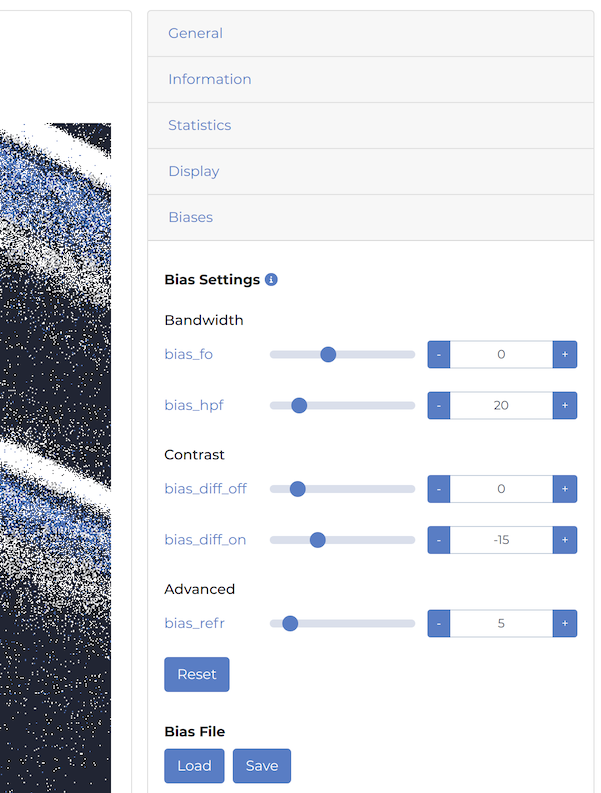
To tune the biases, the easiest way is to use Metavision Studio where the Biases panel available in the Settings allows to adjust the biases and immediately see the effect on the display window:
See also
Metavision Studio also offers a Temporal Plot display to visualize the event stream over time. This feature can be used to tune the biases as introduced in the section Sensor tuning using Temporal Plot.
To get more information on the biases consult the Application Note on bias tuning in Knowledge Center, where we describe the visual effect on tuning the sensor biases.
Bias Ranges
Not all bias values are allowed. There are specific acceptable ranges depending on your sensor’s model.
Those ranges are enforced by each camera plugin through the HAL API, so when trying to set out of range values you will
get warning message similar to [HAL][WARNING] 100 is not in acceptable range for bias_fo
Bias ranges for Gen3.1 sensor:
Bias Name |
Default value |
Minimum value |
Maximum value |
Comment |
|---|---|---|---|---|
bias_diff |
299 |
200 |
400 |
recommended to not change |
bias_diff_on |
384 |
bias_diff + 75 |
bias_diff + 200 |
if bias_fo < 1350, Min Value = bias_diff + 95 |
bias_diff_off |
222 |
100 |
bias_diff - 65 |
if bias_fo < 1350, Max Value = bias_diff - 85 |
bias_fo |
1477 |
1250 |
1800 |
|
bias_hpf |
1499 |
900 |
1800 |
|
bias_refr |
1500 |
1300 |
1800 |
Note
For Gen3.1, note that not all values of biases can be configured within the sensor. For example, setting a bias_hpf of 1445 or 1455 will in fact set the bias to the actual value of 1448. This is not visible in Metavision Studio, but you will notice it when saving the bias values into BIAS files (see below).
Bias ranges for Gen4.1 sensor:
Bias Name |
Default value |
Minimum value |
Maximum value |
Comment |
|---|---|---|---|---|
bias_diff |
80 |
52 |
100 |
recommended to not change |
bias_diff_on |
115 |
bias_diff + 15 |
140 |
|
bias_diff_off |
52 |
25 |
bias_diff - 15 |
|
bias_fo |
74 |
45 |
110 |
|
bias_hpf |
0 |
0 |
120 |
|
bias_refr |
68 |
30 |
100 |
Bias ranges for IMX636 sensor:
Bias Name |
Default value |
Minimum value |
Maximum value |
Comment |
|---|---|---|---|---|
bias_diff |
0 |
-25 |
23 |
recommended to not change |
bias_diff_on |
0 |
-85 |
140 |
|
bias_diff_off |
0 |
-35 |
190 |
|
bias_fo |
0 |
-35 |
55 |
|
bias_hpf |
0 |
0 |
120 |
|
bias_refr |
0 |
-20 |
235 |
Bias ranges for GenX320 sensor for Engineering Sample (ES) and Mass Production (MP) versions:
Bias Name |
Default value (ES) |
Default value (MP) |
Minimum value |
Maximum value |
Comment |
|---|---|---|---|---|---|
bias_diff |
51 |
51 |
41 |
51 |
recommended to not change |
bias_diff_on |
40 |
25 |
24 |
60 |
|
bias_diff_off |
40 |
28 |
19 |
50 |
|
bias_fo |
29 |
34 |
19 |
39 |
|
bias_hpf |
0 |
40 |
0 |
127 |
|
bias_refr |
82 |
10 |
0 |
127 |
Not respecting those ranges may lead to sensor malfunction or damage. Though, if you think your application requires using out of range values for some biases, you can disable the bias ranges check when starting your device.
This option is available in Metavision Studio in the advanced panel when opening a camera.
You can also enable this option through the SDK API using Metavision::DeviceConfig class as shown in the
following code excerpts:
Using HAL C++ API:
Metavision::DeviceConfig device_config;
device_config.enable_biases_range_check_bypass(true);
device = Metavision::DeviceDiscovery::open(serial, device_config);
Using HAL and SDK Core Python API:
device_config = DeviceConfig()
device_config.enable_biases_range_check_bypass(True)
device = DeviceDiscovery.open("", device_config)
mv_iterator = EventsIterator.from_device(device=device)
Using SDK Stream C++ API (Camera class):
Metavision::DeviceConfig device_config;
device_config.enable_biases_range_check_bypass(true);
camera = Metavision::Camera::from_first_available(device_config);
Warning
Beware that disabling biases ranges check is for advanced users and that we don’t guarantee the behavior of the sensors when using out of ranges biases values. In case of doubt, please contact us to discuss this topic.
Saving Biases in Files
The SDK allows to store the bias values among all the other camera settings in a JSON file as described in the Saving/loading the camera settings section of the Camera Settings programming guide.
Metavision Studio is the most convenient tool to create such a JSON file as you can tune the biases while seeing the effect on the event rate and in the frame shown in the display.
Note that, SDK HAL API and Studio also support a specific biases file format (predating the camera settings file)
which is a simple text file where each line configures a specific bias and is made of bias_value and bias_name
separated by percentage sign (%):
0 % bias_diff
10 % bias_diff_off
10 % bias_diff_on
-5 % bias_fo
0 % bias_hpf
0 % bias_refr
This file format for biases can still be used in Metavision Studio and Metavision Viewer, but in most of our samples we are now using the camera settings file, so we advise you to convert this biases file into a camera settings file.
To convert those biases files (.bias) into camera settings file (.json), the easiest way it to use Metavision Studio or Metavision Viewer where you can both load a biases file and then save a camera settings file that will contain those biases.
Alternatively, you can create a camera settings JSON file (or update an existing one) and set manually the biases you want to update, following this structure:
{
 "ll_biases_state": {
  "bias": [
   {
    "name": "bias_diff",
    "value": 0
   },
   {
    "name": "bias_diff_off",
    "value": 10
   },
   (...)
   {
    "name": "bias_refr",
    "value": 0
   }
  ]
 }
}
Biases API
Biases can be tuned using HAL API:
HAL C++ API:
Metavision::I_LL_Biasesfacility as shown in metavision_hal_showcase sampleHAL Python API:
metavision_hal.I_LL_Biaseson adevice, for exampledevice.get_i_ll_biases().set("bias_diff_on", -20)