
Note
This guide is showing how to get started with the SDK Python API. If you are interested in the C++ API, follow the guide Get Started using C++
Get Started using Python API
In this Section, we will create a minimal sample to get started with Metavision SDK in Python. The goal of this sample is to introduce in the simplest possible way some basic concepts of Metavision SDK and create a first running example.
This tutorial will guide you in the creation of the source code step by step.
For convenience, the full source code can also be found in <install-prefix>/share/metavision/sdk/core/python_samples/metavision_sdk_get_started
when installing Metavision SDK from installer or packages. For other deployment methods, check the page
Path of Samples.
Start the camera
The first operation we want to do is to open the event-based camera or a pre-recorded event file.
In the SDK Python API, live cameras and event files are managed in the same way: using the
metavision_core.event_io.EventsIterator class. Let’s see how.
Create a python script, name it metavision_sdk_get_started.py and copy the following code in it:
1 2 3 4 5 6 7 8 9 10 11 12 13 14 15 16 17 18 19 20 21 22 23 24 25 26 27 28 29 | from metavision_core.event_io import EventsIterator def parse_args(): import argparse """Parse command line arguments.""" parser = argparse.ArgumentParser(description='Metavision SDK Get Started sample.', formatter_class=argparse.ArgumentDefaultsHelpFormatter) parser.add_argument( '-i', '--input-event-file', dest='event_file_path', default="", help="Path to input event file (RAW or HDF5). If not specified, the camera live stream is used. " "If it's a camera serial number, it will try to open that camera instead.") args = parser.parse_args() return args def main(): """ Main """ args = parse_args() # Events iterator on Camera or event file mv_iterator = EventsIterator(input_path=args.event_file_path, delta_t=1000) for evs in mv_iterator: print("Events are available!") if __name__ == "__main__": main() |
To execute it, you either need to plug in an event-based camera or use an a RAW or HDF5 event file (you can pick a file among our Sample Recordings).
Execute the following command to process data from a live camera:
Linux
python3 metavision_sdk_get_started.py
Windows
python metavision_sdk_get_started.py
Note
If you are executing this code with a camera and get the error “Camera not found. Check that a camera is plugged into your system and retry”, please refer to our camera troubleshooting FAQ entry.
Execute the following command to process data from a RAW file:
Linux
python3 metavision_sdk_get_started.py -i monitoring_40_50hz.raw
Windows
python metavision_sdk_get_started.py -i monitoring_40_50hz.raw
Note
We suggest that you run the samples in this section with an event file, as some functions are more complicated to demonstrate with a live camera.
If everything went fine, the output in your console should be similar to this:
...
Events are available!
Events are available!
Events are available!
Events are available!
Events are available!
Events are available!
Events are available!
...
Note
The large numbers of console outputs in this tutorial may slow down their execution.
If this creates problems or prevents you from testing the code, we suggest you remove all print
lines to improve execution speed.
Let’s analyze the sample line by line:
from metavision_core.event_io import EventsIterator
This line imports the EventsIterator class,
which is used to get the events from an event file or a live camera.
mv_iterator = EventsIterator(input_path=args.event_file_path, delta_t=1000)
Depending on the command line parameters, an instance of the EventsIterator class can be used
to read from a file (args.event_file_path has been specified with a valid Path) or to stream from a camera
(args.event_file_path contains a camera serial number or is empty).
The source code is the same whether the events are coming from a file or from a live camera.
The for loop shown below simply prints Events are available while the iterator on the camera or file is providing
event-buffers. For now, this EventsIterator runs until the recording is finished (in case of an event file),
or forever in case of a live camera (at least, while the camera is plugged in).
for evs in mv_iterator:
    print("Events are available!")
In this section, we learned how EventsIterator class can be used to open a camera or a file.
In the following one, we will see how to read the events with this iterator.
Get the events
We will now be using a more advanced version of our Python code.
First, replace the content of your metavision_sdk_get_started.py file with the following code:
1 2 3 4 5 6 7 8 9 10 11 12 13 14 15 16 17 18 19 20 21 22 23 24 25 26 27 28 29 30 31 32 33 34 35 36 37 38 39 40 41 42 43 44 45 46 47 48 49 50 51 52 53 54 | from metavision_core.event_io import EventsIterator def parse_args(): import argparse """Parse command line arguments.""" parser = argparse.ArgumentParser(description='Metavision SDK Get Started sample.', formatter_class=argparse.ArgumentDefaultsHelpFormatter) parser.add_argument( '-i', '--input-event-file', dest='event_file_path', default="", help="Path to input event file (RAW or HDF5). If not specified, the camera live stream is used. " "If it's a camera serial number, it will try to open that camera instead.") args = parser.parse_args() return args def main(): """ Main """ args = parse_args() # Events iterator on Camera or event file mv_iterator = EventsIterator(input_path=args.event_file_path, delta_t=1000) global_counter = 0 # This will track how many events we processed global_max_t = 0 # This will track the highest timestamp we processed # Process events for evs in mv_iterator: print("----- New event buffer! -----") if evs.size == 0: print("The current event buffer is empty.") else: min_t = evs['t'][0] # Get the timestamp of the first event of this callback max_t = evs['t'][-1] # Get the timestamp of the last event of this callback global_max_t = max_t # Events are ordered by timestamp, so the current last event has the highest timestamp counter = evs.size # Local counter global_counter += counter # Increase global counter print(f"There were {counter} events in this event buffer.") print(f"There were {global_counter} total events up to now.") print(f"The current event buffer included events from {min_t} to {max_t} microseconds.") print("----- End of the event buffer! -----") # Print the global statistics duration_seconds = global_max_t / 1.0e6 print(f"There were {global_counter} events in total.") print(f"The total duration was {duration_seconds:.2f} seconds.") if duration_seconds >= 1: # No need to print this statistics if the total duration was too short print(f"There were {global_counter / duration_seconds :.2f} events per second on average.") if __name__ == "__main__": main() |
When you execute it, the output should be similar to this:
...
----- New event buffer! -----
There were 144241 events in this event buffer.
There were 19940983 total events up to now.
The current event buffer included events from 57000 to 57999 microseconds.
----- End of the event buffer! -----
----- New event buffer! -----
There were 111155 events in this event buffer.
There were 20052138 total events up to now.
The current event buffer included events from 58000 to 58999 microseconds.
----- End of the event buffer! -----
...
To understand how this code works, let’s look at the processing loop (the for loop) and see how we compute
some simple statistics on the events and print them:
for evs in mv_iterator:
    print("----- New event buffer! -----")
    if evs.size == 0:
        print("The current event buffer is empty.")
    else:
        min_t = evs['t'][0]   # Get the timestamp of the first event of this callback
        max_t = evs['t'][-1]  # Get the timestamp of the last event of this callback
        global_max_t = max_t  # Events are ordered by timestamp, so the current last event has the highest timestamp

        counter = evs.size  # Local counter
        global_counter += counter  # Increase global counter

        print(f"There were {counter} events in this event buffer.")
        print(f"There were {global_counter} total events up to now.")
        print(f"The current event buffer included events from {min_t} to {max_t} microseconds.")
        print("----- End of the event buffer! -----")
In the loop, the EventsIterator produces event-buffers available as numpy structured arrays.
Each event is represented by four attributes: the coordinates x and y, the polarity p and the timestamp t.
Hence, accessing the timestamp of the first event of a buffer can be done with: evs['t'][0].
So we now have access to all the events produced by the EventsIterator class.
With this, we will be able to write all our event-based algorithms.
Once our instance of EventsIterator has been stopped (that is, when the event file finishes),
we can print global statistics of this file:
# Print the global statistics
duration_seconds = global_max_t / 1.0e6
print(f"There were {global_counter} events in total.")
print(f"The total duration was {duration_seconds:.2f} seconds.")
if duration_seconds >= 1:  # No need to print this statistics if the total duration was too short
    print(f"There were {global_counter / duration_seconds :.2f} events per second on average.")
In this section, we learned how to get access to the events. We used it to count the number of events we receive and print some of their characteristics. In the following section, we will create a display to visualize those events.
See also
If you want to know more about the EventsIterator class, check our programming guide on
Reading Events with SDK Core Python API.
In the HAL Python API page, there is a section on how to create
a HAL device to initialize an EventsIterator using the from_device function
that will allow you to access facilities of your device (like biases, ROI etc.)
to create more advanced applications.
Add a display
As we have seen in the previous sections, a camera (or an event file) produces a stream of independent events. Hence we don’t have ready-to-display frames to show. So, to visualize these events, we must artificially build frames by accumulating events over time. This can be done in different ways, but the easiest is to create a binary frame: we start with a frame where each pixel is set to zero, and we set to one the corresponding pixel every time we receive an event. We need to choose the frequency at which these frames are constructed, that is, the equivalent FPS, and how long we accumulate the events, that is, the accumulation time. See also the documentation on Event-Based Concepts for more information.
Doing this frame construction from scratch, while possible, can be complex and long. Luckily, Metavision SDK contains
a class that can help us with this task: metavision_sdk_core.PeriodicFrameGenerationAlgorithm.
To use it, we first need to include the PeriodicFrameGenerationAlgorithm class
and the metavision_sdk_ui.Window class.
from metavision_sdk_core import PeriodicFrameGenerationAlgorithm
from metavision_sdk_ui import EventLoop, BaseWindow, Window, UIAction, UIKeyEvent
Then we will:
create our
EventsIteratoras we have done beforeretrieve the resolution of the camera/file to create using
get_size()function on the iteratorinitiate the Graphical User Interface using a context manager (
with)
mv_iterator = EventsIterator(input_path=args.event_file_path, delta_t=1000)
height, width = mv_iterator.get_size()  # Camera Geometry

# Window - Graphical User Interface
with Window(title="Metavision SDK Get Started", width=width, height=height, mode=BaseWindow.RenderMode.BGR) as window:
    def keyboard_cb(key, scancode, action, mods):
        if action != UIAction.RELEASE:
            return
        if key == UIKeyEvent.KEY_ESCAPE or key == UIKeyEvent.KEY_Q:
            window.set_close_flag()

    window.set_keyboard_callback(keyboard_cb)
In this code, we listen to the user for the q or Escape key, and use this command to exit the loop, effectively terminating the
program. This finally allows us to stop our program even with a live camera, something that was not possible in the previous
versions of our code.
Then, we create the metavision_sdk_core.PeriodicFrameGenerationAlgorithm class by passing the resolution of the camera.
And we set the callback to the frame generator
to a function that will actually show the window. (note that this code should be added within the with context manager,
hence indented along with the call to def keyboard_cb):
# Event Frame Generator
event_frame_gen = PeriodicFrameGenerationAlgorithm(sensor_width=width, sensor_height=height,
                                                   accumulation_time_us=accumulation_time_us)

def on_cd_frame_cb(ts, cd_frame):
    window.show(cd_frame)

event_frame_gen.set_output_callback(on_cd_frame_cb)
We then need to pass the events from the camera to the frame generator, so that it can accumulate them and create the frame for visualization. Every time some events are available, they will be passed to the frame generator.
# Process events
for evs in mv_iterator:
    # Dispatch system events to the window
    EventLoop.poll_and_dispatch()

    event_frame_gen.process_events(evs)
Note
Remember that the full source code can also be found in <install-prefix>/share/metavision/sdk/core/python_samples/metavision_sdk_get_started
when installing Metavision SDK from installer or packages. For other deployment methods,
check the page Path of Samples.
Once ready, execute your code. This is the expected results:
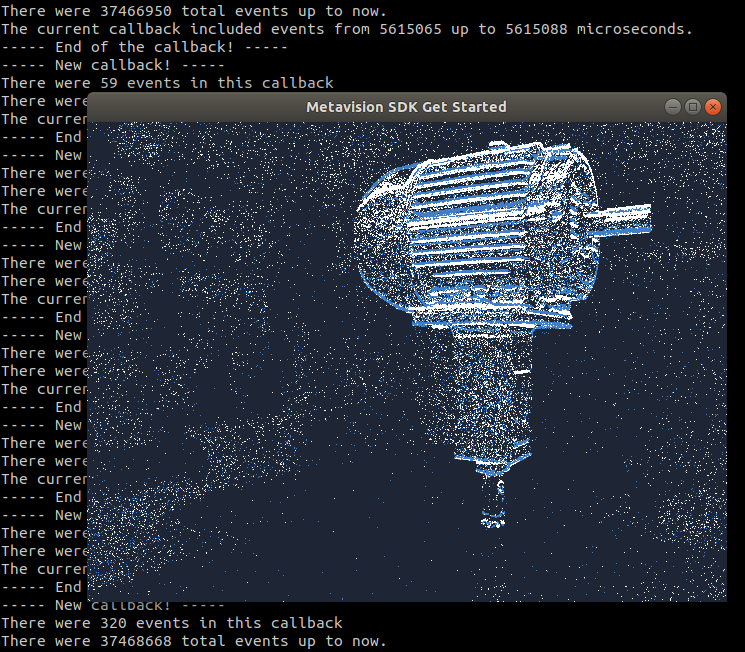
Note
When displaying a event file with the current version of this source code, the speed won’t be the real-time speed
at which the file was recorded because EventsIterator
is iterating over events as fast as possible. If you want to play an event file in a more realistic speed,
you should use LiveReplayEventsIterator
as demonstrated in the sample metavision_simple_viewer.
In this section, we learned how to use the metavision_sdk_core.PeriodicFrameGenerationAlgorithm
to create frames out of the events and display them.
Next steps
In this page, we introduced a minimal example of how to use the SDK Python API to open a camera, compute some simple statistics on the received events, and visualize the events.
To build up on this code sample, you can explore more features of your camera, by accessing the Python binding of the facilities of your HAL device to tune the biases or enable an ESP feature.
If you want to see how to apply some algorithms on the events
before displaying them, check out the metavision_filtering sample
that shows how PolarityFilterAlgorithm and
RoiFilterAlgorithm can be applied on the stream of events.
We also encourage you to discover more complex examples in our samples page.