
Active Marker 2D Tracking Sample
Overview
The Computer Vision API can be used to detect and track active markers.
The sample metavision_active_marker_2d_tracking shows how to implement a pipeline for detecting and tracking an
active marker in 2D.
The source code of this sample can be found in
<install-prefix>/share/metavision/sdk/cv/cpp_samples/metavision_active_marker_2d_tracking when installing Metavision SDK
from installer or packages. For other deployment methods, check the page
Path of Samples.
Expected Output
The sample displays the position and the track of each LED of the active marker. The track allows visualizing the very high speed nature of the tracking.
How to start
You can directly execute pre-compiled binary installed with Metavision SDK or compile the source code as described in this tutorial.
To run the sample, you need to provide a JSON file containing the description of the active marker you want to track.
The easiest way to try this sample is to launch it on the active_marker.raw file that we provide in our
Sample Recordings. Download the file active_marker.zip which contains both the RAW
and the active marker description JSON file. Assuming you extracted the archive next to your executable,
you can launch the sample with the following command:
Linux
./metavision_active_marker_2d_tracking -i active_marker.raw -a rectangular_active_marker.json
Windows
metavision_active_marker_2d_tracking.exe -i active_marker.raw -a rectangular_active_marker.json
If you want to start the sample based on the live stream from your camera, you will need to provide a
camera settings file with bias values wisely chosen for this specific application.
To do so, you can use the command line option --input-camera-config (or -j) with a JSON file containing the settings.
To create such a JSON file, check the camera settings section.
Here is how to launch the sample with a JSON camera settings file:
Linux
./metavision_active_marker_2d_tracking -a /path/to/active_marker_description.json -j path/to/my_settings.json
Windows
metavision_active_marker_2d_tracking.exe -a \path\to\active_marker_description.json -j path\to\my_settings.json
To check for additional options:
Linux
./metavision_active_marker_2d_tracking -h
Windows
metavision_active_marker_2d_tracking.exe -h
Code Overview
The Metavision Active Marker 2D Tracking sample implements the following data flow:
The first step is to start the camera or open a record file. In case of a live stream, the camera setting file is loaded to properly configure the biases of the camera for this application. Note that the bias range check is disabled to allow configuring the camera with values specific to this application:
Metavision::Camera camera;
if (opt_config->event_file_path.empty()) {
    Metavision::DeviceConfig device_config;
    device_config.enable_biases_range_check_bypass(true);
    camera = Metavision::Camera::from_first_available(device_config);
    camera.load(opt_config->cam_config_path);
} else {
    const auto cam_config = Metavision::FileConfigHints().real_time_playback(opt_config->realtime_playback_speed);
    camera                = Metavision::Camera::from_file(opt_config->event_file_path, cam_config);
}
Then, the description of the Active Marker to be used is loaded from the given JSON file. Here, only the LEDs’s IDs are used:
const auto led_ids = load_active_marker(opt_config->am_json_path);
If enabled, the display manager (in charge of drawing and displaying the trails of the LEDs) is instantiated:
std::unique_ptr<DisplayManager> display;

if (!opt_config->no_display) {
    display =
        std::make_unique<DisplayManager>(eb_w, eb_h, led_ids, opt_config->track_length, opt_config->display_ids);
}
The algorithms and the associated data structures are instantiated and configured:
std::vector<Metavision::EventSourceId> source_id_events;
std::vector<Metavision::EventActiveTrack> active_tracks;
Metavision::ModulatedLightDetectorAlgorithm modulated_light_detector(opt_config->detector_params);
Metavision::ActiveMarkerTrackerAlgorithm tracker(opt_config->tracker_params, led_ids);
A time callback is added to the camera device. This is very useful as it allows the tracking algorithm to be regularly notified that some amount of time has elapsed since the last received events. This is important as it allows the tracking algorithm to execute its internal processes even when no events are received. The time callback is also used to update the display when no new track is received (e.g. when the active marker goes out of view):
auto decoder = camera.get_device().get_facility<Metavision::I_EventsStreamDecoder>();

decoder->add_time_callback([&](Metavision::timestamp t) {
    tracker.notify_elapsed_time(t);
    if (display)
        display->notify_elapsed_time(t);
});
The processing callback is set to the camera which executes the algorithms and displays the results:
camera.cd().add_callback([&](const auto begin, const auto end) {
    source_id_events.clear();
    modulated_light_detector.process_events(begin, end, std::back_inserter(source_id_events));

    active_tracks.clear();
    tracker.process_events(source_id_events.cbegin(), source_id_events.cend(), std::back_inserter(active_tracks));

    if (display) {
        display->process_events(active_tracks.cbegin(), active_tracks.cend());
    }
});
Finally the main loop is executed, it only waits for the camera’s processing thread to finish and polls UI events:
camera.start();

while (camera.is_running()) {
    if (!display) {
        std::this_thread::yield();
        continue;
    }

    if (display->should_close())
        break;

    Metavision::EventLoop::poll_and_dispatch(20);
}

camera.stop();
Algorithms Overview
High Level description
Active markers are rigid objects composed of several blinking LEDs which emit modulated light. The light is modulated in a way that each LED transmits its own ID. The ability to detect and track an active marker relies on the capacity to detect and track those LEDs.
The efficiency and robustness of the algorithms rely on joint hardware/software design: the camera biases are carefully tuned so that only one event is triggered when the LED blinks which enables simpler and more robust methods to be implemented.
Modulated Light Detection
The Metavision::ModulatedLightDetectorAlgorithm algorithm is in charge of detecting modulated light sources and
decoding their ID per pixel. It takes Metavision::EventCD as input and produces
Metavision::EventSourceId as output.
LEDs transmit information by modulating the period between two blinks. Only multiples of a base period \({\alpha}\) are used which allows the following scheme:
\({\alpha}\) : logical 0
\(2{\alpha}\) : logical 1
\(3{\alpha}\) : start code
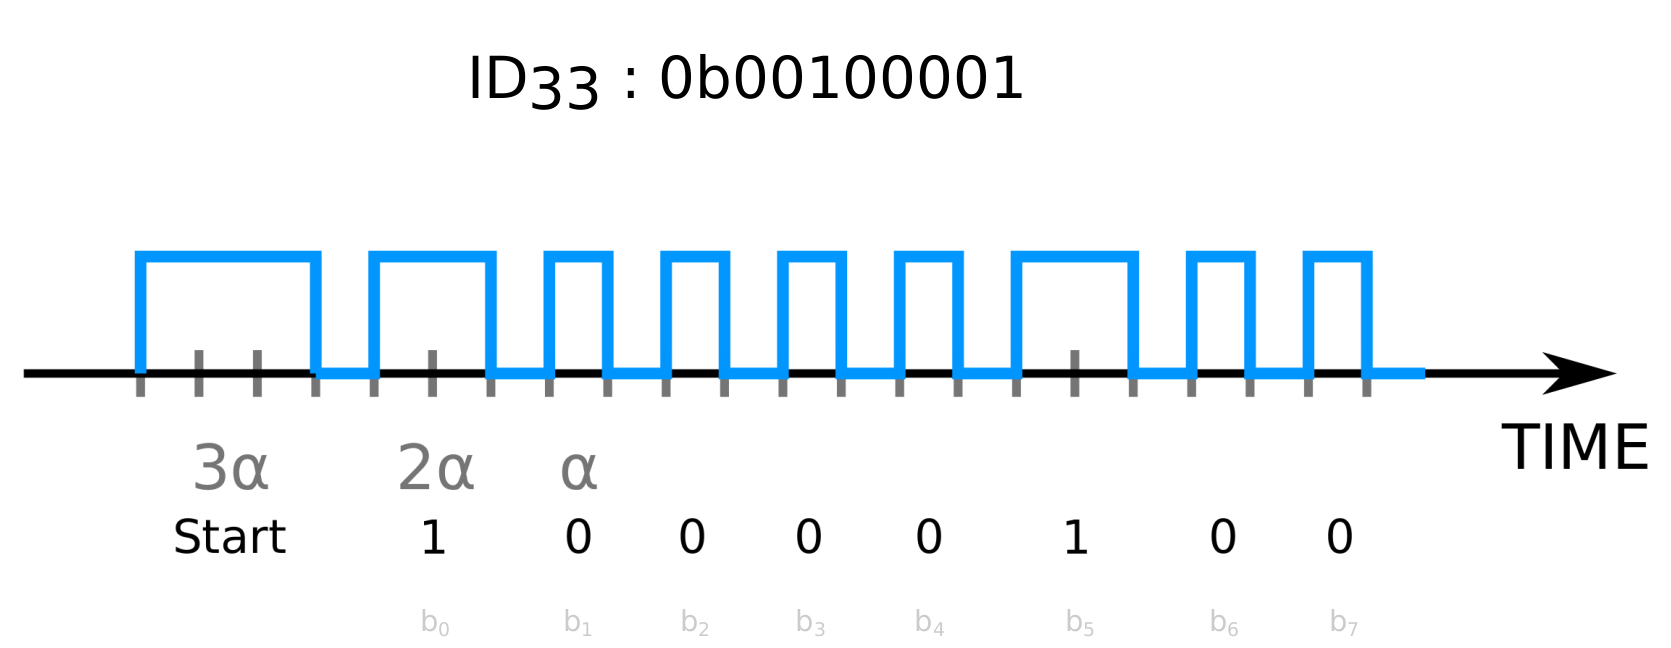
Since the sensor was carefully tuned for this application, we know that only one event is generated per blink. As a result, decoding a bit is just a matter of measuring the time elapsed between two blinks.
When enough bits are decoded (i.e. the configured size of a word) a Metavision::EventSourceId is produced
with the corresponding reconstructed LED ID. As a consequence, the ID detection happens at a lower rate than the input
CD events. However, a Metavision::EventSourceId is still produced with an invalid ID value when an input CD
event didn’t allow decoding an ID yet. The rationale behind this approach is to enable the downstream tracking to
operate at very high speed (i.e. the tracking step doesn’t require valid Metavision::EventSourceId only to
execute).
Active Marker Tracking
The Metavision::ActiveMarkerTrackerAlgorithm algorithm is in charge of tracking in 2D an Active Marker meaning
tracking all the LEDs the Active Marker is made of. It takes Metavision::EventSourceId events as input
and produces Metavision::EventActiveTrack events as output.
The algorithm operates as follow:
A
Metavision::EventActiveTrackevent is produced the first time aMetavision::EventSourceIdevent is received with an ID that is valid and corresponds to one of the LEDs of the Active Marker. This LED is then considered being tracked internally by the algorithm.Active tracks are updated by using the position of the incoming
Metavision::EventSourceIdevents. To do so, incoming events are first associated to an active track based on a radius criterion. Then, their position is used to average the position of the active track. Every time an inputMetavision::EventSourceIdevent allows for updating the position of a track, an outputMetavision::EventActiveTrackevent is produced with the updated position.A track is considered lost when it was not updated for a given amount of time or when its ID doesn’t match the ID of a
Metavision::EventSourceIdevent it was associated with.A monitoring process is periodically called using the camera’s clock (based on the timestamps of the input events) to detect inactive tracks and re-assess their influence radius, which is proportional to the lowest distance between them.
Every time a track is considered lost, an output
Metavision::EventActiveTrackevent is produced with the appropriate status.
In the end, the Metavision::ActiveMarkerTrackerAlgorithm algorithm produces the complete tracking history of every
LED that are part of the Active Marker.
Configuring the camera
In order for the Metavision::ModulatedLightDetectorAlgorithm and
Metavision::ActiveMarkerTrackerAlgorithm to run correctly, the camera needs to be carefully configured.
The first step is to make sure the focus is adjusted correctly, you can use the sample presented here to that end.
Then, the biases need to be tuned in a way they enable the algorithms to operate efficiently and robustly.
To do so, you should use the command line option --input-camera-config with a camera settings file that contains
some custom bias values. For example, for an IMX636 sensor the following biases can be used:
bias_diff: 0
bias_diff_off: 180
bias_diff_on: 60
bias_fo: 30
bias_hpf: 140
bias_refr: 0
The main effects of these biases are the following:
The contrast sensitivity threshold for OFF events (bias_diff_off) is set very high to almost disable the generation of such events
The contrast sensitivity threshold for ON events (bias_diff_on) is set to a high value to allow detecting high increases of light (i.e. in our case an LED turning ON)
The low-pass and high-pass filters (bias_fo and bias_hpf) are set to values that only allow signals like those coming from blinking LEDs to generate events
The refractory period (bias_refr) is set to a value such that one blink of an LED only generates one event
Warning
These settings are applicable for the IMX636 sensor only. For other sensors or in case of doubt, please contact us to discuss this topic.
Finally, the last important step is to correctly adjust the aperture of the camera to make the LEDs generate blobs of events of reasonable size in the sensor array. Indeed, they should be big enough to both be able to track the LEDs from farther distances and keep the tracking efficient.
Note
All of these steps can be realized using Metavision Studio.