From Frames to Events
For your EB machine learning experiments, if you don’t have access to any labeled event-sequence, despair not! We will see how to generate synthetic event-based sequences from any image stream!
let’s first define some functions for image & video visualization.
import sys
import os
import cv2


DO_DISPLAY = True and os.environ.get("DOC_DISPLAY", 'ON') != "OFF" # display the result in a window


def namedWindow(title, *args):
    if DO_DISPLAY:
        cv2.namedWindow(title, *args)

def imshow(title, img, delay):
    if DO_DISPLAY:
        cv2.imshow(title, img)
        cv2.waitKey(delay)

def destroyWindow(title):
    if DO_DISPLAY:
        cv2.destroyWindow(title)

%load_ext autoreload
%autoreload 2
Download Test Data
We have prepared an “upsampled” version of Adobe-240fps using the script Super-SloMo. We call this test data “mini_adobe” (because it contains only a subset of Adobe-240fps dataset). The dataset has been generated with adaptive sampling, in which we interpolate frames based on motion. In other words, the timestamps are irregular or asynchronous: you will not get the same time interval between 2 samples.
Here is the link to download the files used in this sample: high_fps_videos.zip.
Extract the ZIP file so that you have a mini_adobe in your current folder.
You should also download this image: `prophesee_logo.jpg <https://kdrive.infomaniak.com/app/share/975517/8eba638b-2834-4d3c-9fe8-6442ea559f6d>_.
Video Stream
Let’s see how to read a video stream with our TimedVideoStream
object. This object expects two main inputs:
a sequence of image frames (video stream)
a NPY file of corresponding timestamps or a fixed fps value
Note that the NPY file should be saved in the same location as the video
input, with a file name of the following convention:
<videoname>_ts.np.
In this example we set the fixed frame-rate to 240 fps. You can also use the Super-SloMo script to create a video with NPY timestamp file.
%matplotlib inline
import os
import numpy as np
import matplotlib.pyplot as plt
plt.rcParams['figure.figsize'] = [11, 11]
from metavision_core_ml.data.video_stream import TimedVideoStream
from itertools import islice
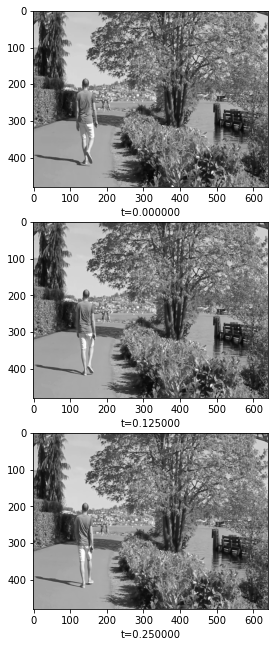
path = os.path.join("mini_adobe", "GOPR9633.mp4")
stream = TimedVideoStream(path)
namedWindow("GOPR9633", cv2.WINDOW_NORMAL)
fig, axes_array= plt.subplots(nrows=3, ncols=1)
f = 30
for i, (img, ts) in enumerate(islice(stream, 90)):
if i % f ==0:
axes_array[i//f].imshow(img, cmap='gray')
axes_array[i//f].set_xlabel(f"t={ts*1e-6:.6f}")
imshow("GOPR9633", img, 10)
destroyWindow("GOPR9633")
You can do the same based on a static image and then create some moving
pictures using the PlanarMotionStream object, or you can create your
own video stream with timestamp.
#The following objects create a video stream from a picture
#by generating continuous homographies (camera motion)
from metavision_core_ml.data.image_planar_motion_stream import PlanarMotionStream
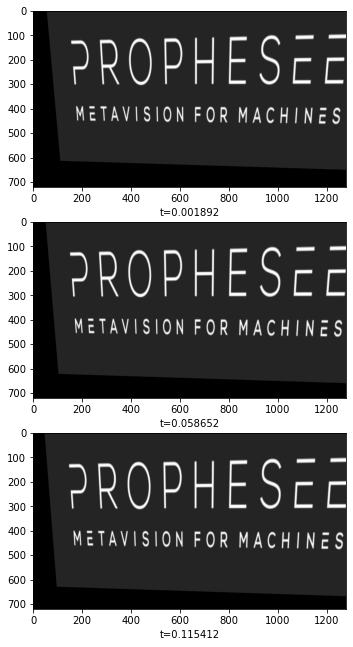
pic = "prophesee_logo.jpg"
stream2 = PlanarMotionStream(pic, 720, 1280)
namedWindow("prophesee_logo", cv2.WINDOW_NORMAL)
fig, axes_array= plt.subplots(nrows=3, ncols=1)
f = 30
for i, (img,ts) in enumerate(islice(stream2, 3*f)):
if i%f == 0:
axes_array[i//f].imshow(img, cmap='gray')
axes_array[i//f].set_xlabel(f"t={ts*1e-6:.6f}")
imshow("prophesee_logo", img, 10)
destroyWindow("prophesee_logo")
Event Simulator object
Next let’s create events from the stream. We need three main inputs:
the timestamped video stream
the EventSimulator object
a pre-defined preprocessing function
from metavision_core_ml.video_to_event.simulator import EventSimulator
from metavision_ml.preprocessing import CDProcessor
plt.rcParams['figure.figsize'] = [11, 11]
stream = TimedVideoStream(path)
prepro_fn = "event_cube" #define our preprocessing function
# Choose appropriate parameters for our Simulator
C = 0.15 # contrast threshold in log-intensity
refractory_period=10 # minimum time interval between 2 events emitted by the same pixel
cutoff_hz=30 # can be used to simulate higher photodiode latency, good if you want to get nighttime events
sigma_threshold=0.003 # threshold discrepancy around the sensor
shot_hz=10 # shot-noise frequency
max_count = int(3e5)
sim_events = EventSimulator(stream.height, stream.width, C,C,refractory_period, cutoff_hz=cutoff_hz, sigma_threshold=0, shot_noise_rate_hz=shot_hz)
tensorizer = CDProcessor(stream.height, stream.width, 1, prepro_fn)
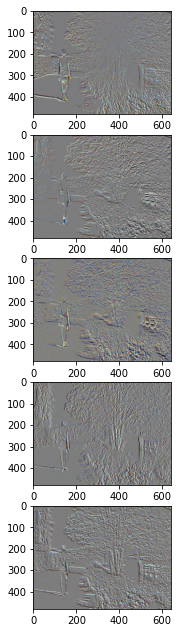
namedWindow("Events", cv2.WINDOW_NORMAL)
images = []
for img,ts in islice(stream, 300):
total = sim_events.image_callback(img.squeeze(), ts)
if total > max_count:
events = sim_events.get_events()
sim_events.flush_events()
events['t'] -= events['t'][0]
ev_count = tensorizer(events)
image_rgb = tensorizer.show(ev_count[0])
if len(images) < 5:
print('num events: ', len(events))
print('events x: ', events['x'].min(), events['x'].max())
print('events y: ', events['y'].min(), events['y'].max())
print('timings: ', events['t'][0]*1e-6, events['t'][-1]*1e-6, 's')
images.append(image_rgb)
imshow("Events", image_rgb, 10)
destroyWindow("Events")
fig, axes_array= plt.subplots(nrows=len(images), ncols=1)
for i, img in enumerate(images):
axes_array[i].imshow(img)
num events:  305985
events x:  0 639
events y:  0 479
timings:  0.0 0.06627 s
num events:  325091
events x:  0 639
events y:  0 479
timings:  0.0 0.045834 s
num events:  305022
events x:  0 639
events y:  0 479
timings:  0.0 0.054166 s
num events:  314478
events x:  0 639
events y:  0 479
timings:  0.0 0.041666999999999996 s
num events:  301034
events x:  0 639
events y:  0 479
timings:  0.0 0.033333 s
SimulatedEventsIterator is a streamline way to obtain an EventIterator from a video
You can use SimulatedEventsIterator exactly as you would use EventsIterator (with some extra parameters for the simulator which you may want to tune) by giving it the path of a video.
from metavision_core_ml.video_to_event.simu_events_iterator import SimulatedEventsIterator
from metavision_core_ml.preprocessing import viz_events
import os

path = os.path.join("mini_adobe", "GOPR9633.mp4")


simu = SimulatedEventsIterator(path, delta_t=10000, mode="delta_t", n_events=0, start_ts=100000)
height,width = simu.get_size()


cv2.namedWindow('event simulator')
for events in simu:
    img = viz_events(events, height, width)
    cv2.imshow("event simulator", img[:, :, ::-1])
    cv2.waitKey(1)
cv2.destroyWindow("event simulator")
Another way to make your own dataloader of simulated events!
Let’s create a custom Pytorch DataLoader from our event simulator. We will illustrate it with an example to predict the sobel map from the events.
We will need two main objects:
a custom Pytorch DataLoader
MultiStreamDataLoaderto load the processed event tensora custom
SobelDatasetIteratorto create sobel map out of our event streamer
from metavision_core_ml.data.stream_dataloader import StreamDataLoader, StreamDataset
from metavision_core_ml.utils.files import grab_images_and_videos


class SobelDatasetIterator(object):
    """
    This iterator streams sobel map and a [1,T,H,W] histogram event-tensor.
    """
    def __init__(self, path, num_tbins, height, width, max_frames=1000):
        #choose random parameters
        c = np.random.randn() * 0.09 + 0.2

        print(path)

        self.simu = EventSimulator(height, width, c, c, 10)
        self.image_stream = TimedVideoStream(path, height, width, max_frames=max_frames, rgb=False)

        self.tensorizer = CDProcessor(height, width, num_tbins, "histo")
        self.num_tbins = num_tbins
        self.height, self.width = height, width
        self.max_frames = max_frames

    def __iter__(self):
        started = True
        num_images = 0
        for gray, ts in self.image_stream:

            self.simu.image_callback(gray, ts)

            num_images += 1

            if num_images < 5:
                continue

            events = self.simu.get_events().copy()

            self.simu.flush_events()

            if len(events) <= 1:
                continue

            dx = cv2.Sobel(gray, cv2.CV_8U, 1, 0)
            dy = cv2.Sobel(gray, cv2.CV_8U, 0, 1)

            dxabs = cv2.convertScaleAbs(dx)
            dyabs = cv2.convertScaleAbs(dy)
            mag = cv2.addWeighted(dxabs, 0.5, dyabs, 0.5, 0)
            mag = mag[None]

            events['t'] -= events['t'][0]
            tensor = self.tensorizer(events).reshape(1, 2*self.num_tbins, self.height, self.width)

            yield torch.from_numpy(mag)[None], torch.from_numpy(tensor), started

            started = False
            num_images = 0
            last_ts = ts


def collate_fn(data_list):
    """
    this is used by the StreamDataLoader to patch partial batches together.
    """
    images, events, started = zip(*data_list)
    images = torch.cat(images, dim=0)
    events = torch.cat(events, dim=0)
    started = torch.FloatTensor(list(started))[:,None,None,None]
    return {'events': events, 'images': images, 'reset': started}


def make_sobel_dataset(path, batch_size, num_workers, num_tbins, height, width):
    """
    Here we build the dataloader

    1. we "split" the dataset into several groups according to how many workers you have
    2. we feed all the dataset parts to the MultiStreamDataLoader which creates one Pytorch DataLoader per dataset.
    Note here that each Pytorch DataLoader uses a "default" batch-collate.

    """
    files = grab_images_and_videos(path)
    print(files)
    def iterator_fun(file_path):
        return SobelDatasetIterator(file_path, num_tbins, height, width)

    dataset = StreamDataset(files, iterator_fun, batch_size, "data", None)
    dataloader = StreamDataLoader(dataset, num_workers, collate_fn)
    return dataloader


#we need the following functions for visualization
def normalize(im):
    low, high = im.min(), im.max()
    return (im - low) / (1e-5 + high - low)


def filter_outliers(input_val, num_std=3):
    val_range = num_std * input_val.std()
    img_min = input_val.mean() - val_range
    img_max = input_val.mean() + val_range
    normed = input_val.clamp_(img_min, img_max)
    return normed
import torch
from torchvision.utils import make_grid
import cv2
path = "mini_adobe/"
batch_size = 4
num_workers = 2
num_tbins = 2
height = 240
width = 320
dataloader = make_sobel_dataset(path, batch_size, 2, num_tbins, height, width)
nrows = 2 ** ((batch_size.bit_length() - 1) // 2)
namedWindow("Data")
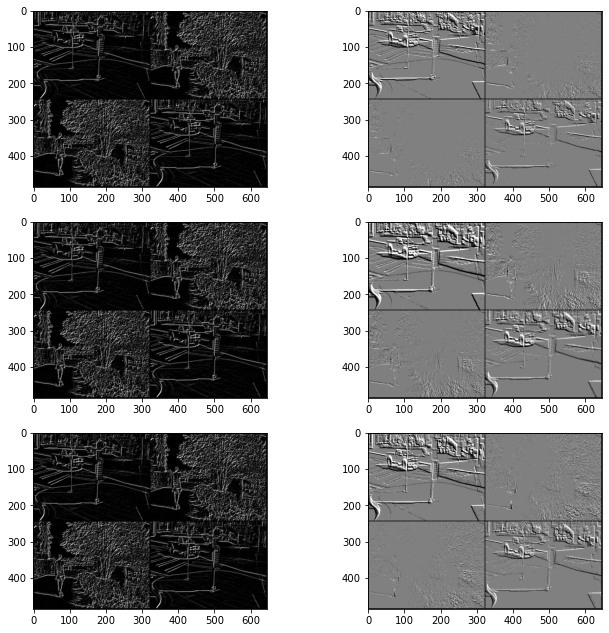
fig, axes_array= plt.subplots(nrows=3, ncols=2)
for i, batch in enumerate(islice(dataloader,30)):
x = batch["events"]
x = x.reshape(len(x), x.shape[1]//2, 2, height, width)
x = x.sum(dim=1)
x = x[:,1]-x[:,0]
x = x[:,None]
x = 255*normalize(filter_outliers(x))
y = batch["images"]
gy = make_grid(y, nrow=nrows).permute(1,2,0).numpy().astype(np.uint8)
gx = make_grid(x, nrow=nrows).permute(1,2,0).numpy().astype(np.uint8)
if i < 3:
axes_array[i,0].imshow(gy)
axes_array[i,1].imshow(gx)
cat = np.concatenate((gx,gy), axis=1)
imshow('Data', cat, 10)
destroyWindow('Data')
['mini_adobe/GOPR9633.mp4', 'mini_adobe/GOPR9655a.mp4', 'mini_adobe/GOPR9647.mp4', 'mini_adobe/GOPR9645.mp4', 'mini_adobe/GOPR9637b.mp4']
mini_adobe/GOPR9633.mp4
mini_adobe/GOPR9645.mp4
mini_adobe/GOPR9655a.mp4
mini_adobe/GOPR9637b.mp4