Note
If you are a Prophesee customer, you can access datasheets and user manuals in our Knowledge Center after requesting an account. This page provides additional details on cameras synchronization, focusing on how to configure it with the SDK.
See also
For a quick setup guide and an overview of synchronization with the EVK4, you can also watch our training video. This video may be helpful even if you’re using a different camera model.
Cameras Synchronization
In many different situations it is required to use multiple cameras: stereo, benchmark, fusion… In such multi-camera acquisition, data streams must be synchronized to allow correct processing. This applies when using multiple Prophesee event cameras, or a combination of Prophesee cameras and Frame Based cameras.
Cameras synchronization is leveraging the EVKs timing interfaces that are described in the Camera Manuals available in the Knowledge Center and summarized in a dedicated documentation page.
Warning
Some synchronization setup may require to boost the Sync Out signal of the event-based master camera. If you are in that case, you could find some guidance in this page.
Synchronizing Multiple Event Cameras
In Prophesee cameras, events are timestamped with a 1MHz clock (1µs period). This clock is internally generated when used in standalone mode (single camera).
When multiple Event cameras are synchronized, they have to be configured in two ways:
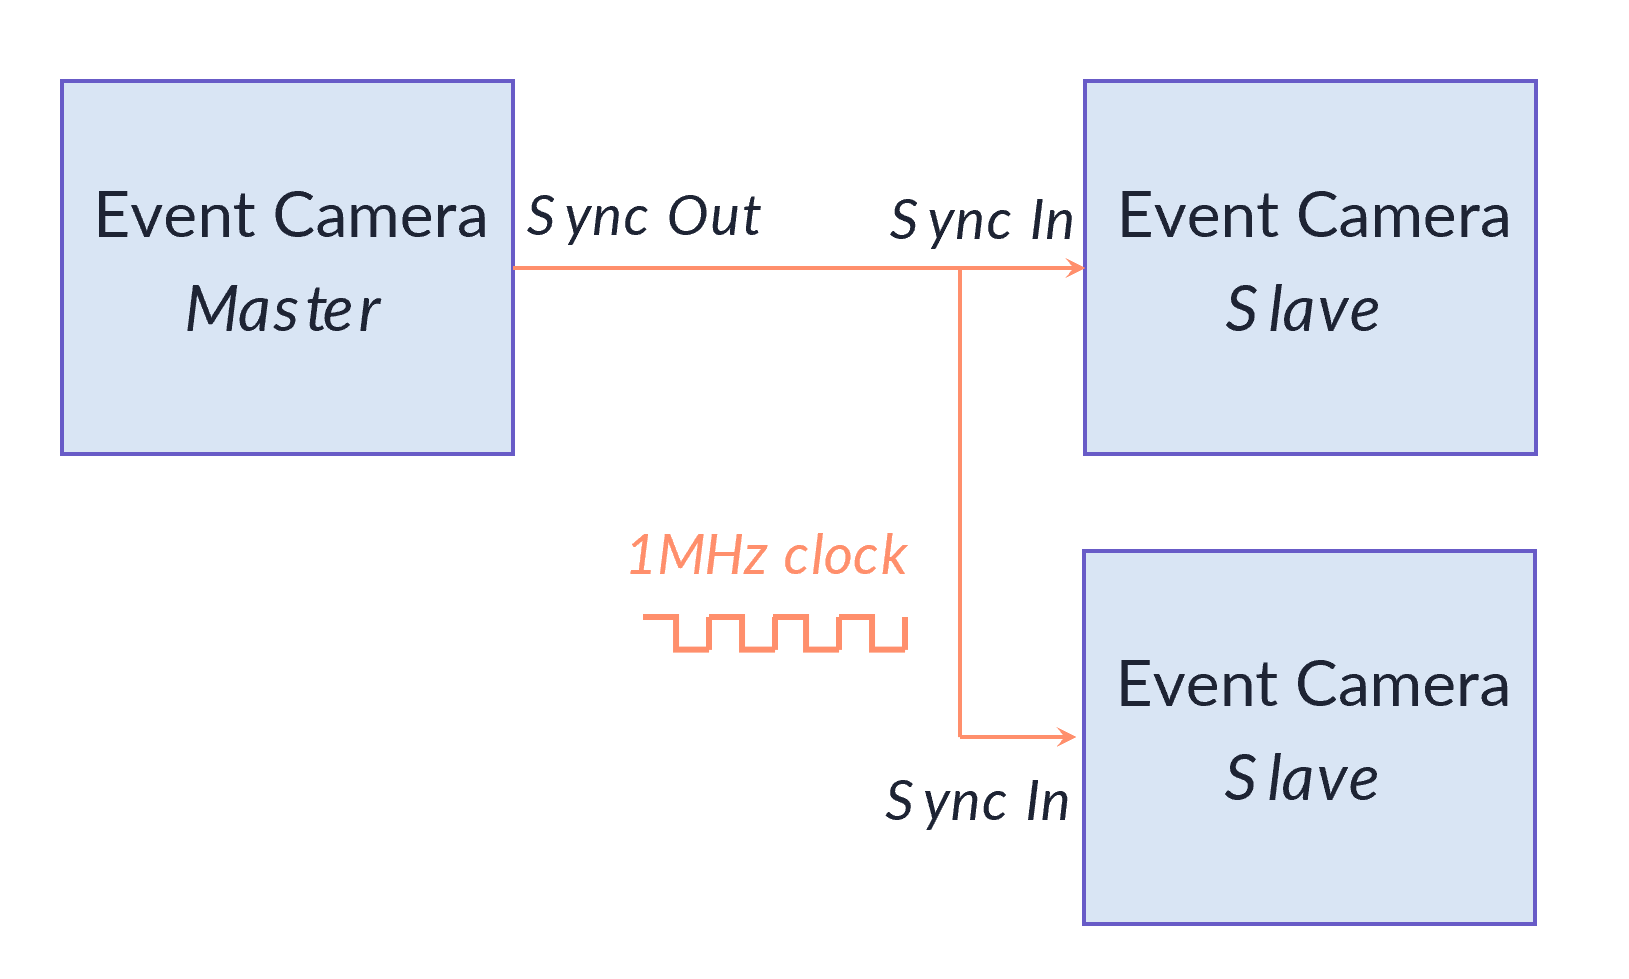
one has to be configured as master and will output the 1MHz clock on Sync Out
other cameras have to be configured as slave and will use the external clock signal received on Sync In
Once wired and configured properly, start the slave camera first, followed by the master camera. Then the camera will produce synchronous timestamping.
Note
EVKs with Gen3 and Gen3.1 sensors configured in slave mode are streaming as soon as started even before they receive the 1 MHz clock. However, all events have timestamps set to 0 until the master clock is received. Data with timestamp of 0 should be removed by software afterwards. With newer Prophesee Sensors EVKs (gen4, gen4.1, IMX636 and GenX320), slave do not stream until it receives the clock.
Warning
Ground signals are not represented in the following graphs. Though, it is mandatory to connect the GND pins according to the recommendations provided in the Camera Manuals available in the Knowledge Center.
Here is a configuration with two Prophesee cameras:

This configuration can be seen in action using our Synchronization samples that show how to configure and start both cameras:
You may also be interested in the Synced Camera Streams Slicer samples, which demonstrate how to use the
the SyncedCameraStreamsSlicer class to divide
and process event streams generated by master and slave cameras.
When using more cameras, the configuration is as follow:

Beware that with multiple slave cameras, you will need to check the electrical levels/loads. For more details on electrical requirements, refer to Camera Manuals and this KC page.
Synchronizing Frame Cameras with Event Cameras
There are two different ways to synchronize Event and Frame cameras: either Frame or Event camera is master.
Frame Master Camera / Event Standalone Camera
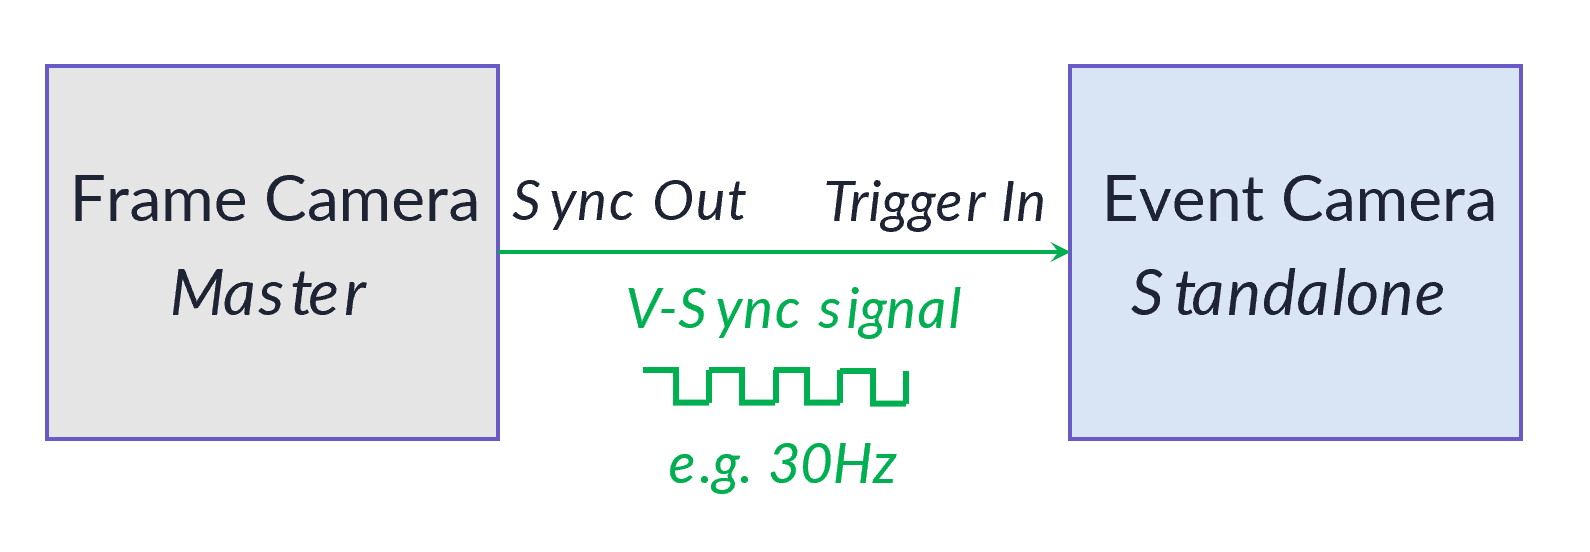
When using the Frame camera as master, you have to configure it to generate a VSync signal which is fed to Trigger In interface of the Event camera:

Prophesee camera is used in standalone mode (which is the default mode of the camera). The VSync signal signal provided by the Frame camera is generating External Trigger Event in the event stream (ON event at each rising edge of VSync and OFF event at each falling edge). Those events can then be used to synchronize the Frame and Event streams in post-processing using appropriate scripts/software.
Startup sequence:
Standalone Event cameras is started: data stream starts immediately
Master Frame camera is started: VSync is fed to Event camera and External Trigger events are generated in Event camera
To see how enable the Trigger In facility, see Trigger In Configuration section.
Event Master Camera / Frame Slave Camera
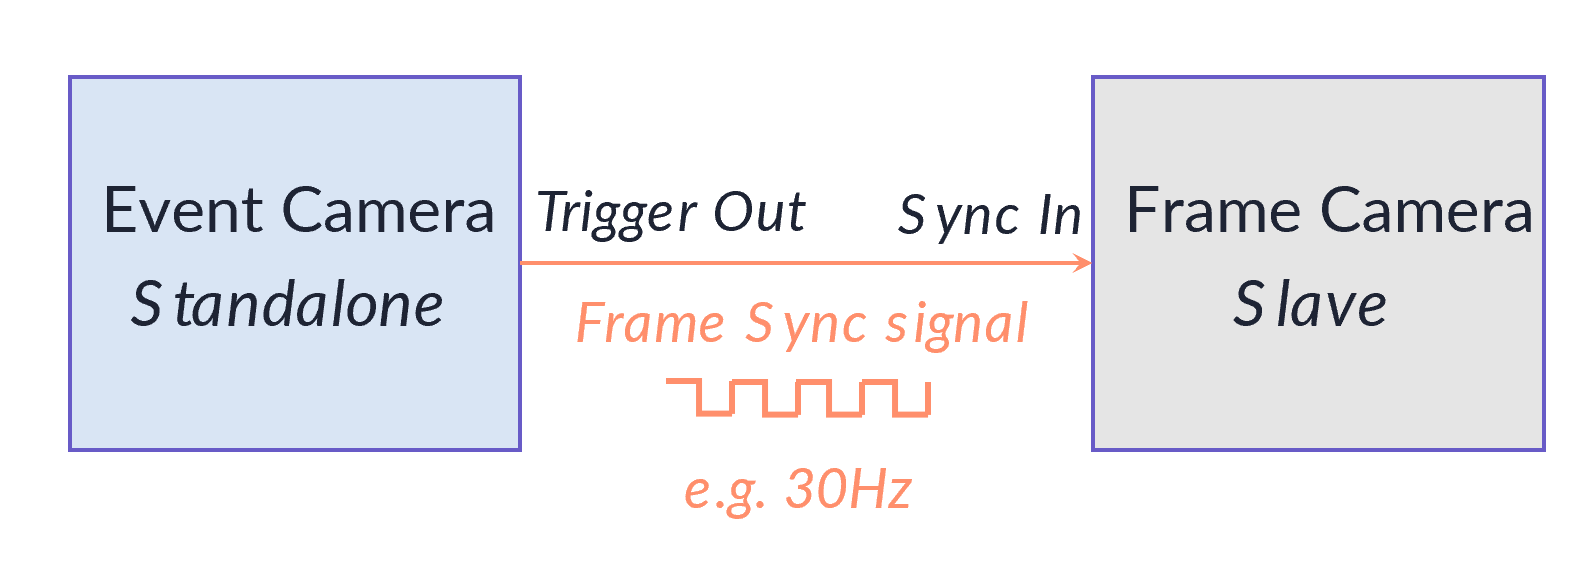
In this configuration, Prophesee camera EVK is set in standalone Mode and generates a Frame Sync signal using Trigger Out that is fed to the Frame camera which locks this signal:

Startup sequence:
Slave Frame camera is started: it waits for Frame Sync signal
Standalone Event cameras is started with Trigger Out programmed to output Frame Sync signal (though the Event camera is configured as standalone, it acts as a Master thanks to the Trigger Out)
Master Frame camera starts to stream as soon as it receives the Frame Sync Signal
To see how enable the Trigger Out facility, see Trigger Out Configuration section.
Note
This configuration can not be used with our EVK4 and EVK3 using Gen4.1, IMX636 and GenX320 sensors as those cameras do not provide a Trigger Out facility. For this sensor, there are two alternate options:
Frame camera is set as a master like explained in the previous section (“Frame Master Camera / Event Slave Camera”)
Both cameras are set to standalone mode and an external signal source generate an external trigger on both camera (with Trigger In enabled on the Event camera)
Synchronizing multiple Event and Frame cameras
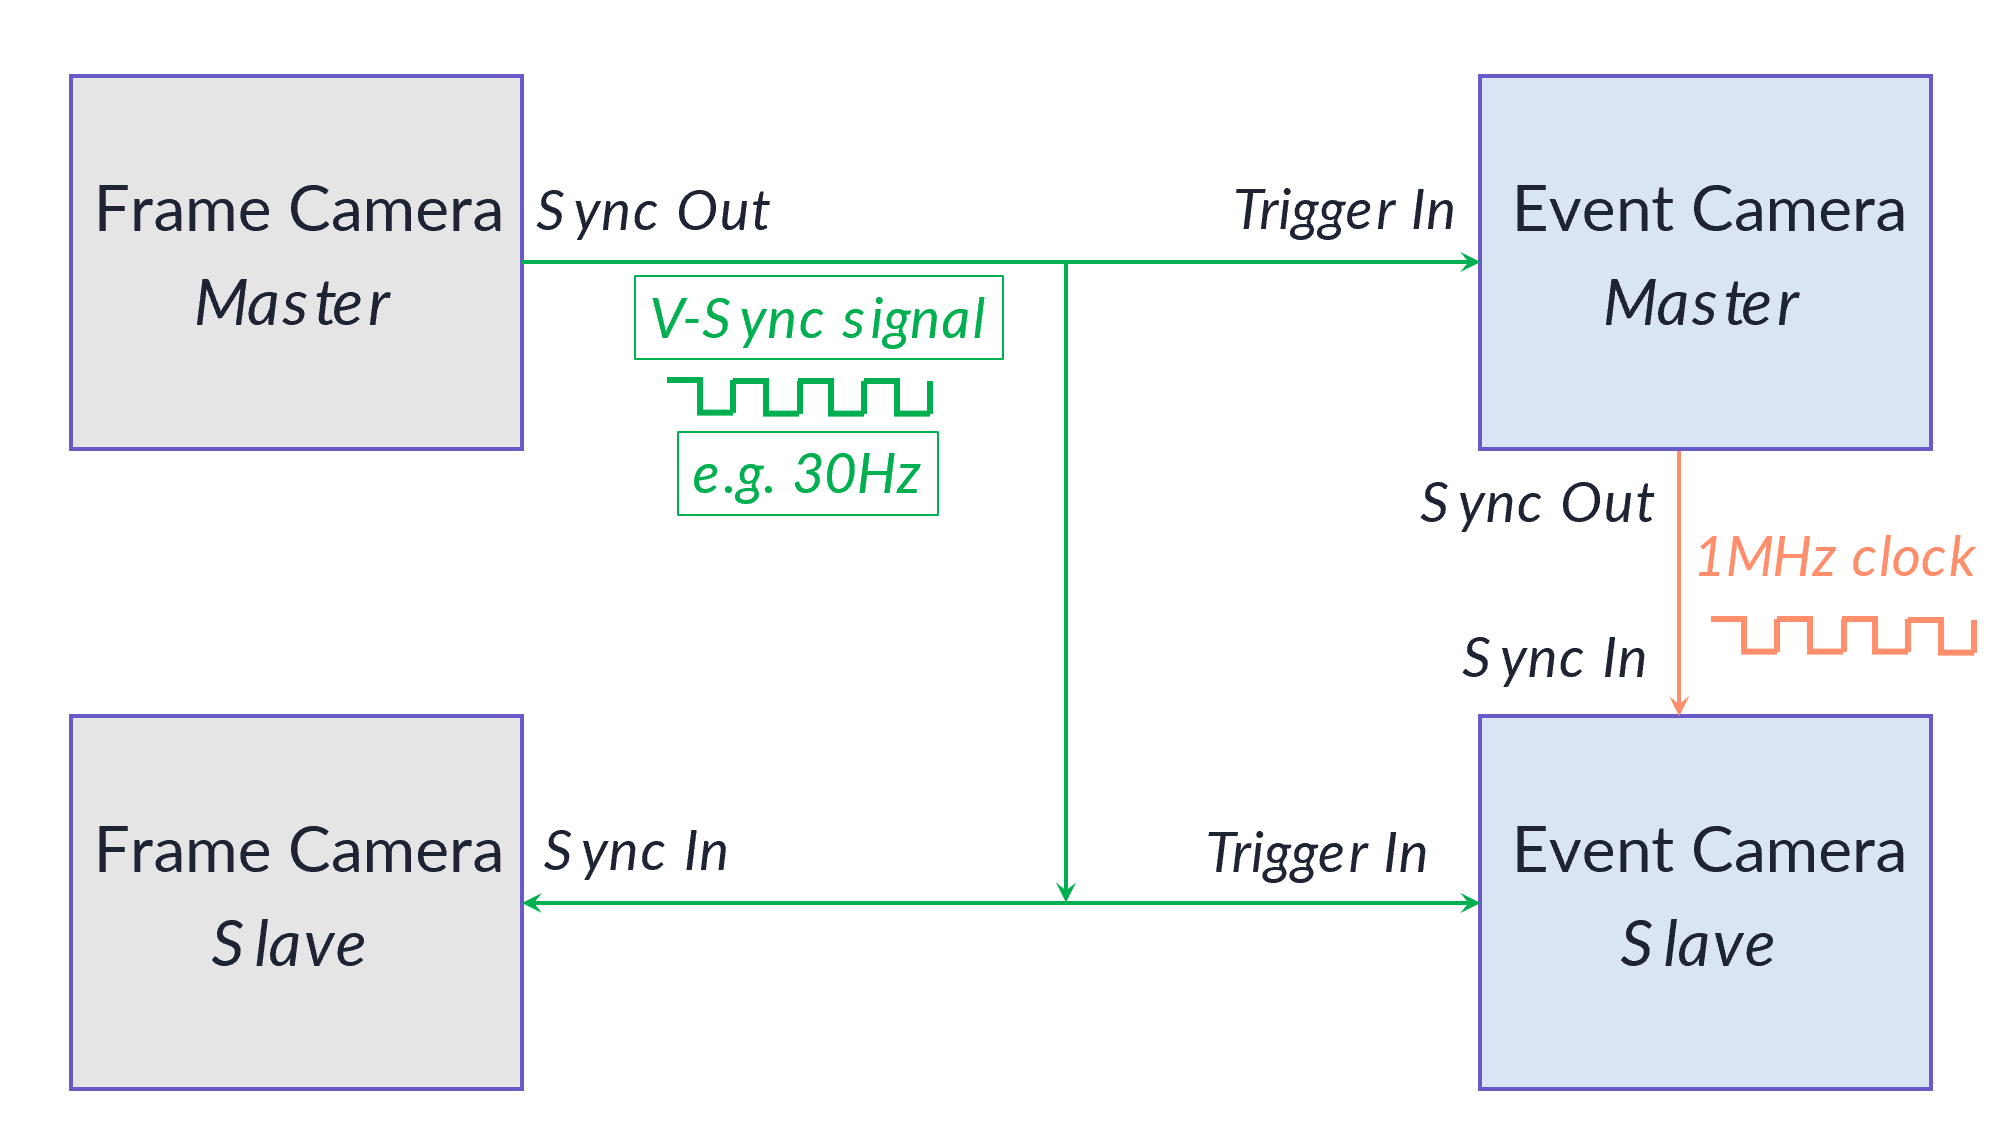
In a configuration with multiple frame and event cameras, one solution is to use :
one frame camera as master to provide VSync signal fed to all other cameras:
it allows to sync the slave frame cameras through an input interface
it allows to sync the event cameras using Trigger In interface
one event camera acting as master feeding 1MHz clock to the other slave event cameras:
it allows all the event cameras to produce synchronous timestamping
Such a configuration with four cameras can be seen in the following figure:

Beware that with multiple slave cameras, you will need to check the electrical levels/loads. For more details on electrical requirements, refer to Camera Manuals and this KC page.