
Metavision Studio
Metavision Studio is the perfect tool to start with, whether you have an event-based camera or not.
It features a Graphical User Interface allowing to visualize and record data streamed by Prophesee-compatible event-based vision systems. You can try it out by playing one of the event files (RAW or HDF5) provided in our sample recordings page. If you own one of our Evaluation Kits or a camera from our partner, you can visualize the events, adjust the display parameters and tune multiple camera settings.
Table of Contents
Note
Metavision Studio is not included in OpenEB. However, you can use the more basic Metavision Viewer application as an alternative.
Main features
Metavision Studio offers a wide range of capabilities designed to help you visualize, configure, and analyze event-based data efficiently. Below are the main features available:
Stream and display events from a live camera
Visualize events from a recording in the frame rate of your choice (normal, slow-motion, high-speed…)
Configure display parameters (accumulation time, color theme)
Control sensor pixels settings (biases)
Set a Region Of Interest and configure a Digital Event Mask
Configure Event Signal Processing (ESP) (Anti-Flicker, Event Trail Trail Filter and Event Rate Controller)
Configure Trigger interfaces (Trigger In and Trigger Out)
Record data from a live camera to RAW file and cut recording to keep only relevant data
Export events recording to HDF5 event file or to AVI video
Serialize/deserialize camera configuration (see save/load camera settings)
Temporal Plot to visualize the event stream over time (see Sensor tuning using Temporal Plot)
See also
If you just recently acquired an EVK and are willing to use Studio to stream some events from your camera, you may want to start your journey by watching our EVK4 unboxing video as it shows the first steps with the EVK, the installation of Metavision SDK and how to launch Studio.
Starting Studio
Metavision Studio can be started by typing metavision_studio in the command line prompt of your operating system.
On Windows, you can also launch it from the Windows Menu or the Search Bar.
On your first connexion, you will be offered to follow a guided tour to discover how to use Studio:
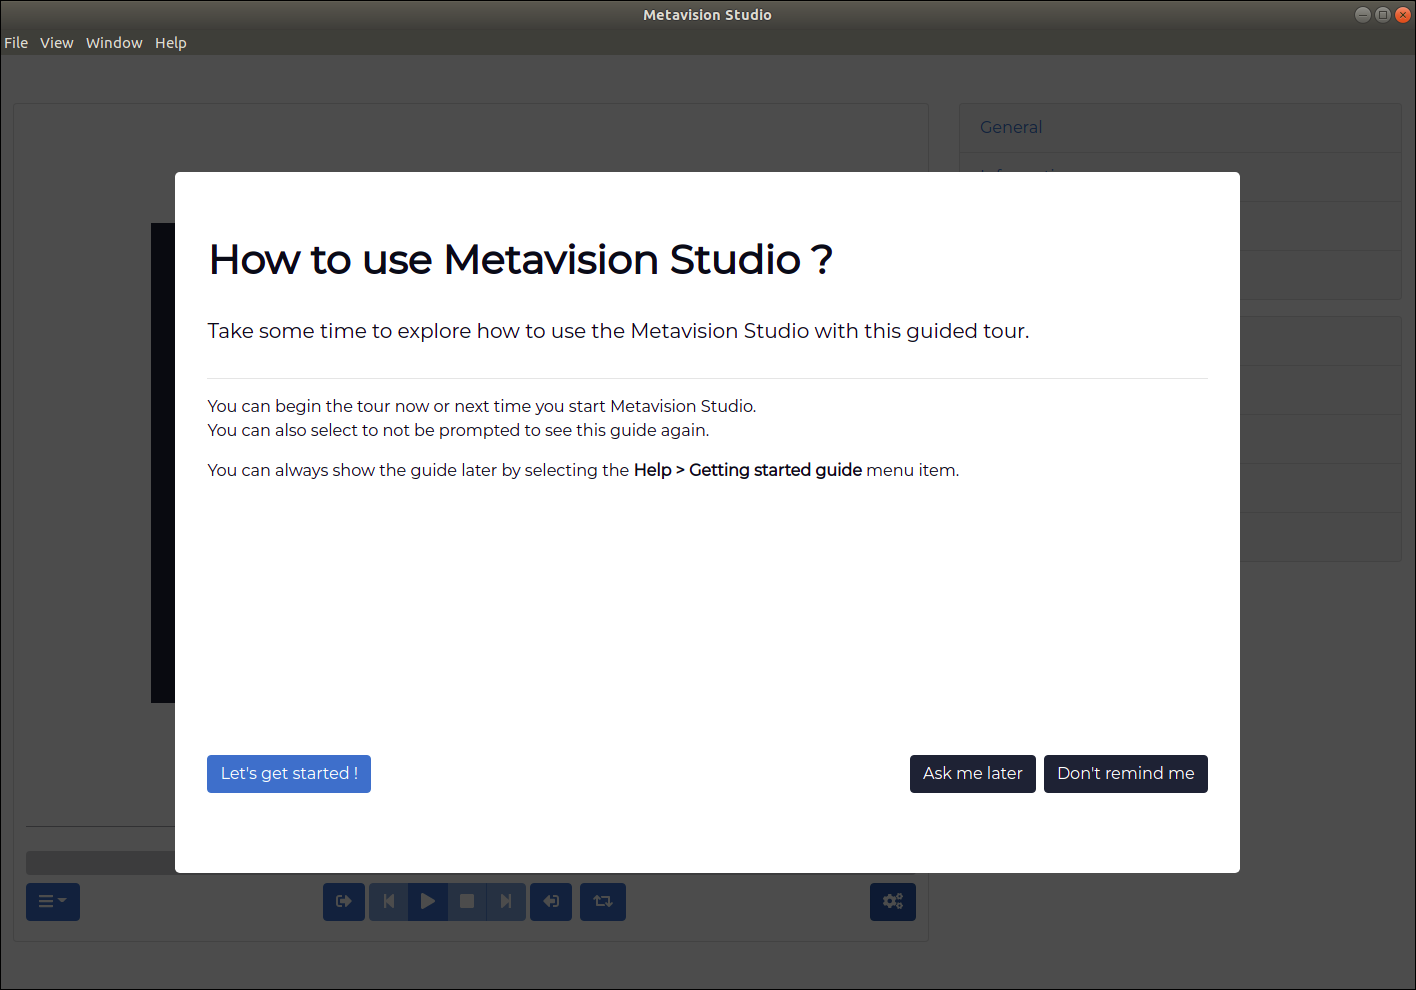
This guide gives you information to start reading and recording event-based data as well as configuring your camera settings. Note that you will be able to access it anytime by selecting “Help > Getting Started Guide” menu item.
Warning
If Studio displays empty windows, missing UI elements, or the error “Metavision Studio internal error” in the console, please refer to our FAQ entries about troubleshooting Studio for guidance.
First visualization of a recording
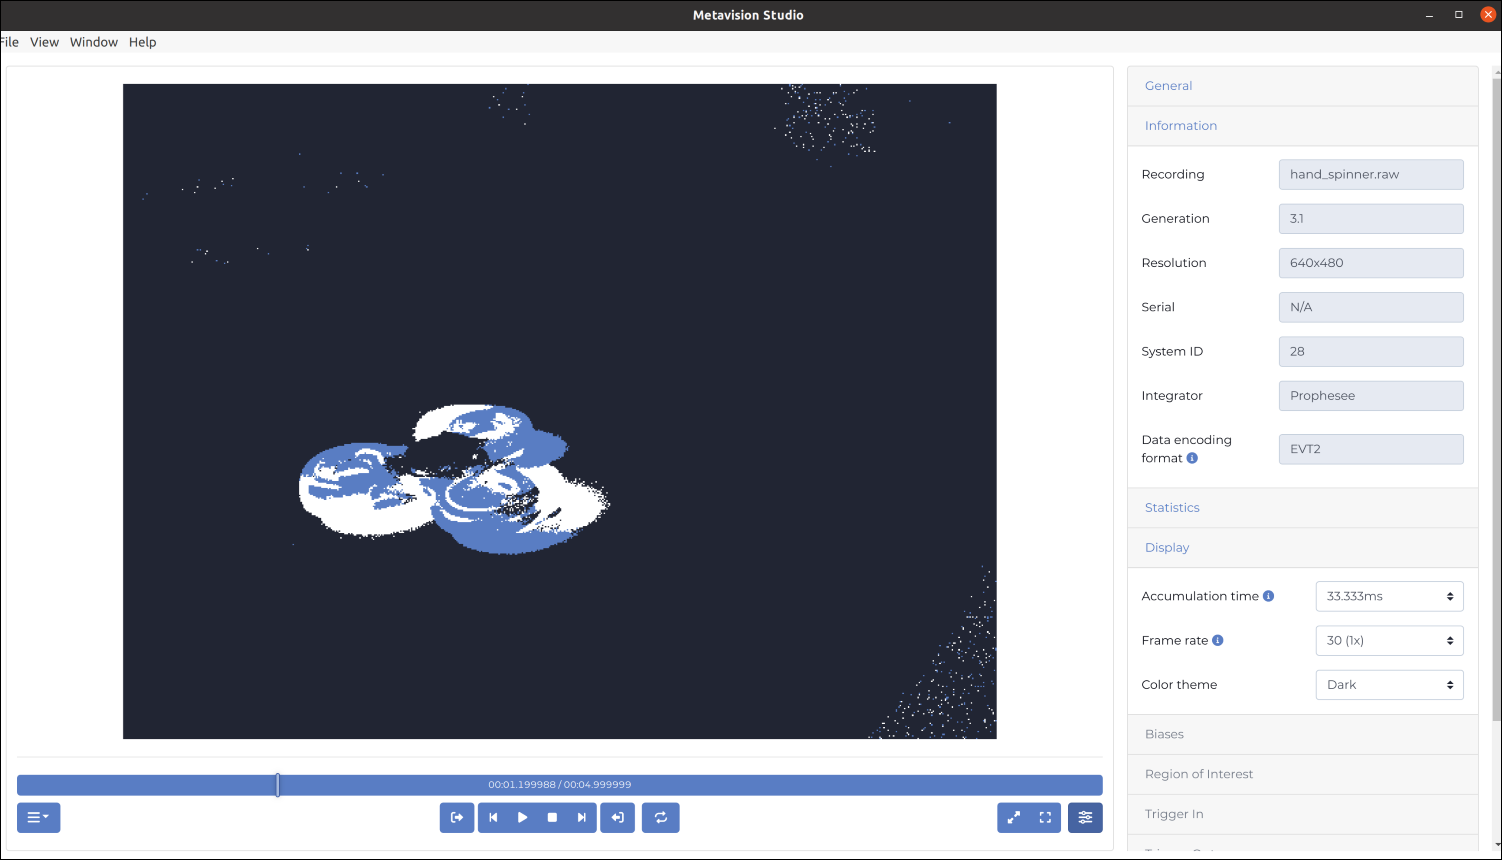
To start with Studio, download an event file from our Sample Recordings (RAW or HDF5). For example, choose laser.raw which is a laser recorded using an Evk3 Gen4.1 (HD sensor). When you open the file in Studio, it will automatically be played. The default color theme is a black background with ON and OFF events displayed respectively as white and blue pixels.
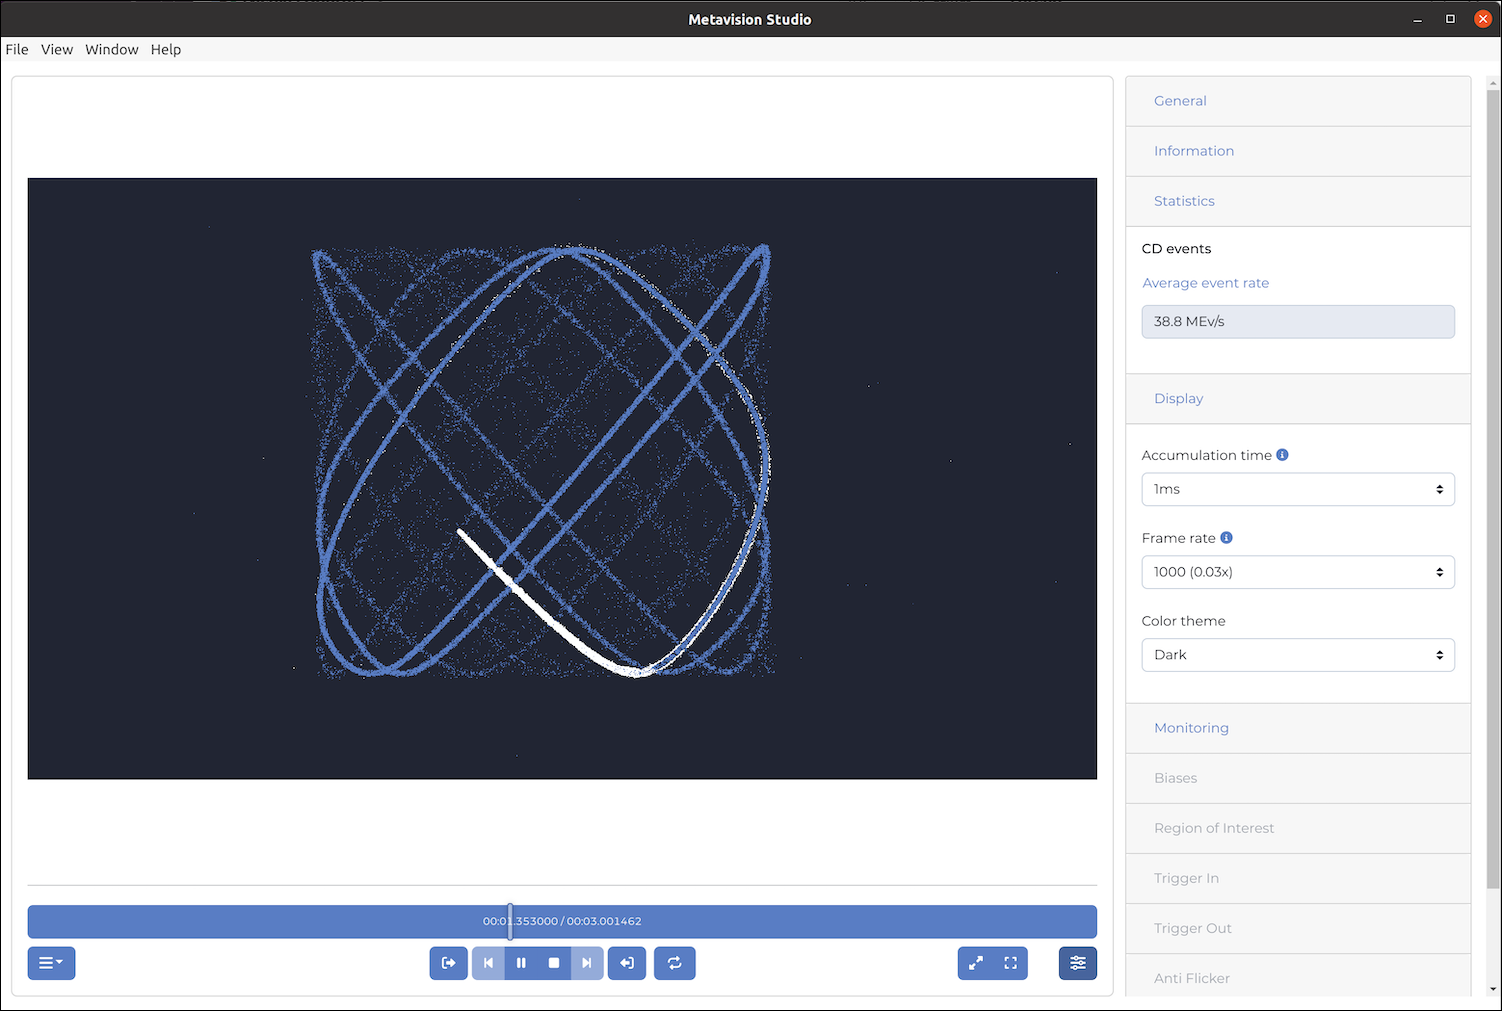
Now, open the Settings panel on the right and look at the Information, Statistics and Display sections. In the Information section, you can see that it was recorded with a Gen4.1 sensor of HD resolution (1280x720). In the Statistics section, you can see a live estimation of the data rate which is quite constant for this recording (around 38 Mev/s). Finally, in the Display section, you can change the way the frames are built and displayed from the events. For example, change Accumulation Time to 1ms and Frame Rate to 1000 (0.03x) to see the recording in slow motion:
Warning
When opening the recording with Studio on Windows, you may get a not an existing file error:
------------------------------------------------
Metavision SDK Stream exception

Error 103001: Opening file at c:\Users\name\Recordings\??.raw: not an existing file.
No such file or directory.
------------------------------------------------
This error is probably caused by some non-ANSI characters in the file path (either in the folder or the file name) like characters with accents or asian characters (chinese, japanese etc.). Until the SDK is enhanced to support those file paths properly, the workaround is to store your recording in pure-ANSI paths.
Note
To understand the concept of accumulation time and more generally to get more familiar with our way of managing events, go through the event-based concepts page where we explain how frames are generated from events.
First visualization from a live camera
If you own an event-based camera, plug it to an USB3 port and open the camera in Studio. If no camera is detected and you see the message “No cameras available, please check that a camera is connected”, please refer to our camera troubleshooting FAQ entry.
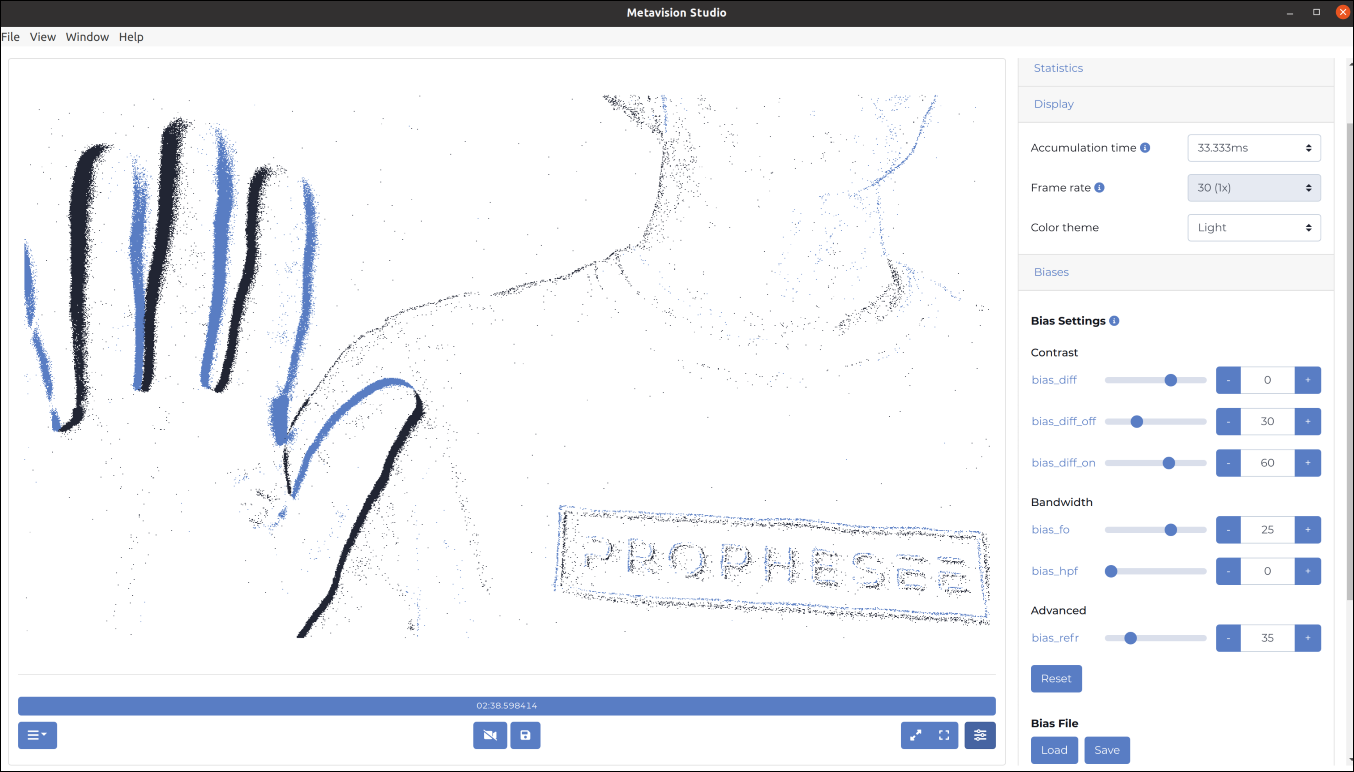
You should now see live events streaming from your camera. To customize the appearance, you can adjust the color theme in the Display section of the settings. In the example image below, we selected the Light theme, where ON events are displayed as blue pixels and OFF events as black pixels on a white background. If your camera is pointed at a static scene, you may only observe minimal background noise. For more dynamic and meaningful events, try pointing the camera at yourself and waving your hand to generate activity in the event stream:
Note
In rare cases, your EVK device may show up as a USB2 device or present the following error: EVKx device is not enumerated as a USB 3 SuperSpeed device. To resolve this issue, please disconnect the cable from the PC USB port and re-insert the cable with increased speed. For more information, please refer to our FAQ.
The image shown above is sharp and exhibits minimal background noise. To achieve similar results, start by focusing your camera by adjusting the aperture and focus distance of your lens (note that the availability of these settings depends on your specific lens model).
To further reduce background noise, open the bias settings and adjust bias_fo, monitoring both the event rate and the display to observe how the noise level changes. For detailed guidance on bias settings and their impact, please refer to the sensor biases page.
Even after focusing and adjusting the biases, Studio may still display an image with numerous unexpected events, as illustrated in the example below:
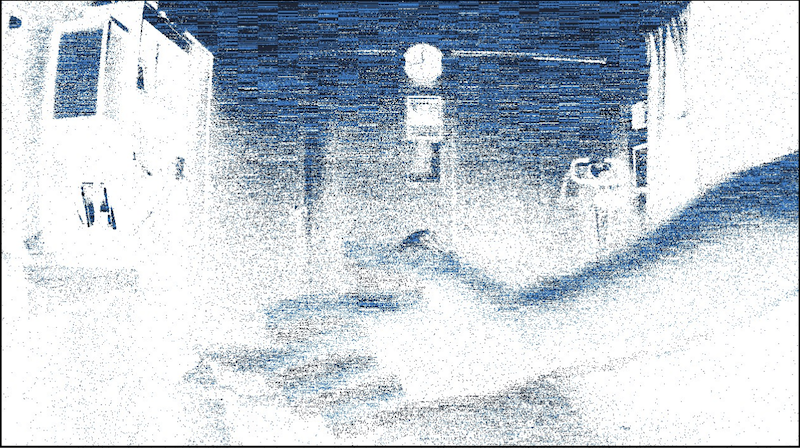
This could be caused by:
Lighting conditions: certain artificial lights may flicker, generating numerous events on the sensor. In the image above, you can even observe horizontal artifacts caused by sensor saturation. To address this issue, change your lighting device if you have the possibility to do so. The best non-flickering light source is any halogen lighting, but if you want a LED source, you must double check it is not flickering (lots of them are using PWM modulation for dimming, and produce flicker).
The Event Rate Controller (ERC) of the sensor (designed to limit the event rate). While ERC is helpful for preventing the computing unit from being overwhelmed by spikes of events, it may compromise signal quality, potentially introducing horizontal artifacts similar to those shown in the image above.
A sudden flash of light: it could cause a similar visual artifacts but just for a brief period of time. To mitigate the impact, further bias tuning could be necessary to decrease the sensitivity of the sensor. For more details on visual effect of readout saturation, check this article.
If you can not choose your lighting device, then on Gen4.1, IMX636 and GenX320 sensors, you can enable the Anti-Flicker sensor filter available in the Settings panel of Studio. To get more information on flicker mitigation, check the Application Note in the Knowledge Center.
Warning
If you choose not to enable any filters (e.g., ERC, Anti-Flicker), all events produced by the camera will be streamed. However, be cautious: in this configuration, you may exceed the bandwidth and computational limits of the devices involved, including the camera, laptop, and their connections (both internal to the camera and the USB link between the camera and laptop).
When these limits are reached, you may experience display lag, and in severe cases, it could result in data loss or corruption. To avoid such issues, ensure you are capturing only relevant events before pushing the event rate to high values. For more details on recording and managing events effectively, refer to the next section.
First recording from a live camera
Now that you successfully streamed from an event-based camera, you can do your first recordings. Note that some checks should be performed to get good quality data.
First, review your general setup:
Camera installation: when possible, mount your camera on a tripod stand to avoid any spurious motion during acquisition
Lighting conditions: like mentioned in the previous section, make sure you don’t have unexpected events due to flickering light source.
Focus adjustment: to help you focusing your camera, you can use the metavision_blinking_pattern_focus application
Then adjust some sensor settings to enhance the quality of your data:
Sensor pixels settings (biases): depending on your applications requirements and conditions (higher speed, lower background activity, higher contrast sensitivity threshold, etc.), you should adjust the camera biases.
Region Of Interest: whenever possible you should limit the area of the sensor to the pixels that might gather relevant events for your application. For example, if you are tracking vehicle on a road and you are unable to adjust your objective lens to see only the road, you can configure a ROI in Metavision Studio to exclude non-relevant areas (sidewalks, sky etc.).
Events filtering: if your camera is using a Gen4, IMX636 or GenX320 sensor, leverage the Event Signal Processing (ESP) block that provide some event filtering features: Anti-Flicker, Event Trail Filter and Event Rate Controller (ERC).
When you are satisfied with your setup, start doing some recordings with Studio. You will get some RAW files that you can then play-back in Studio with different frame rate and accumulation time.
Warning
Keep in mind that the RAW files you will record don’t depend on the accumulation time you configured in Studio. It is important to understand that this accumulation time is only a visualization option similar to watching a video file in slow motion.
Out of curiosity, you can take a look at the actual events contained in those RAW files. To do so, use the metavision_file_to_csv sample to generate a CSV file and check its content to see the x,y,p,t tuples:
$ more my_first_recording.csv
382,341,0,5012
548,716,0,5031
990,625,0,5042
1162,122,0,5043
524,665,0,5043
987,606,1,5049
209,73,0,5052
878,504,0,5062
(...)
In this example, we see that the very first event recorded was an OFF event located at coordinates (x=382,y=341) and timestamped at t=5012us.
Saving and loading camera settings
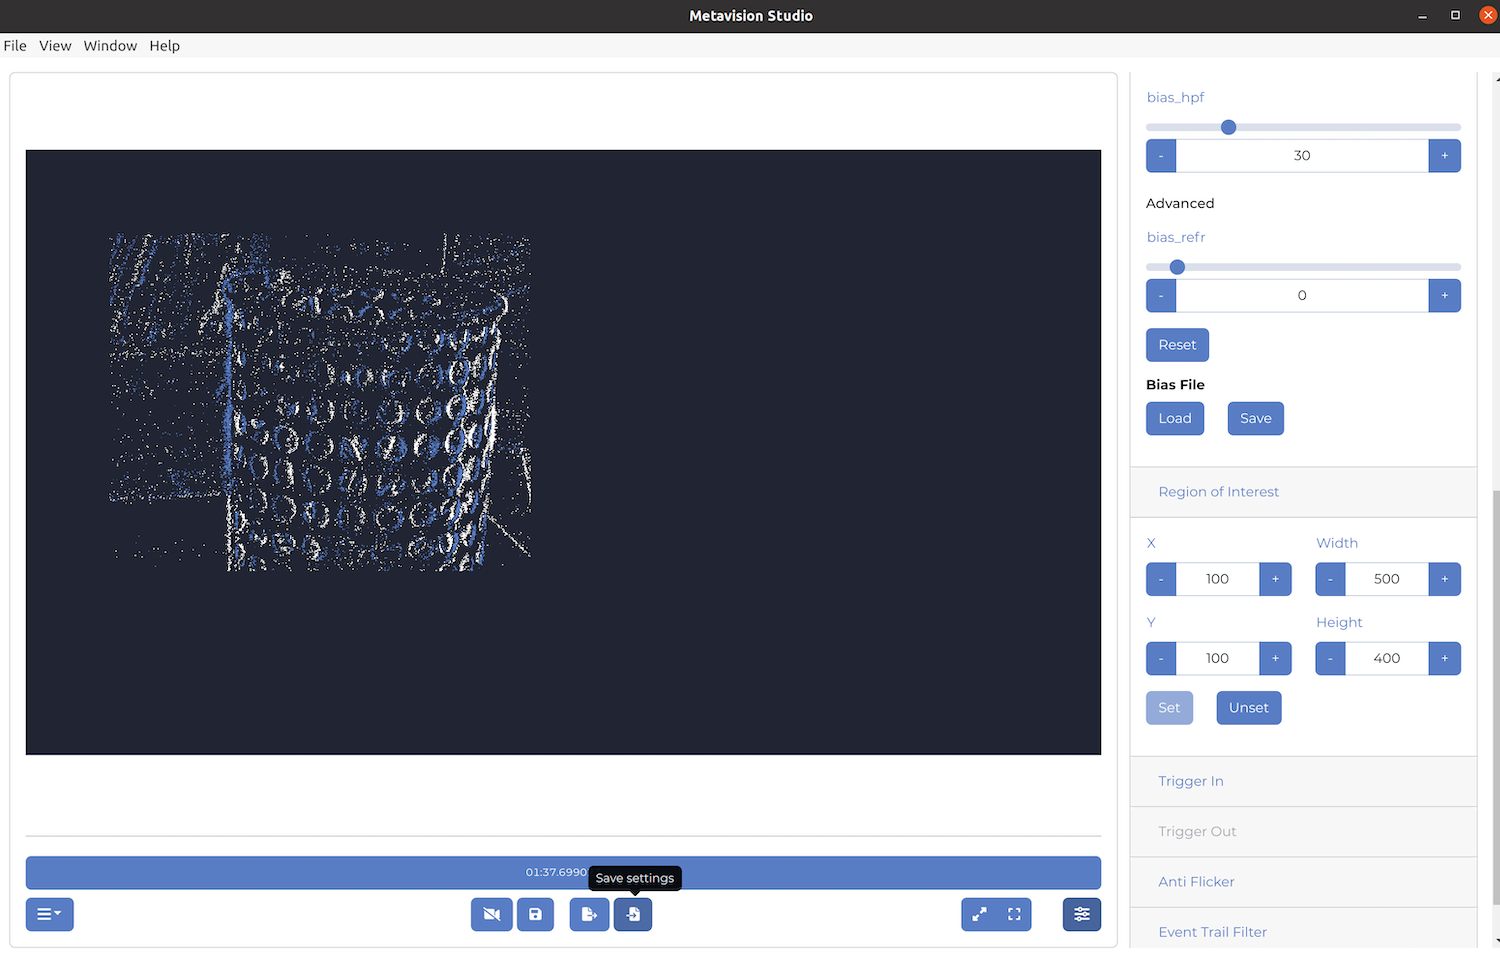
Once you have configured some camera settings, you might want to save those settings for another session in Studio
or to use them in another application of the SDK. For example, in the following screenshot, we can see that
bias_hpf was set to 30 and that an ROI was configured. You can now save the camera settings by clicking
on the icon “Save Settings” on the bottom of the display or choose the “Save camera settings” in the File menu:
If you look at the content of the saved file, you will find the biases, the ROI and all the other settings
that were applied to the camera. Note that some of them are not yet available in Metavision Studio like
Digital Event Mask, Digital Crop (see C++ API: I_DigitalCrop)
and the camera synchronization mode. Note also that depending on the way the Studio
GUI was built, some settings won’t refresh the settings panel (e.g. loading an ROI won’t fill-in the values of the
current ROI in the settings).
Once you have a JSON settings files that suits you, you can load it in Studio whenever you need, but you can also use it in Metavision Viewer and with most of our C++ samples.
Sensor tuning using Temporal Plot
Metavision Studio offers a “Temporal Plot” of the event stream that allows to better visualize the data over time and hence get complementary information on the temporal distribution of the data. Let’s see how this feature can be used to tune your camera according to your needs and the scene.
In our setup, an EVK4 is positioned in front of a fan, which blades are clearly rotating at a high speed:

The default view presents the blade’s shape, but extracting detailed information about the number and frequency of ON and OFF events from this display is challenging. Remember that the default CD events view builds a frame by accumulating events, as explained in the Frame Generation section and that the policy “last event polarity takes it all” means that if there were 10 ON events followed by 1 OFF event during the accumulation period, the OFF event alone will determine the pixel’s color.
We can observe that the average event rate is approximately 145 Me/s, which is quite high. To prevent sensor and laptop overload during our analysis of the event stream, we have established an ROI in the central area of the fan blades:
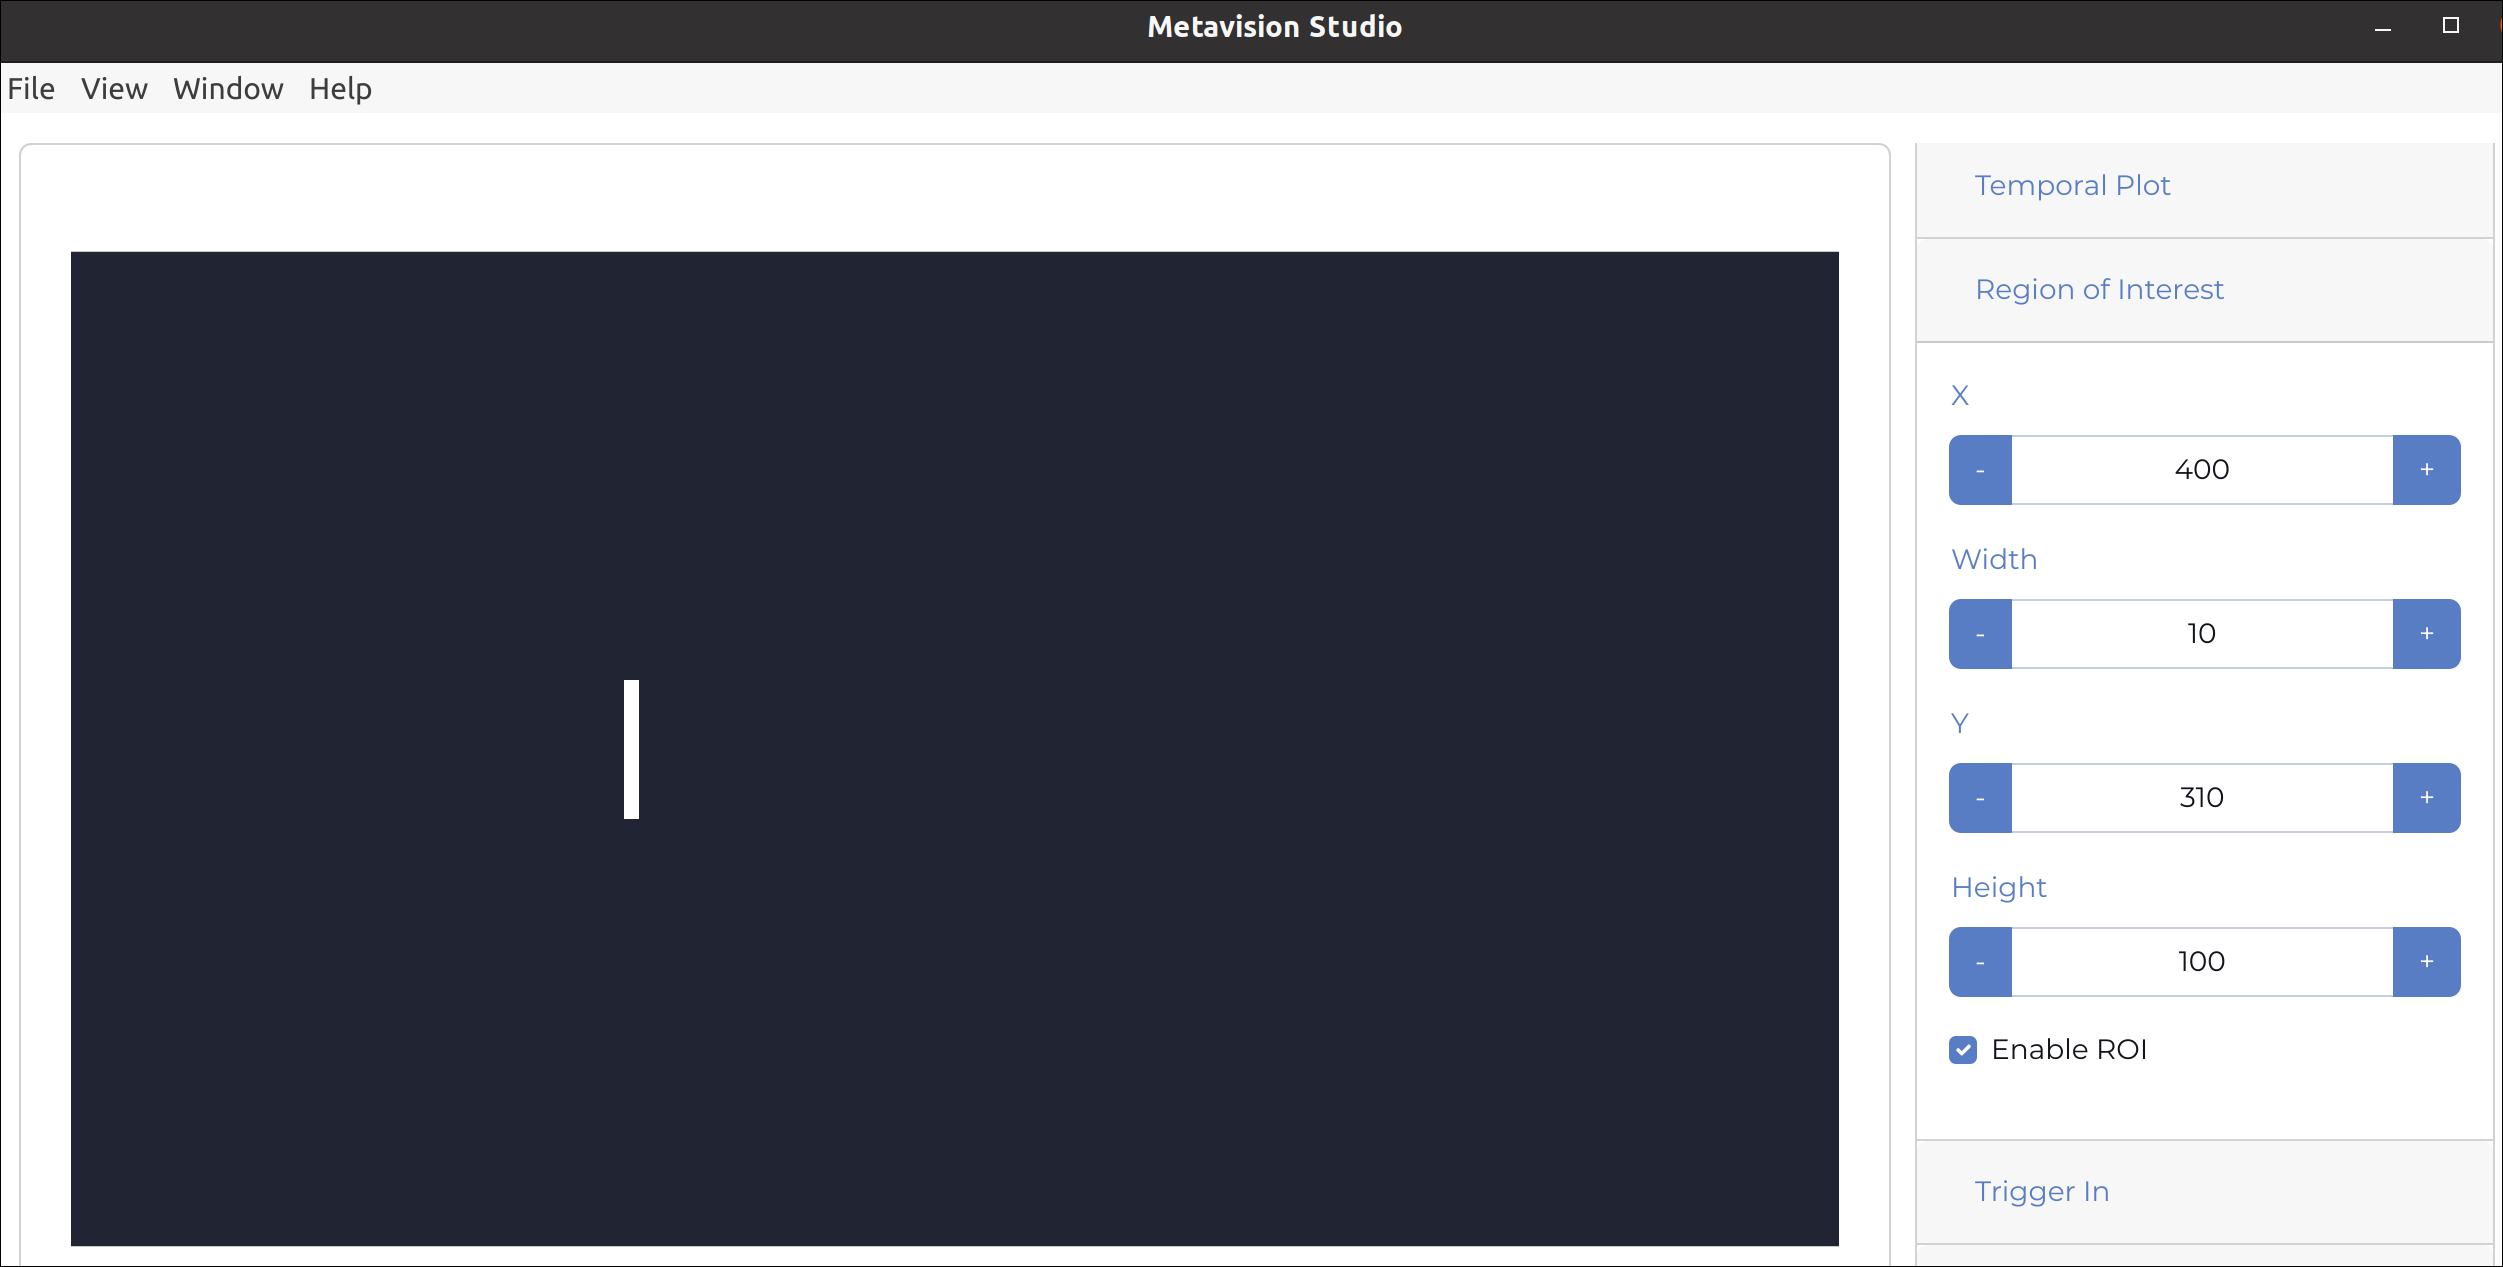
By setting up this ROI, the event rate reduces to 700 Ke/s, making it much more manageable. Additionally, this region captures the event stream necessary for observing the impact of sensor adjustments on the event stream.
Now, we set the Temporal Plot to focus on the X axis at a specific column within the ROI (for example, x=405, which lies between 400 and 410). We adjust the accumulation time to 100ms and then click on “Start Plot”:
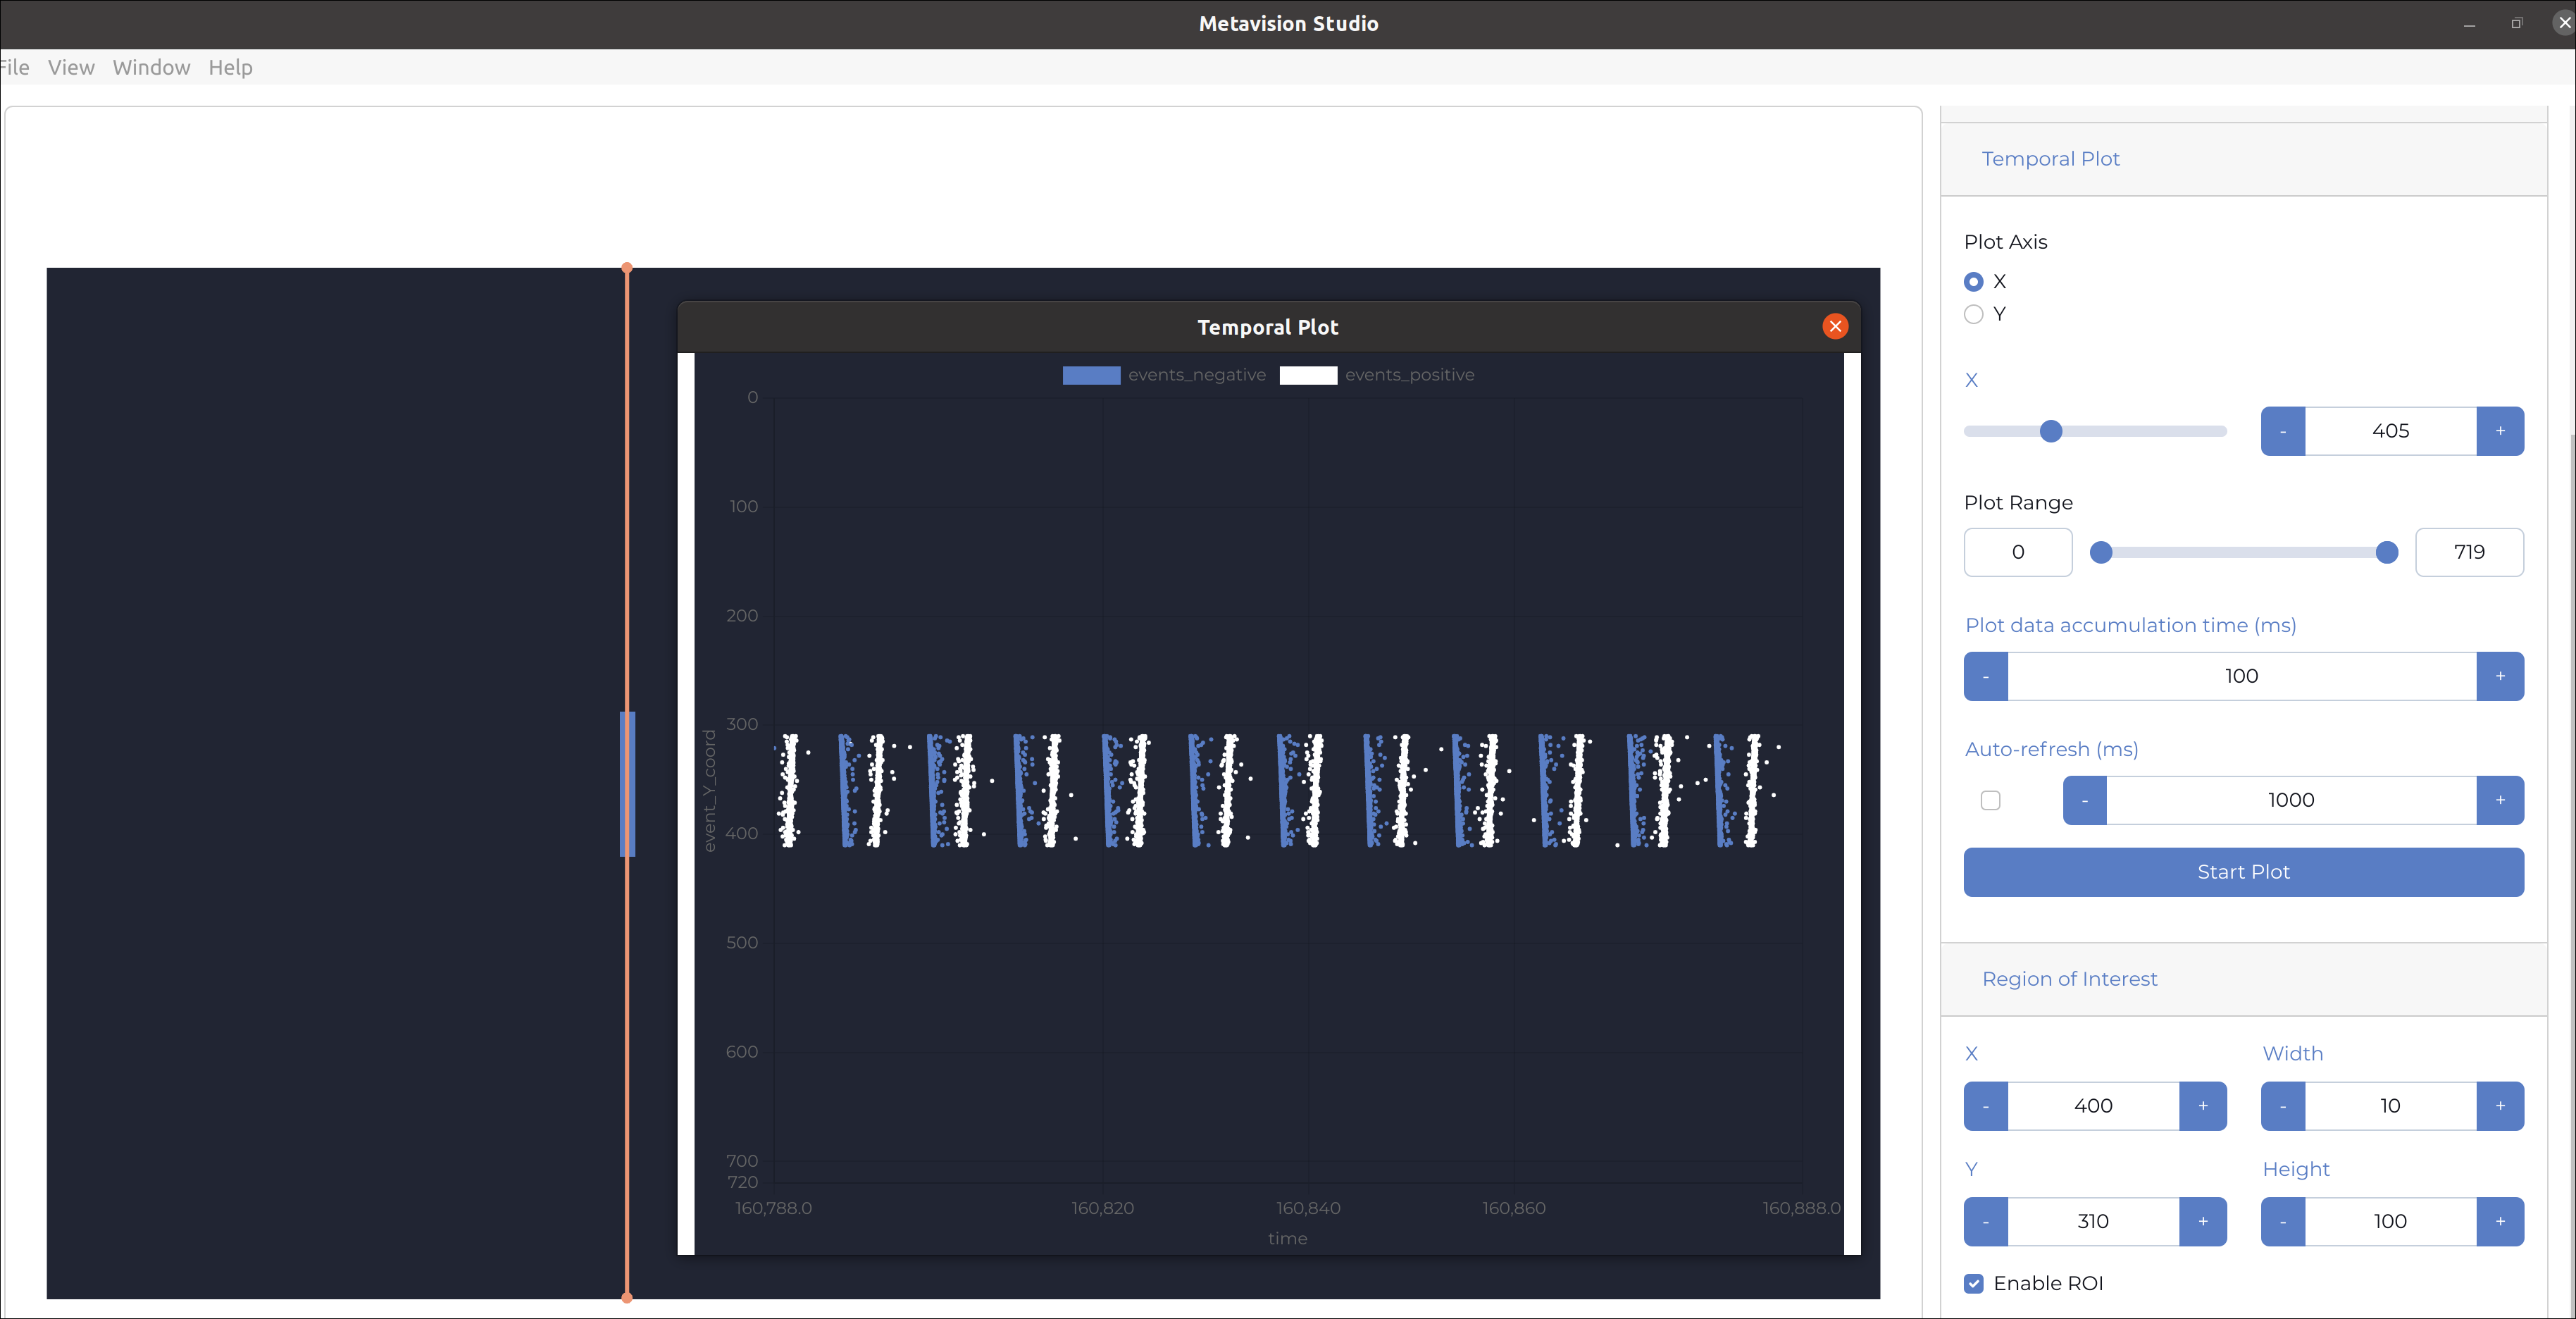
The “Temporal Plot” window displays a scatter plot of the event pixels over time, with colors indicating polarity. In our example, the window shows a series of white and blue dots aligned in vertical sequences against the time axis that runs horizontally across the bottom. Each vertical sequence of dots represents a snapshot of data captured at a particular moment in time:
Blue dots represent OFF events that are clustered across the plot.
White dots represent ON events that are also distributed in clusters interspersed among the blue dots.
Each vertical cluster of this visualization correspond to a blade of the fan going through the sensor field of vision on the column 405 of the sensor array. This fan is white and the background is dark, so each ON event cluster corresponds to a blade appearing in front of the sensor (pixels are detecting more light) and each OFF event cluster corresponds to a blade disappearing from the field of view of the sensor (scene becomes darker).
The Temporal Plot window allows us to observe the periodic behavior in the scene. From the plot, we can determine the fan’s speed or frequency by noting the 11 clusters representing ON and OFF event groups within the 100ms timeframe. This indicates that the blades are captured by the camera at a frequency of 110 Hz (11 clusters / 0.1 seconds). Since the fan has 3 blades, we can deduce that the fan’s rotation speed is 36.6 rotations per second (110 Hz / 3 blades).
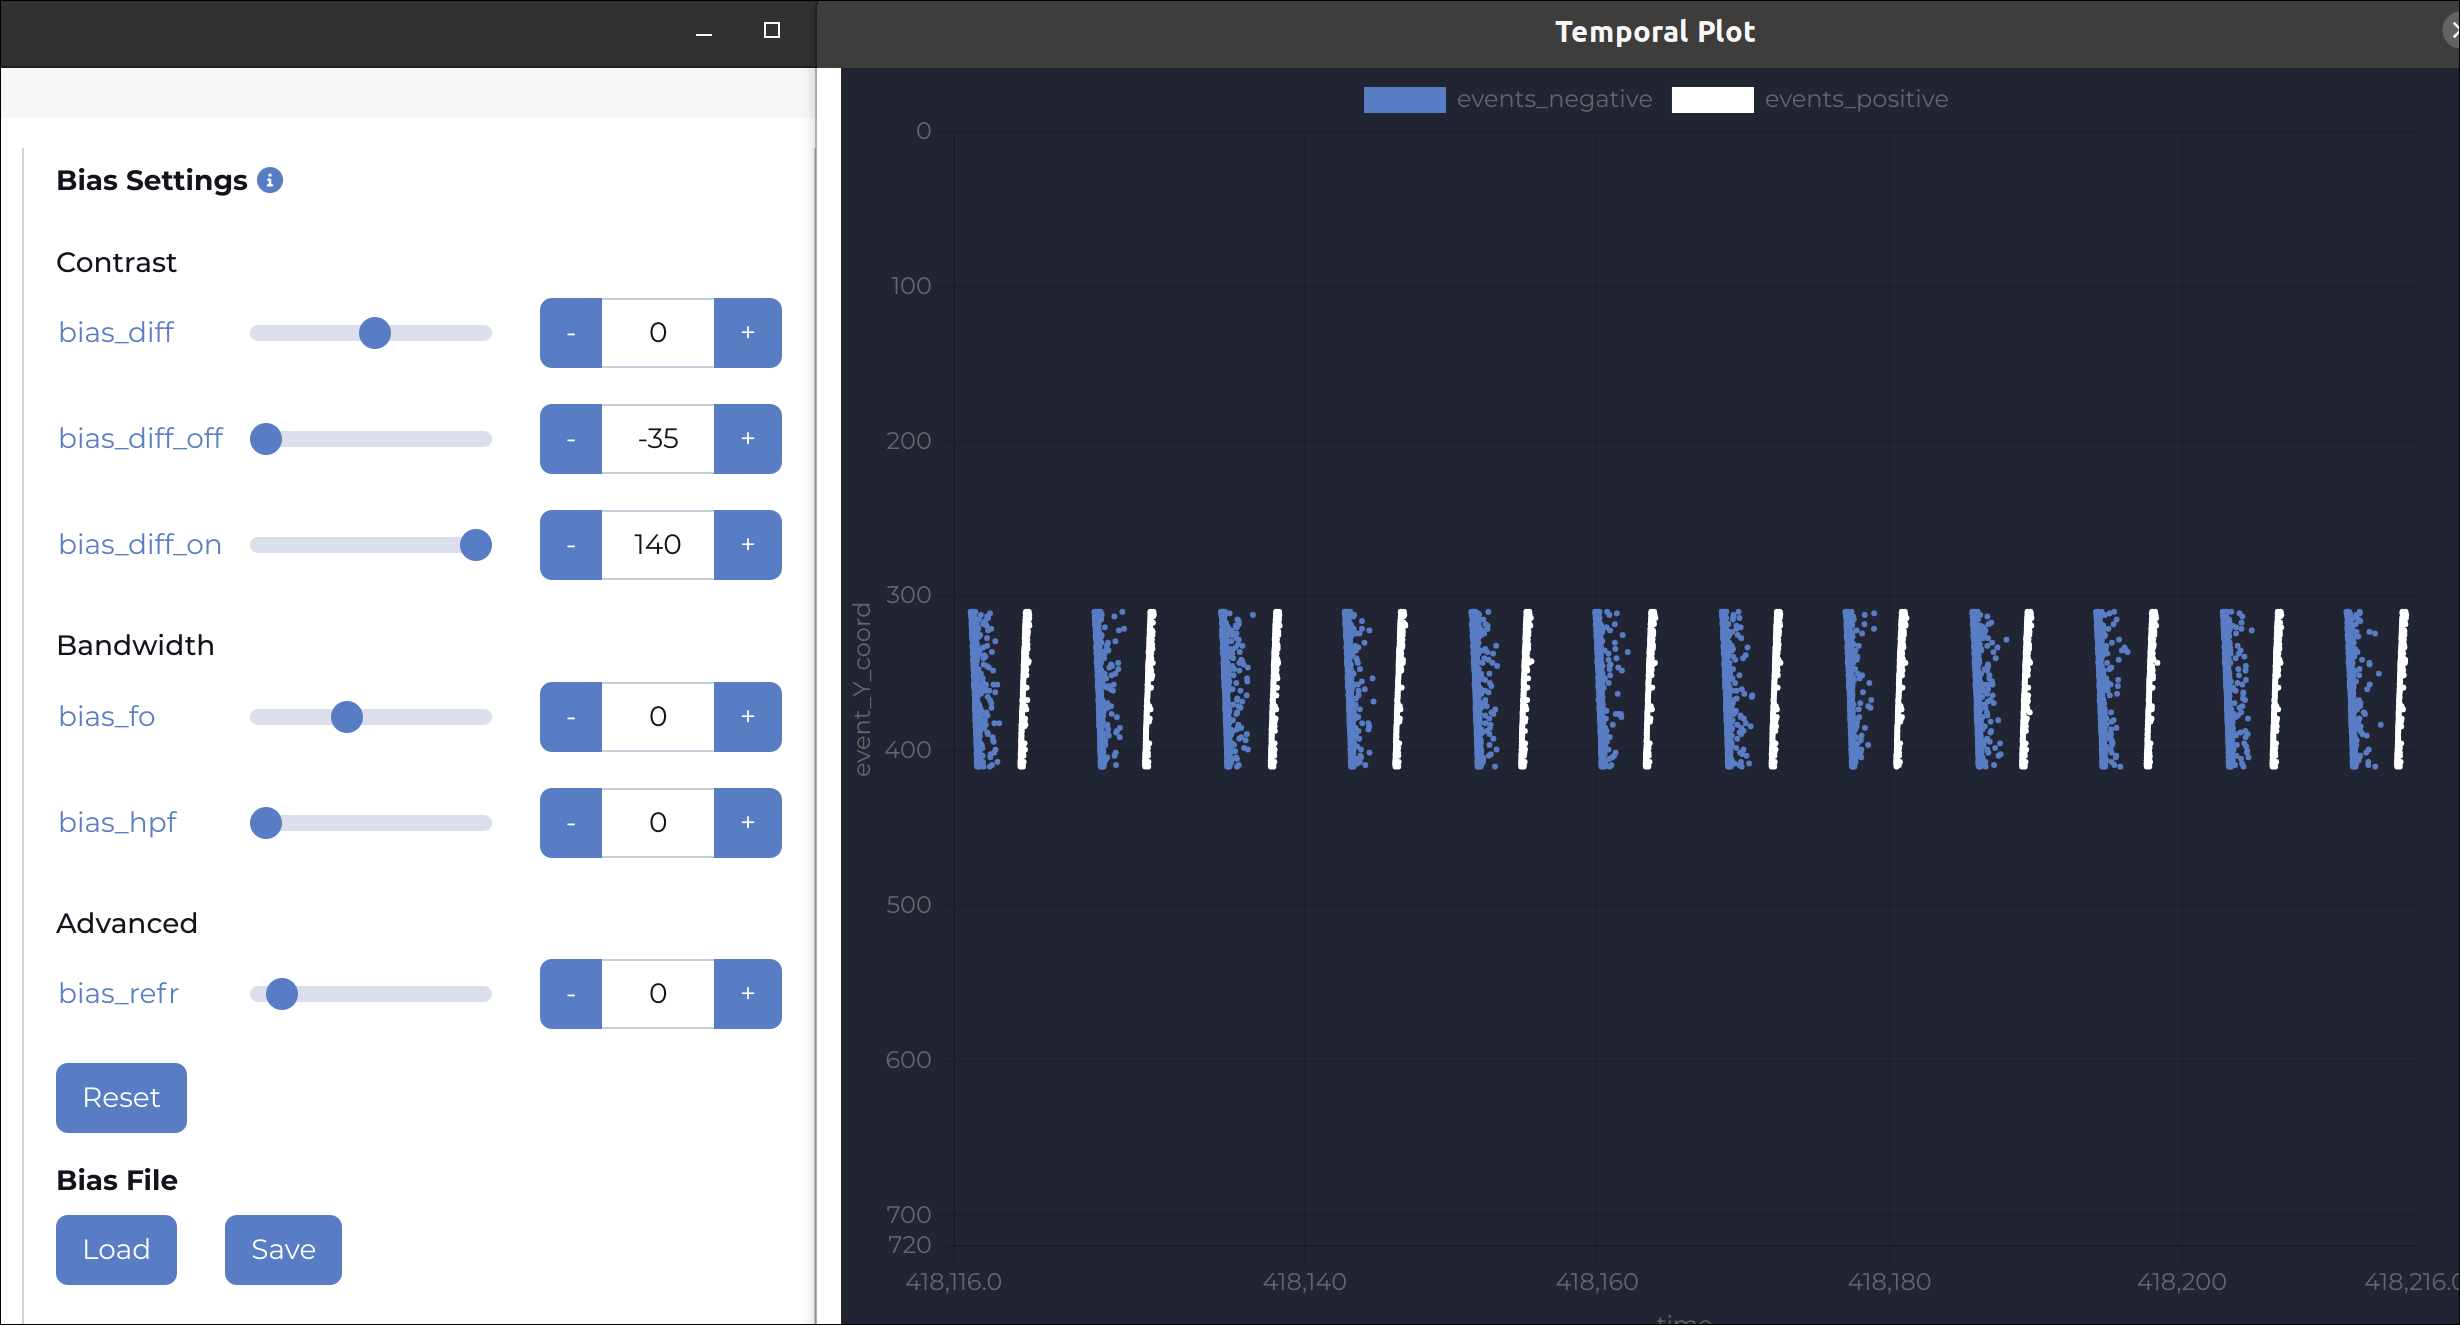
We can now change contrast sensitivity threshold biases (bias_diff_on, bias_diff_off) as explained in the biases page. For example, if we set bias_diff_off to the minimum value and bias_diff_on to the maximum value, we expect to see much more OFF events than ON events which is what we observe:
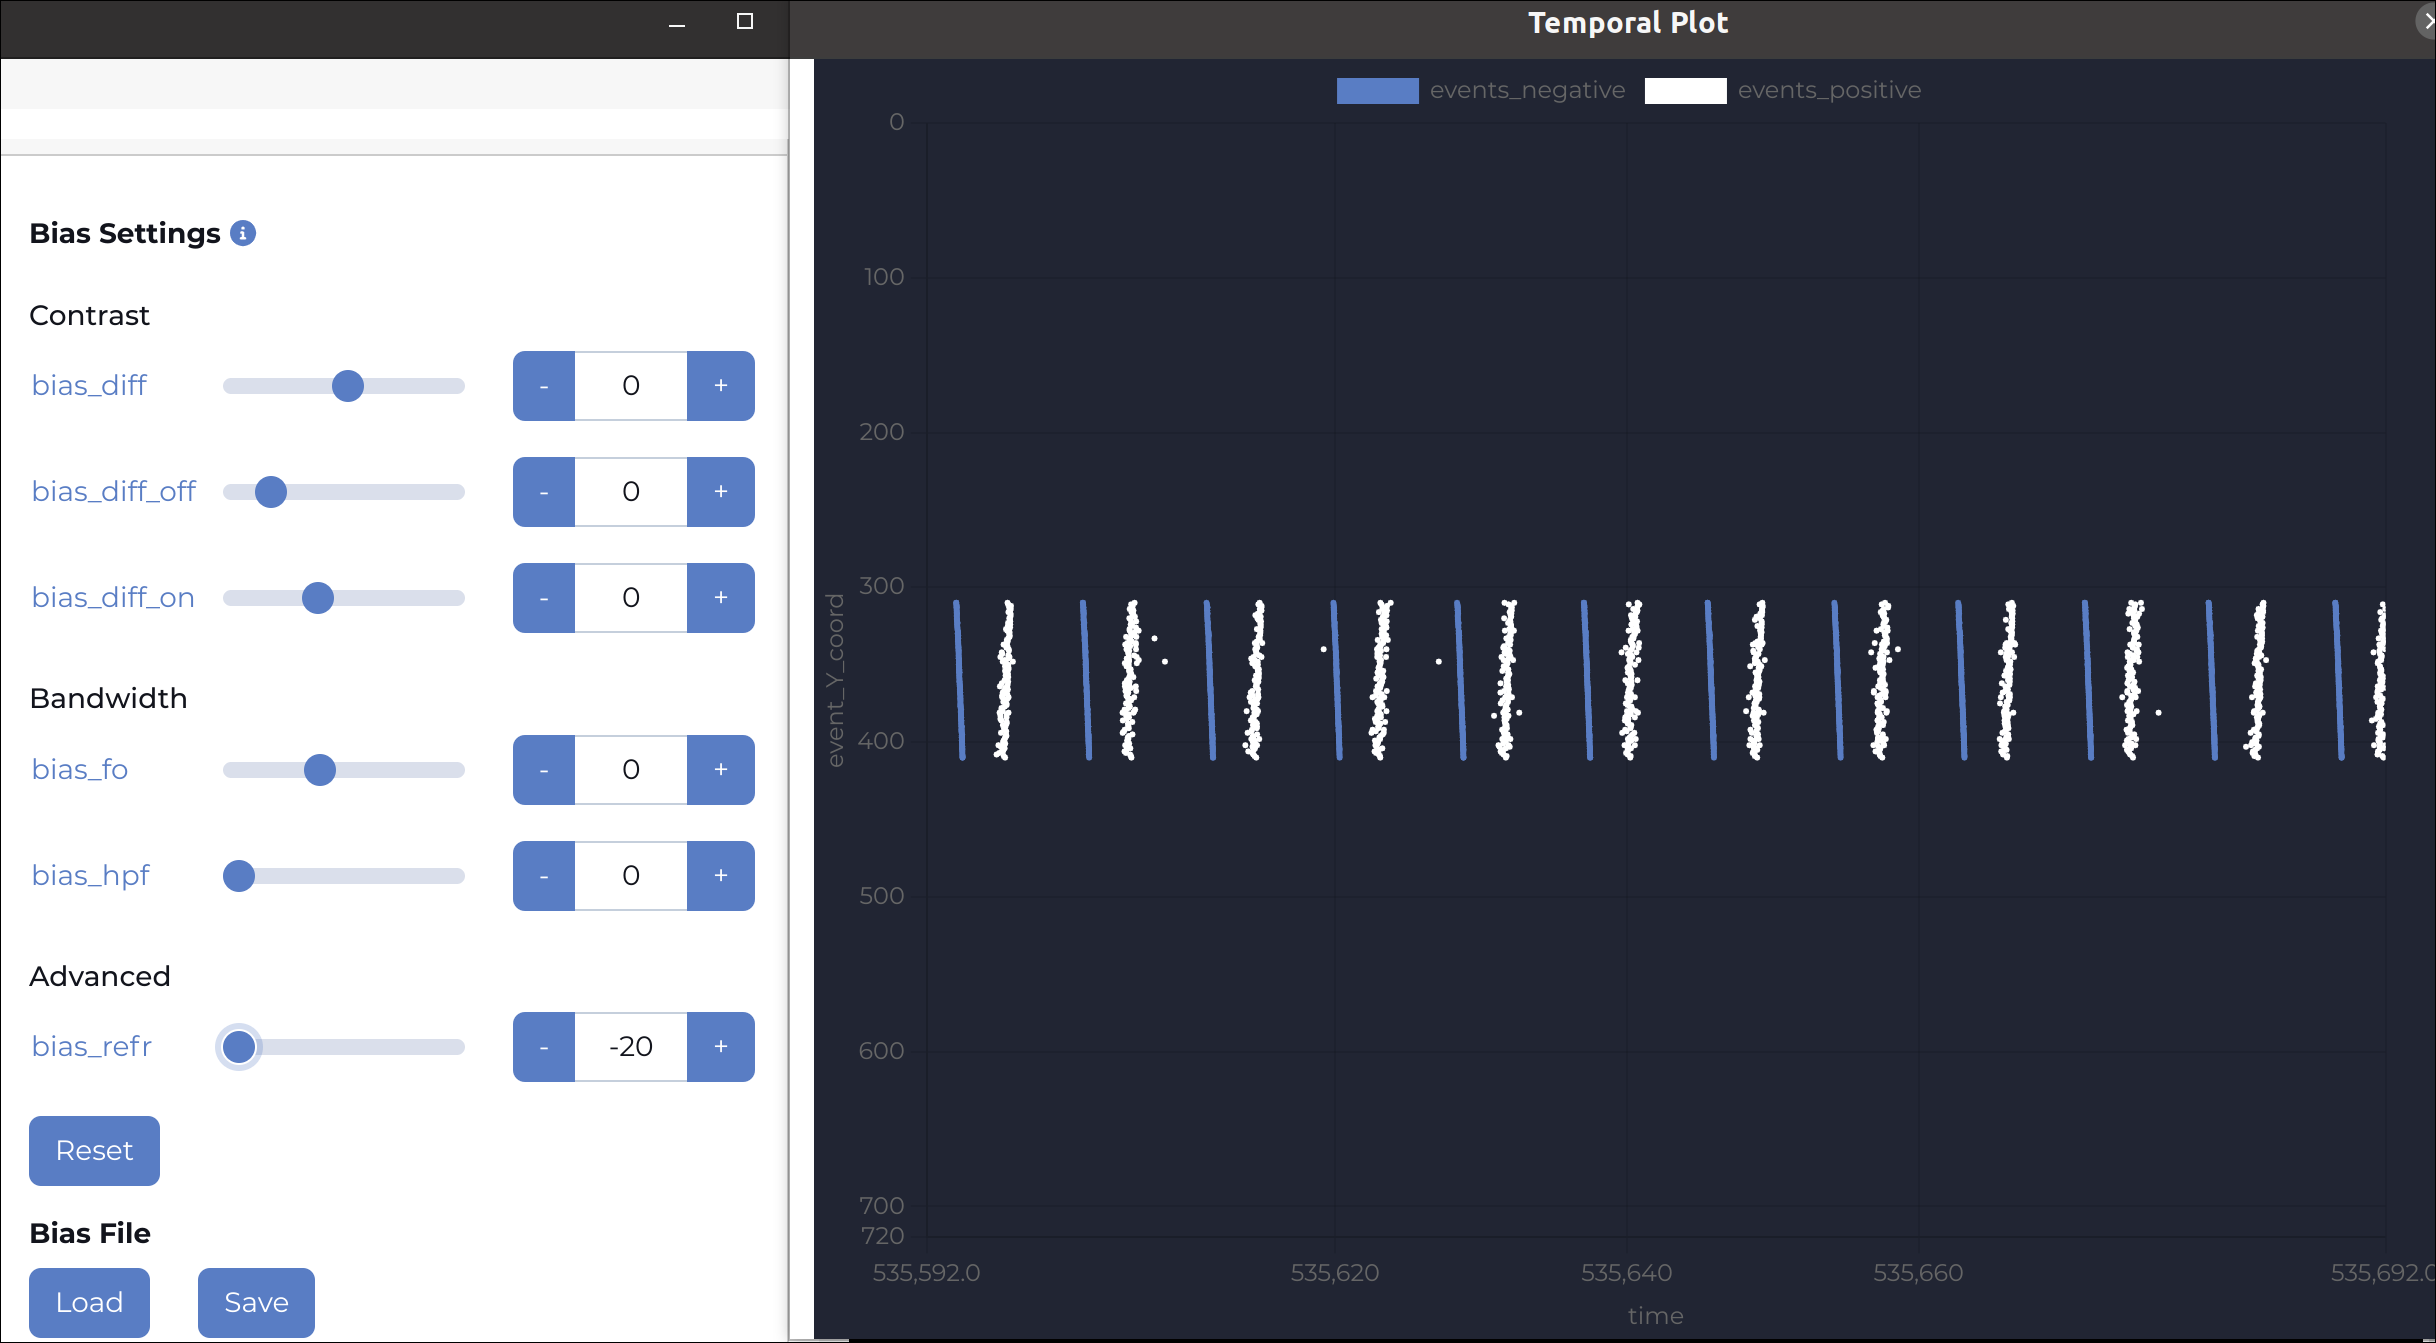
Similarly, we can also adjust the bias_refr to the minimum value to have a longer refractory period. As this bias determines the duration for which the pixel is blind after each event, we are not surprised to see that we have much thinner events clusters:
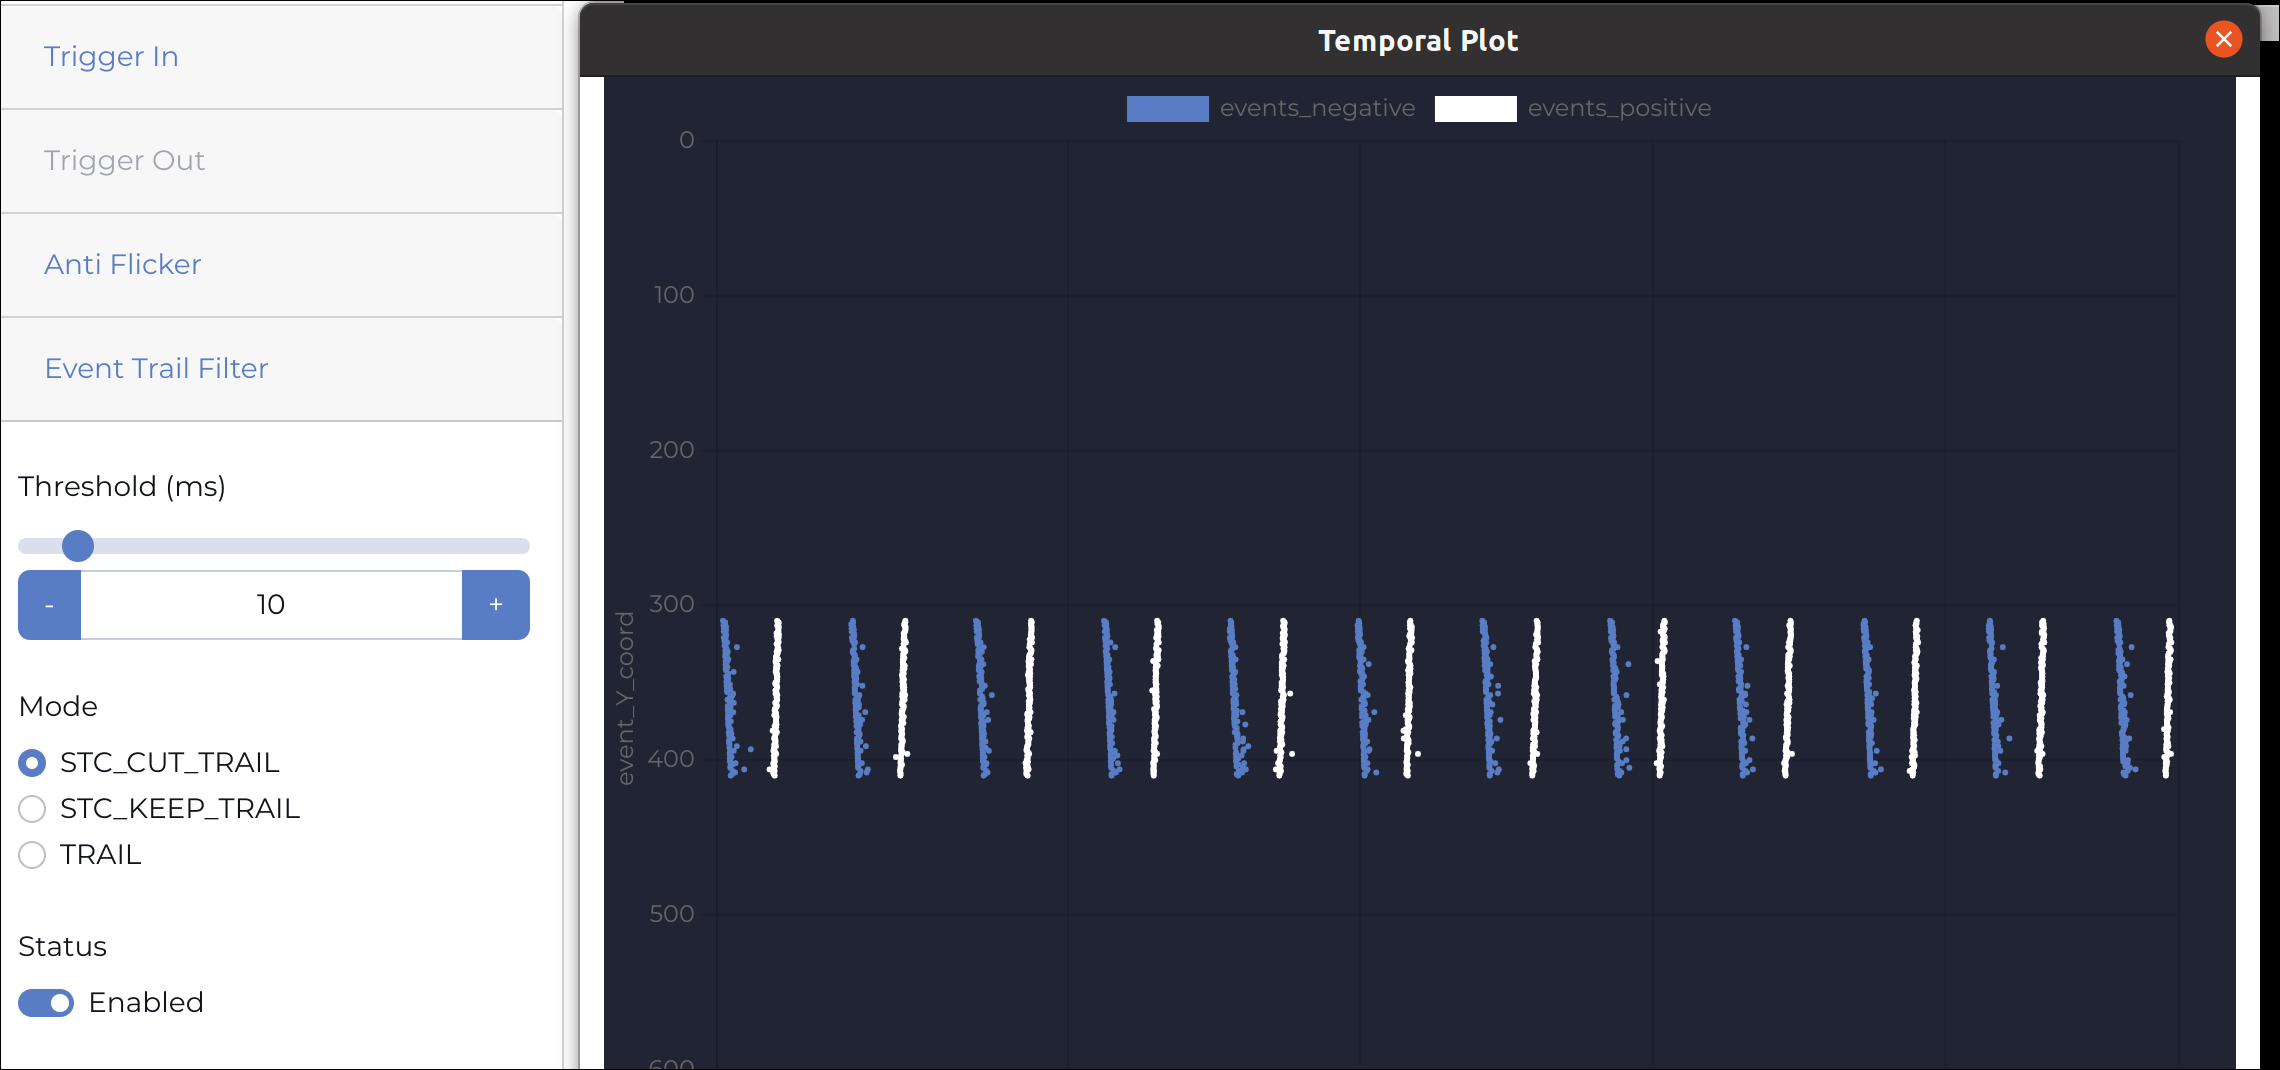
In the previous example, the effect of the refractory period was to only keep the first event of the event trail which is something that can also be achieved with a filter from the Event Signal Processing (ESP). For example, if we configure the Event Trail Filter with the STC option, we obtain a similar result:
The Temporal Plot feature offers versatile applications across various contexts, with numerous potential uses for you to explore.
Next steps
To go further, you can now explore the various use cases and applications that you may consider focusing on, alongside the other tools available.
If you can’t wait to start coding, check our getting started, programming guides and code samples and build your own solution using our C++ API or Python API.
To go even further, if you want to start building your own application from a Prophesee sensor, have a look at this application note to get some useful tips and good practices.
Note
Metavision Studio is leveraging Electron framework that is using multiple 3rd party open-source dependencies. A list of these Licenses is included in this page.