
Note
This guide is showing how to get started with the SDK Python API. If you are interested in the C++ API, follow the guide Get Started using C++
Get Started using Python API
In this Section, we will create a minimal sample to get started with Metavision SDK in Python. The goal of this sample is to introduce in the simplest possible way some basic concepts of Metavision SDK and create a first running example.
This tutorial will guide you in the creation of the source code step by step.
For convenience, the full source code can also be found in <install-prefix>/share/metavision/sdk/stream/python_samples/metavision_sdk_get_started
when installing Metavision SDK from installer or packages. For other deployment methods, check the page
Path of Samples.
Note
This guide leverages the SDK Stream clas CameraStreamSlicer
while several existing Python samples in the SDK continue to utilize the older SDK Core class EventsIterator
We recommend adopting the CameraStreamSlicer class
as it is built on the Camera class , which is also a cornerstone
of our C++ API. This alignment ensures that Python code written with the Slicer class is more consistent
with its C++ equivalent, facilitating easier comparisons, conversions, and future development.
Note also that in certain scenarios where precise control over data reading from your device is required (e.g. when to fetch data, when to decode or skip events etc), you may prefer to directly manage the data flow. For such detailed control, you can directly employ the HAL API, as demonstrated in the metavision_hal_get_started Python sample.
Start the camera
The first operation we want to do is to open the event-based camera or a pre-recorded event file.
With the SDK Stream Python API, both live cameras and event files can be managed seamlessly using the
CameraStreamSlicer class. Here’s how you can do it:
Create a Python script named metavision_sdk_get_started.py and paste the following code into it:
 1from metavision_sdk_stream import Camera, CameraStreamSlicer
 2
 3
 4def parse_args():
 5    import argparse
 6    """Parse command line arguments."""
 7    parser = argparse.ArgumentParser(description='Metavision SDK Get Started sample.',
 8                                     formatter_class=argparse.ArgumentDefaultsHelpFormatter)
 9    parser.add_argument(
10        '-i', '--input-event-file',
11        help="Path to input event file (RAW or HDF5). If not specified, the camera live stream is used.")
12    args = parser.parse_args()
13    return args
14
15
16def main():
17    args = parse_args()
18
19    if args.input_event_file:
20        camera = Camera.from_file(args.input_event_file)
21    else:
22        camera = Camera.from_first_available()
23
24    slicer = CameraStreamSlicer(camera.move())
25    for _ in slicer:
26        print("Events are available!")
27
28if __name__ == "__main__":
29    main()
To run the script, you will need to either connect an event-based camera or provide a RAW or HDF5 event file (you can pick a file among our Sample Recordings).
Execute the following command to process data from a live camera:
python metavision_sdk_get_started.py
Note
If you get the error “Camera not found. Check that a camera is plugged into your system and retry”, please refer to our camera troubleshooting FAQ entry.
Execute the following command to process data from a RAW file:
python metavision_sdk_get_started.py -i laser.raw
Note
We suggest that you run the samples in this section with an event file, as some functions are more complicated to demonstrate with a live camera.
If everything went fine, the output in your console should be similar to this:
...
Events are available!
Events are available!
Events are available!
Events are available!
Events are available!
Events are available!
Events are available!
...
Note
The large numbers of console outputs in this tutorial may slow down their execution.
If this creates problems or prevents you from testing the code, we suggest you remove all print
lines to improve execution speed.
Let’s analyze the sample line by line:
from metavision_sdk_stream import Camera, CameraStreamSlicer
This line imports the Camera and CameraStreamSlicer classes.
Camerais used to open either an event file or a live camera
CameraStreamSliceris responsible for retrieving events from thecamerainstance
if args.input_event_file:
    camera = Camera.from_file(args.input_event_file)
else:
    camera = Camera.from_first_available()
Depending on the command line parameters, an instance of the Camera
class can be built to read from a file (args.event_file_path has been specified with a valid Path) or to stream
from a camera (args.event_file_path is empty).
Next, we create a CameraStreamSlicer instance by transferring the
ownership of the camera instance to it:
slicer = CameraStreamSlicer(camera.move())
The for loop below demonstrates a simple operation: it prints Events are available as long as the iterator
from the camera or file continues to provide event-buffers (slices). In the case of an event file,
the CameraStreamSlicer will run until the recording is fully processed. For a live camera, it will continue indefinitely,
as long as the camera remains connected and operational.
for _ in slicer:
    print("Events are available!")
In this section, we explored how the CameraStreamSlicer class
can be used to open and manage a live camera or an event file seamlessly. In the next section, we will dive deeper
into how to use this iterator to read and process the events efficiently.
Get the events
Next, we’ll move on to a more advanced version of our Python code.
To proceed, update the content of your metavision_sdk_get_started.py file by replacing it with the code provided below:
 1from metavision_sdk_stream import Camera, CameraStreamSlicer
 2
 3
 4def parse_args():
 5    import argparse
 6    """Parse command line arguments."""
 7    parser = argparse.ArgumentParser(description='Metavision SDK Get Started sample.',
 8                                     formatter_class=argparse.ArgumentDefaultsHelpFormatter)
 9    parser.add_argument(
10        '-i', '--input-event-file',
11        help="Path to input event file (RAW or HDF5). If not specified, the camera live stream is used.")
12    args = parser.parse_args()
13    return args
14
15
16def main():
17    args = parse_args()
18
19    if args.input_event_file:
20        camera = Camera.from_file(args.input_event_file)
21    else:
22        camera = Camera.from_first_available()
23
24    global_counter = 0  # This will track how many events we processed
25    global_max_t = 0  # This will track the highest timestamp we processed
26
27    slicer = CameraStreamSlicer(camera.move())
28    for slice in slicer:
29        print("----- New event slice! -----")
30        if slice.events.size == 0:
31            print("The current event slice is empty.")
32        else:
33            min_t = slice.events['t'][0]   # Get the timestamp of the first event of this slice
34            max_t = slice.events['t'][-1]  # Get the timestamp of the last event of this callback
35            global_max_t = max_t  # Events are ordered by timestamp, so the current last event has the highest timestamp
36
37            counter = slice.events.size  # Local counter
38            global_counter += counter  # Increase global counter
39
40            print(f"There were {counter} events in this event slice.")
41            print(f"There were {global_counter} total events up to now.")
42            print(f"The current event slice included events from {min_t} to {max_t} microseconds.")
43            print("----- End of the event slice! -----")
44
45
46    # Print the global statistics
47    duration_seconds = global_max_t / 1.0e6
48    print(f"There were {global_counter} events in total.")
49    print(f"The total duration was {duration_seconds:.2f} seconds.")
50    if duration_seconds >= 1:  # No need to print this statistics if the total duration was too short
51        print(f"There were {global_counter / duration_seconds :.2f} events per second on average.")
52
53if __name__ == "__main__":
54    main()
When you execute it, the output should be similar to this:
...
----- New event slice! -----
There were 38220 events in this event slice.
There were 62108 total events up to now.
The current event slice included events from 7000 to 7999 microseconds.
----- End of the event slice! -----
----- New event slice! -----
There were 38824 events in this event slice.
There were 100932 total events up to now.
The current event slice included events from 8000 to 8999 microseconds.
----- End of the event slice! -----
...
To understand how this code works, let’s look at the processing loop (the for loop) and see how we compute
some simple statistics on the events and print them:
for slice in slicer:
    print("----- New event slice! -----")
    if slice.events.size == 0:
        print("The current event slice is empty.")
    else:
        min_t = slice.events['t'][0]   # Get the timestamp of the first event of this slice
        max_t = slice.events['t'][-1]  # Get the timestamp of the last event of this callback
        global_max_t = max_t  # Events are ordered by timestamp, so the current last event has the highest timestamp

        counter = slice.events.size  # Local counter
        global_counter += counter  # Increase global counter

        print(f"There were {counter} events in this event slice.")
        print(f"There were {global_counter} total events up to now.")
        print(f"The current event slice included events from {min_t} to {max_t} microseconds.")
        print("----- End of the event slice! -----")
In the loop, the CameraStreamSlicer produces event-buffers available as numpy structured arrays.
Note
In the output, you can observe that, by default, the slicer generates buffers every 1000 microseconds (1 millisecond). However, this behavior can be customized during the slicer’s instantiation by configuring the relevant parameters, though this is beyond the scope of this getting started guide
In the event buffers, each event is characterized by four attributes: the spatial coordinates x and y,
the polarity p, and the timestamp t. These attributes collectively define the properties of an individual event.
Hence, you can access the timestamp of the first event in a buffer using slice.events['t'][0].
With the events now accessible through the CameraStreamSlicer class,
we have a powerful foundation to work with. This enables us to develop a wide range of event-based algorithms
tailored to our specific needs
Once our instance of CameraStreamSlicer has been stopped
(that is, when the event file finishes), we can print global statistics of this file:
# Print the global statistics
duration_seconds = global_max_t / 1.0e6
print(f"There were {global_counter} events in total.")
print(f"The total duration was {duration_seconds:.2f} seconds.")
if duration_seconds >= 1:  # No need to print this statistics if the total duration was too short
    print(f"There were {global_counter / duration_seconds :.2f} events per second on average.")
In this section, we explored how to access and work with events. Specifically, we demonstrated counting the number of events received and inspecting some of their key characteristics. In the next section, we will take it a step further by creating a display to visually represent these events, making their behavior and patterns easier to interpret.
See also
If you’d like to dive deeper into the capabilities of the CameraStreamSlicer class,
you can check out our dedicated sample where
we demonstrate how to configure the slicing mode using command-line options, offering greater flexibility and control.
Add a display
As discussed in the previous sections, a camera (or an event file) generates a continuous stream of independent events rather than ready-to-display frames. Hence, to visualize these events, we must artificially construct frames by accumulating events over a specified period.
There are several approaches to creating such frames, but the simplest is to build a binary frame: starting with an empty frame where each pixel is initialized to zero, we set the corresponding pixel to one whenever an event occurs.
To achieve this, we need to define two key parameters:
The equivalent FPS: the frequency at which the frames are generated.
The accumulation time: the duration over which events are collected to form each frame.
For further insights into these concepts, refer to the documentation on Event-Based Concepts
Constructing frames from scratch, while feasible, can be a complex and time-consuming process.
Fortunately, the Metavision SDK provides a convenient solution with the metavision_sdk_core.BaseFrameGenerationAlgorithm class.
To use it, we first need to include the BaseFrameGenerationAlgorithm class
and the metavision_sdk_ui.Window class:
from metavision_sdk_stream import Camera, CameraStreamSlicer
Then we will:
create our
CameraStreamSliceras we have done beforeretrieve the resolution of the camera/file to create using
slicer.camera().width()andslicer.camera().height()create our frame at the proper resolution where each pixel is initialized to zero
initiate the Graphical User Interface using a context manager (
with). We use aMetavision::MTWindowthat owns an internal rendering thread allowing a fixed frequency display synchronized with the screen’s refresh rate.
slicer = CameraStreamSlicer(camera.move())
width = slicer.camera().width()
height = slicer.camera().height()
frame = np.zeros((height, width, 3), np.uint8)

with MTWindow(title="Metavision SDK Get Started", width=width, height=height,
              mode=BaseWindow.RenderMode.BGR) as window:
    def keyboard_cb(key, scancode, action, mods):
        if key == UIKeyEvent.KEY_ESCAPE or key == UIKeyEvent.KEY_Q:
            window.set_close_flag()

    window.set_keyboard_callback(keyboard_cb)
In this code, we monitor user input for the q or Escape key. When either of these keys is pressed, the program exits
the loop, effectively terminating execution. This improvement enables us to gracefully stop the program even
when using a live camera—a capability that was absent in earlier versions of our code.
Then:
we poll input system’s events from the main thread and send to the window using the
poll_and_dispatchfunctionwe pass the events from the slicer to the frame generator, so that it can accumulate them and create the frame for visualization
we display the frame using the
show_asyncfunction
    EventLoop.poll_and_dispatch()
    BaseFrameGenerationAlgorithm.generate_frame(slice.events, frame)
    window.show_async(frame)
Note
Remember that the full source code can also be found in <install-prefix>/share/metavision/sdk/stream/python_samples/metavision_sdk_get_started
when installing Metavision SDK from installer or packages. For other deployment methods,
check the page Path of Samples.
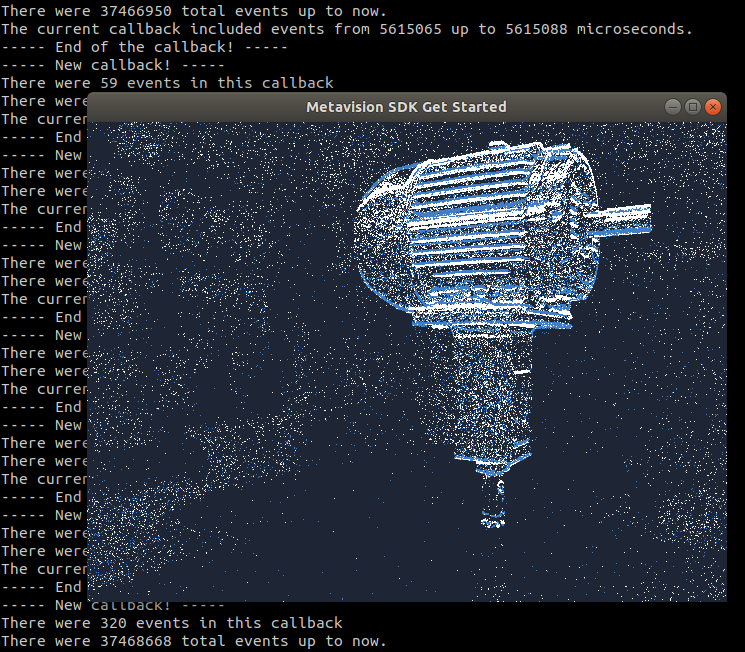
Once ready, execute your code. This is the expected results:
Next steps
In this page, we introduced a minimal example of how to use the SDK Python API to open a camera, compute some simple statistics on the received events, and visualize the events.
We encourage you to dive deeper by exploring more advanced examples on our samples page or by following our comprehensive programming guides. Expand your skills and discover what’s possible!