
Note
This C++ sample has a corresponding Python sample.
Jet Monitoring using C++
The Analytics API provides algorithms to monitor jets (i.e. dots) that are being dispensed.
The sample metavision_jet_monitoring.cpp shows how to detect, count and timestamp jets (i.e. dots) that are being dispensed.
The sample metavision_jet_monitoring_calibration.cpp allows calibrating the Regions Of Interest (ROIs) used in the sample.
The ROIs are used for the following purposes:
the camera ROI to reduce the amount of acquired data (decreasing the total event rate while acquiring all data in the ROI)
the detection ROI to interpret a peak in the event rate as a jet
The source code of those files can be found in <install-prefix>/share/metavision/sdk/analytics/cpp_samples/metavision_jet_monitoring
and <install-prefix>/share/metavision/sdk/analytics/cpp_samples/metavision_jet_monitoring_calibration
when installing Metavision SDK from installer or packages. For other deployment methods, check the page
Path of Samples.
Expected Output
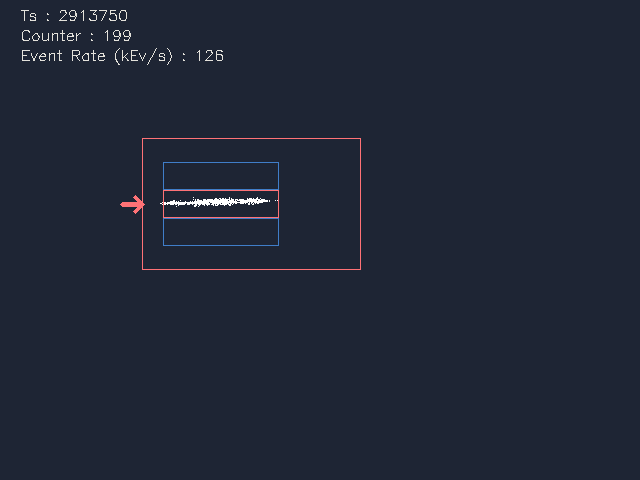
Metavision Jet Monitoring sample visualizes
the events triggered by the dispensed jets,
the ROIs:
the ROI used by the camera (shown by red color)
the ROI used for detection (shown by red color)
two surrounding background activity ROIs (shown by blue color)
the event rate
the output jet counter
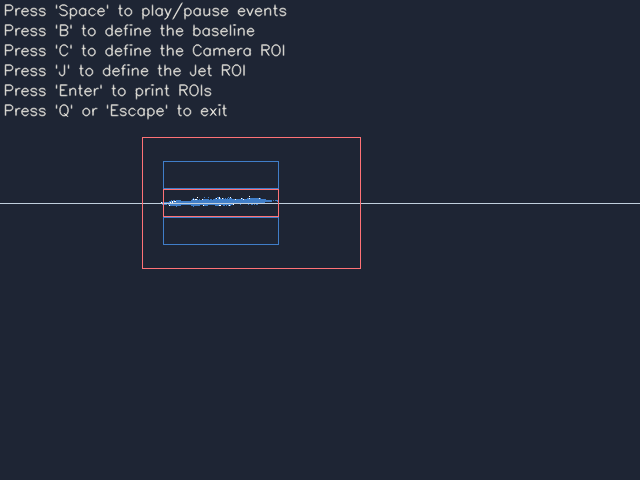
The following image shows an example of output displayed by the calibration tool:
The following image shows an example of output displayed by the monitoring sample:
Setup & requirements
Camera
To accurately monitor jets, it is very important to fulfill some conditions:
the camera should be static and the object in focus
there should be good contrast between the background and the jet
set the camera to have minimal background noise (for example, remove flickering lights)
The counting ROI should be as small as possible, but still being able to contain a ‘nominal’ jet:
if too small, the algorithm precision is affected: we may miss counts
if too large, the algorithm precision is affected: we may add count due to jet unrelated activity
Finally, depending on the speed of the jets you might have to tune the sensor biases to get better data (make the sensor faster and/or less or more sensitive).
Calibration
Make sure to run the calibration tool before using Metavision Jet Monitoring sample. Here’s how to retrieve the camera and detection ROIs.
Plug the camera to your computer and launch the calibration tool. A window displaying events should appear.
Make sure the picopulse nozzle arrow is in the field of view of the camera.
Rotate the camera to align the base of the dispenser with the vertical.
Translate the camera to shift the base of the dispenser to the center-left part of the image.
Focus the camera on the dispenser’s nozzle.
Position the laser to make it point right under the nozzle. Run the dispenser in continuous mode to check it.
Press ‘Space’ when the jet is clearly visible on the display of events.
Press ‘B’ to define the baseline, i.e. the jet direction.
Press ‘J’ to define the Jet/Detection ROI.
Press ‘C’ to define the Camera ROI.
Press ‘Enter’ to print the Camera and Detection ROIs in the console.
Hopefully, if the system does not move, you should not have to go over this calibration phase again.
How to start
You can directly execute pre-compiled binary installed with Metavision SDK or compile the source code as described in this tutorial.
Calibration Tool
To start the calibration tool based on the live stream from your camera, run:
Linux
./metavision_jet_monitoring_calibration
Windows
metavision_jet_monitoring_calibration.exe
Monitoring
To start the sample based on 200_jets_at_200hz.hdf5 file from our Sample Recordings:
Linux
./metavision_jet_monitoring -i 200_jets_at_200hz.hdf5
Windows
metavision_jet_monitoring.exe -i 200_jets_at_200hz.hdf5
To start the monitoring sample based on the live stream from your camera, use the nozzle position obtained during the calibration (instead of the placeholders) and run:
Linux
./metavision_jet_monitoring --detection-roi Jet_X Jet_Y Jet_WIDTH Jet_HEIGHT --camera-roi Cam_X Cam_Y Cam_WIDTH Cam_HEIGHT
Windows
metavision_jet_monitoring.exe --detection-roi Jet_X Jet_Y Jet_WIDTH Jet_HEIGHT --camera-roi Cam_X Cam_Y Cam_WIDTH Cam_HEIGHT
To start the sample based on recorded data, provide the full path to a RAW or HDF5 event file (instead of FILENAME):
Linux
./metavision_jet_monitoring -i FILENAME --detection-roi Jet_X Jet_Y Jet_WIDTH Jet_HEIGHT --camera-roi Cam_X Cam_Y Cam_WIDTH Cam_HEIGHT
Windows
metavision_jet_monitoring.exe -i FILENAME --detection-roi Jet_X Jet_Y Jet_WIDTH Jet_HEIGHT --camera-roi Cam_X Cam_Y Cam_WIDTH Cam_HEIGHT
To check for additional options:
Linux
./metavision_jet_monitoring -h
Windows
metavision_jet_monitoring.exe -h