
Customizing Prophesee plugin and firmware for CX3-based camera
This guide targets customers who purchased an RDK3 to design a custom camera based on the CX3 IC by leveraging Prophesee firmware and plugin.
It can also be useful to customers with EVK3 or EVK4 that requires a firmware update.
The main modification that you will need to perform is to assign you own VendorID/ProductID (VID/PID) to the camera. To so so, you will have to update the source code of:
RDK3 camera Firmware
Prophesee camera Plugin
Firmware update
Open the file
Prophesee_firmware_sources/src/Applicative_Firmware/evk3_usb_descriptors.cand modify the VID/PID accordingly: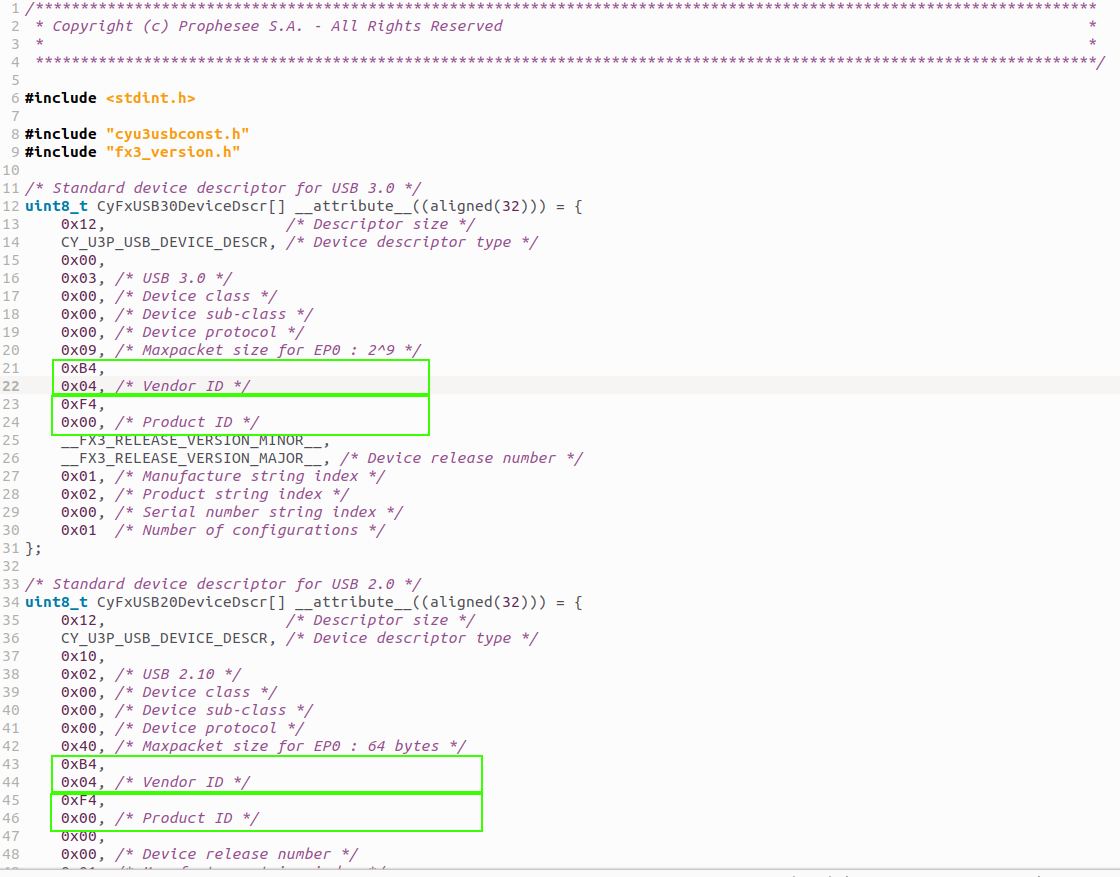
Note
If you want to apply further changes in the source, you can refer to the CX3 documentation
Modify the metavision_cx3_updater file (available in OpenEB) so that you can use it with your own VID/PID:

Flash the new image in the camera using
metavision_cx3_updaterapplication as explained in this guide
If your camera is running the Prophesee firmware (so with a supported VID/PID by Prophesee), you can use the official
metavision_cx3_updater. However, note that at the end of the upgrade, the camera will have the new VID/PID you just assigned and will not be recognized anymore bymetavision_cx3_updater.If your camera is running a firmware with a VID/PID not initially present in the
metavision_cx3_updaterlist, you should be able to flash the camera after you have applied the modification mentioned in the previous point.
Plugin update
Here, we outline the procedure for creating the new plugin on a Linux OS. The steps should be similar for Windows OS.
Fetch the OpenEB source code (version 3.0 minimum, preferably latest version).
in the
hal_psee_pluginsfolder of the repository, copypsee_universal.cppfile intomy_custom_plugin.cpp:/hal_psee_plugins ├── lib │ ├── CMakeLists.txt │ ├── ... ├── src │ ├── plugin │ │ ├── CMakeLists.txt │ │ ├── psee_universal.cpp │ │ ├── my_custom_plugin.cpp <== new file
in
my_custom_plugin.cpp, replace those lines:// Register the known USB vendor ID, with the subclass used for Treuzell tz_cam_discovery->add_usb_id(0x03fd, 0x5832, 0x19); tz_cam_discovery->add_usb_id(0x03fd, 0x5832, 0x0); tz_cam_discovery->add_usb_id(0x04b4, 0x00f4, 0x19); tz_cam_discovery->add_usb_id(0x04b4, 0x00f5, 0x19);by those lines:
// Register the known USB vendor ID, with the subclass used for Treuzell
tz_cam_discovery->add_usb_id(<my_vendor_id>, <my_product_id>, 0x19);
Modify two
CMakeLists.txtfiles in order to build properly the new created plugin:
In the file
/hal_psee_plugins/src/plugin/CMakeLists.txt, below the linetarget_sources(hal_plugin_prophesee PRIVATE ${CMAKE_CURRENT_SOURCE_DIR}/psee_universal.cpp)add a new target_sources:
target_sources(my_hal_plugin_name PRIVATE ${CMAKE_CURRENT_SOURCE_DIR}/my_plugin.cpp)In the file
/hal_psee_plugins/lib/CMakeLists.txt, add the name of your plugin by changing this:set(plugin_list hal_plugin_prophesee )into that:
set(plugin_list
    hal_plugin_prophesee
    my_hal_plugin_name
)
Then above this block of code:
if(EXISTS "${PROJECT_SOURCE_DIR}/licensing/LICENSE_METAVISION_SDK")
    install(FILES ${PROJECT_SOURCE_DIR}/licensing/LICENSE_METAVISION_SDK
       DESTINATION share/metavision/licensing)
endif()
add the following code:
set(my_plugin_list my_hal_plugin_name hal_plugin_prophesee)
foreach(my_plugin ${my_plugin_list})
    foreach(object ${lib_obj_list})
        # Linkage with generic hal plugin object
        target_sources(${my_plugin}
            PRIVATE
            $<TARGET_OBJECTS:${object}>
        )
        target_link_libraries(${my_plugin}
            PRIVATE
            ${object}
        )
    endforeach()
endforeach()
OpenEB includes the
metavision_psee_hw_layerlibrary, which provides application developers with access to device-specific implementations. Detailed information can be found on the Hardware Layer Library page.If you are designing a custom camera plugin, you should apply one of the following modifications to tailor the library to your needs:
Rename the Library: Replace
metavision_psee_hw_layerwith a custom name, such asmetavision_mycompany_hw_layer, to reflect your custom implementation.Remove the Library: Exclude the compilation of this library from the CMake files if it is not required for your application. This library is optional; refer to the Hardware Layer Library page for further explanations.
Now you should compile OpenEB by following the OpenEB install guide for Linux.
Note that at the step requiring to set the udev rules:
sudo cp <OPENEB_SRC_DIR>/hal_psee_plugins/resources/rules/*.rules /etc/udev/rules.d
sudo udevadm control --reload-rules
sudo udevadm trigger
You will need to create and add manually your udev rules file (which has your VID).
To do so you, add a file
my_cyusb_file.rulesin the folder/hal_psee_plugins/resources/rules:/hal_psee_plugins ├── resources │ ├── rules │ │ ├── 88-cyusb.rules │ │ ├── 99-cyusb.rules │ │ ├── my_cyusb_file.rules <== new fileYou can just copy and edit the file
88-cyusb.rulesand replace the VID0x04b4by your vendor_id (line 3 and 5 of the file).Note
The equivalent step on Windows is the section related to
wdi-simple.exefrom the OpenEB Windows install guide.
Final steps
After the plugin compilation, you can plug your camera to the PC and check your camera settings
with the command metavision_platform_info --system.
To get more detailed logs, you can set the environment variable MV_LOG_LEVEL to TRACE
as explain in this FAQ entry.
If everything went well, you should be able to stream with your camera using Metavision Viewer.