
Installation of SDK on Windows with installer
This section describes how to install Metavision SDK on Windows 11 64-bit.
Note
Metavision SDK comes as pre-built Windows installer of our whole software offer. If you want to work from source (for example, to compile on platforms other than those we officially support), follow the specific guide on the Installation of SDK on Windows from sources.
Table of Contents
See also
Before following this installation guide, you may want to watch our EVK4 unboxing video as it includes an overview of the installation of Metavision SDK on Windows along the first steps with the EVK.
Supported Cameras
Metavision SDK comes with a Prophesee camera plugin, enabling:
Streaming live data from Prophesee event-based cameras,
Reading recordings of event-based data.
Currently supported cameras are:
If you want to use a Prophesee EVK that is not listed above, it might have been discontinued. Refer to the Prophesee EVKs Support section to find out which previous version of the SDK is supporting it.
If you own a third-party vendor event-based camera, refer to the Camera Plugin Installation page to see how it can be deployed and configured.
Required Configuration
Please note the minimum system requirements for using Metavision SDK:
Operating system: Windows 11 64-bit
Architecture: amd64 (a.k.a. x64)
Graphics card: must support at least OpenGL 3.0
CPU: must support AVX2
To install the SDK on Linux, see the page SDK installation on Linux from packages.
Required Artifacts
When installing Metavision SDK using Windows installer, the required artifact should be retrieved from our JFrog Artifactory APT server:
If you don’t have a Prophesee Microsoft Entra ID account yet, request one by completing this form
Ensure you are not currently logged into any other domains with a Microsoft Entra ID account besides Prophesee. To avoid conflicts, consider using a private or incognito browsing window, which will isolate your login session.
Connect to https://propheseeai.jfrog.io
Choose “SAML SSO” login type
Enter your Entra ID credentials. Your login should follow this format: jdoe@customers.prophesee.ai
The windows installers can then be found at this URL or can also be retrieved by browsing the Artifacts menu (metavision-sdk-5-windows-nc / main / windows-11).
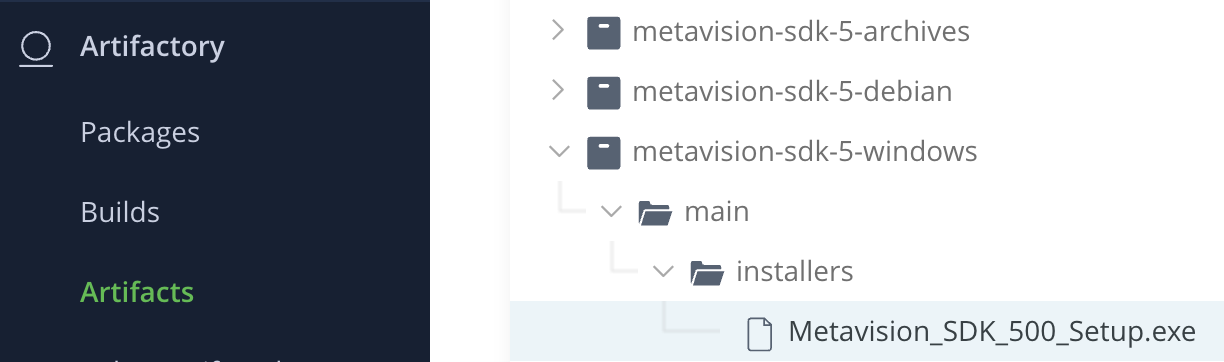
Among the list of SDK Windows installers (
Metavision_SDK_xyz_Setup.exe), download the one with highest version number
Upgrading Metavision
If you are upgrading Metavision from a previous version, you should carefully read the Release Notes as some changes may impact your usage of our SDK (e.g. API updates) and cameras (e.g. firmware update might be necessary).
Then, if you have previously installed any Prophesee software, you will need to uninstall it first:
Make sure that no Prophesee or Metavision software is running
Open the Start menu
Click Settings
Search for Apps & features via the search
In the list of installed programs, find any Prophesee or Metavision software and click the Uninstall button
Check that there is no
Propheseefolder left in yourProgram Filesfolder (if still present, delete it)
Warning
Removing the old version of Metavision SDK is mandatory even for patch upgrades (e.g. from x.y.0 to x.y.1)
SDK Installation
To install the SDK, simply run the SDK installer and follow the instructions.
Additional Dependencies
If you plan to use only Metavision Studio for now, you can skip the rest of this section.
If you intend to run code samples or tutorials, you will need to install additional dependencies.
Installing FFMPEG
Install FFMPEG library, which is required to write videos:
Add the
bindirectory of FFMPEG to yourPATH
Installing Python
To run our Python Samples and use the Python API, you will need Python and some additional libraries.
If Python is not available on your system, install it:
Download the installer for one of the supported Python versions:
Python 3.12 (“Windows installer (64-bit)”)
Python 3.11 (“Windows installer (64-bit)”)
Python 3.10 (“Windows installer (64-bit)”)
Run the installer and follow the prompt
Add Python install and script directories in your
PATHand make sure they are listed before theWindowsAppsfolder which contains a Python alias launching the Microsoft Store. So, if you installed Python 3.10 in the default path, your userPATHshould contain those three lines in that order:%USERPROFILE%\AppData\Local\Programs\Python\Python310 %USERPROFILE%\AppData\Local\Programs\Python\Python310\Scripts %USERPROFILE%\AppData\Local\Microsoft\WindowsApps
We recommend using Python with virtualenv to avoid conflicts with other installed Python packages.
Create a virtual environment:
python -m venv C:\tmp\prophesee\py3venv --system-site-packages
When creating the virtual environment, it is necessary to use the --system-site-packages option to ensure that
the SDK packages installed in the system directories are accessible. However, this option also makes your local
user site-packages visible by default. To prevent this and maintain a cleaner virtual environment,
you should set the environment variable PYTHONNOUSERSITE to true (which you may add to your system configuration to make it permanent):
set PYTHONNOUSERSITE=true
Finally, install the necessary dependencies:
C:\tmp\prophesee\py3venv\Scripts\python -m pip install pip --upgrade
C:\tmp\prophesee\py3venv\Scripts\python -m pip install -r "C:\Program Files\Prophesee\share\metavision\python_requirements\requirements_openeb.txt" -r "C:\Program Files\Prophesee\share\metavision\python_requirements\requirements_sdk_advanced.txt" -r "C:\Program Files\Prophesee\share\metavision\python_requirements\requirements_pytorch_cpu.txt"
Optionally, you can run the activate command (C:\tmp\prophesee\py3venv\Scripts\activate) to modify your shell’s environment variables,
setting the virtual environment’s Python interpreter and scripts as the default for your current session.
This allows you to use simple commands like python without needing to specify the full path each time.
For simplicity, throughout the documentation of the Code Samples, we will assume
the python command refers to the interpreter within the activated virtual environment.
Note
You can also use anaconda to install Python and
conda to manage your Python packages, but be sure to use a Python version that we support.
You will need to adapt the library installation steps accordingly and use conda whenever we use pip.
In addition, check that conda PYTHONPATH contains the aforementioned PATH. For example for Python 3.10:
%USERPROFILE%\AppData\Local\Programs\Python\Python310
%USERPROFILE%\AppData\Local\Programs\Python\Python310\Scripts
%USERPROFILE%\AppData\Local\Microsoft\WindowsApps
If not, add them. For example with sys.path.append() method of python module sys:
import sys
print(sys.path)
# Add %USERPROFILE%\AppData\Local\Programs\Python\Python310 to PYTHONPATH if the output of print(sys.path) does not mention it.
sys.path.append("%USERPROFILE%\AppData\Local\Programs\Python\Python310")
In this documentation, we chose to use pip as a package manager.
Installing Dependencies for Machine Learning Module
To use Machine Learning features, you need to install some additional dependencies.
If you have some Nvidia hardware with GPUs, you can optionally install CUDA and cuDNN to leverage them with PyTorch and LibTorch. Make sure that you install a version of CUDA that is compatible with your GPUs by checking Nvidia compatibility page.
Note
At the moment, we don’t support OpenCL and AMD GPUs.
LibTorch for C++
To compile and run the ML C++ samples that leverage the Torch library, you need LibTorch (PyTorch’s C++ frontend):
Download the LibTorch version corresponding to the CUDA version with which our Machine Learning library was compiled (12.8):
Unzip the archive as a new folder
LIBTORCH_DIR_PATHAdd
LIBTORCH_DIR_PATH\libto yourPATH(in Advanced system setting / Environment Variables) to be able to compile the ML samples depending on libtorch
ONNX Runtime for C++
Optionally, you can install ONNX Runtime to run ML samples providing ONNX models:
Download the archive for v1.23.2:
Extract the archive to any location (referred to as ONNX_FOLDER). The folder should contain include and lib directories.
You can then use the -DUSE_ONNXRUNTIME=ON and -DONNXRUNTIME_DIR=${ONNX_FOLDER} flags in the cmake command to configure the project with enabled ONNX Runtime.
Camera Plugins
Prophesee camera plugin is included in the SDK, and the drivers for most of the Prophesee cameras are deployed during the installation.
If Metavision software does not detect your EVK or partner’s camera, check the FAQ entry on installing EVK3 driver.
If you are using a third-party camera, you need to follow the instructions provided by the camera vendor
to install the driver and the camera plugin. Make sure that you reference the location of the plugin in
the MV_HAL_PLUGIN_PATH environment variable.
If you are using a third-party camera, you need to follow the instructions provided by the camera vendor
to install the driver and the camera plugin. Make sure that you reference the location of the plugin in
the MV_HAL_PLUGIN_PATH environment variable.
Get started!
You are now ready to use Metavision SDK. The best way to start getting familiar with the event-based technology is to open an event-based camera with Metavision Studio to begin data collection and visualization. You can choose to dive directly in the SDK by following a getting started guide or looking at a Code Sample.
If you want to use the Machine Learning modules, ensure that you have installed the required additional dependencies for ML module.