
Installation of SDK on Linux Ubuntu from Sources
This section describes how to install Metavision SDK on Linux Ubuntu 22.04 and 24.04 64-bit from sources. Compilation on other versions of Ubuntu or other Linux distributions was not tested. For those platforms some adjustments to this guide or to the code itself may be required (specially for non-Debian Linux).
Note
If you don’t own Metavision SDK, you can still have access to the source code of the Open modules (Base, Core, Core ML, Stream, UI, and HAL), and compiling our open source project OpenEB will be enough if you plan to work only with open modules. In that case, follow the specific guide on the Installation of OpenEB.
Table of Contents
Supported Cameras
Metavision SDK contains the source code of the Prophesee camera plugin, enabling streaming of data from our event-based cameras and to read recordings of event-based data. The supported cameras are:
If you want to use a Prophesee EVK that is not in the list above, it might have been discontinued. Refer to the Prophesee EVKs Support section to find out which previous version of the SDK is supporting it.
If you own a third-party vendor event-based camera, refer to the Camera Plugin Installation page to see how it can be deployed and configured.
Required Configuration
Compilation and execution were tested on platforms that meet the following requirements:
Operating system: Linux Ubuntu 22.04 or 24.04 64-bit
Architecture: amd64 (a.k.a. x64)
Graphics card: must support at least OpenGL 3.0
To install the SDK on Windows, check the page Installation of SDK on Windows.
Required Artifacts
To compile Metavision SDK on Linux, you will need some source code archives available in our JFrog Artifactory APT server.
To download those archives, follow those steps:
If you don’t have a Prophesee Microsoft Entra ID account yet, request one by completing this form
Ensure you are not currently logged into any other domains with a Microsoft Entra ID account besides Prophesee. To avoid conflicts, consider using a private or incognito browsing window, which will isolate your login session.
Connect to https://propheseeai.jfrog.io
Choose “SAML SSO” login type
Enter your Entra ID credentials. Your login should follow this format: jdoe@customers.prophesee.ai
The source code archives can then be found at this URL or can also be retrieved by browsing the Artifacts menu (metavision-sdk-5-archives-nc / main / sources).
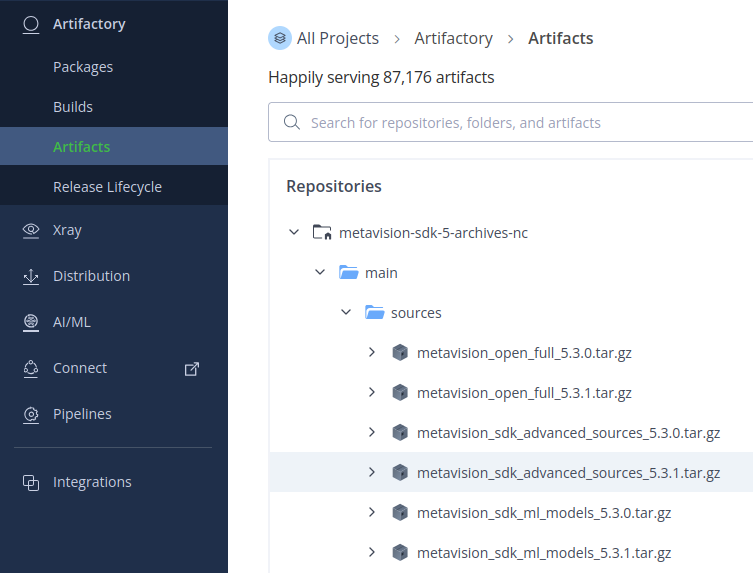
Download the following files:
metavision_open_full_x.y.z.tar.gz(OpenEB)
metavision_sdk_advanced_sources_x.y.z.tar.gz(Advanced modules and standalone applications)
Upgrading Metavision
If you are upgrading Metavision SDK from a previous version, you should carefully read the Release Notes as some changes may impact your usage of our SDK (e.g. API updates) and cameras (e.g. firmware update might be necessary).
Then, you need to clean your system from previously installed Prophesee software. If after a previous compilation, you chose to
deploy the Metavision SDK files in your system path, then go to the build folder in the source code directory and
launch the following command to remove those files:
sudo make uninstall
In addition, remove Prophesee or Metavision SDK folders and files in your system paths (/usr/include, /usr/lib, /usr/bin, /usr/share
along with their /usr/local equivalents) and in your environment variables (PATH, PYTHONPATH and LD_LIBRARY_PATH).
Preparation of the source code
First, extract the content of the archive metavision_open_full_x.y.z.tar:
tar -xvf metavision_open_full_x.y.z.tar.gz
This will create the folder openeb-x.y.z containing OpenEB source code.
The absolute path to this directory is called MV_SDK_SRC_DIR in the next sections.
Then extract the advanced source archive in MV_SDK_SRC_DIR:
tar -xvf metavision_sdk_advanced_sources_x.y.z.tar -C <MV_SDK_SRC_DIR>
Prerequisites
Installing General Dependencies
Install the following dependencies:
sudo apt update
sudo apt -y install apt-utils build-essential software-properties-common wget unzip curl git cmake
sudo apt -y install libopencv-dev libboost-all-dev libusb-1.0-0-dev libprotobuf-dev protobuf-compiler libeigen3-dev libceres-dev
sudo apt -y install libhdf5-dev hdf5-tools libglew-dev libglfw3-dev libcanberra-gtk-module ffmpeg
Optionally, if you want to run the tests, you need to install Google Gtest and Gmock packages. For more details, see Google Test User Guide :
sudo apt -y install libgtest-dev libgmock-dev
To execute our Python Samples and use the Python API, you will need Python and some additional libraries. If you plan to use only Metavision Studio for now, you can skip this Python dependencies section.
We support Python 3.9 and 3.10 on Ubuntu 22.04 and Python 3.11 and 3.12 on Ubuntu 24.04.
We recommend using Python with virtualenv to avoid conflicts with other installed Python packages. So, first install it along with some Python development tools:
sudo apt -y install python3.x-venv python3.x-dev
# where "x" is 9, 10, 11 or 12 depending on your Python version
Next, create a virtual environment:
python3 -m venv /tmp/prophesee/py3venv --system-site-packages
When creating the virtual environment, it is necessary to use the --system-site-packages option to ensure that
the SDK packages installed in the system directories are accessible. However, this option also makes your local
user site-packages visible by default. To prevent this and maintain a cleaner virtual environment,
you should set the environment variable PYTHONNOUSERSITE to true (which you may add to your ~/.bashrc to make it permanent):
export PYTHONNOUSERSITE=true
Finally, install the necessary dependencies:
/tmp/prophesee/py3venv/bin/python -m pip install pip --upgrade
/tmp/prophesee/py3venv/bin/python -m pip install -r MV_SDK_SRC_DIR/utils/python/requirements_openeb.txt -r MV_SDK_SRC_DIR/utils/python/requirements_sdk_advanced.txt -r MV_SDK_SRC_DIR/utils/python/requirements_pytorch_cpu.txt
Optionally, you can run the activate command (source /tmp/prophesee/py3venv/bin/activate) to modify your shell’s environment variables,
setting the virtual environment’s Python interpreter and scripts as the default for your current session.
This allows you to use simple commands like python without needing to specify the full path each time.
For simplicity, throughout the documentation of the Code Samples, we will assume
the python command refers to the interpreter within the activated virtual environment.
Note
You can use anaconda to install Python and
conda to manage your Python packages, but be sure to use a Python version that we support.
You will need to adapt the library installation steps accordingly and use conda whenever we use pip.
In addition, check that conda PYTHONPATH contains /usr/lib/python3/dist-packages/. If not, add it. For example with sys.path.append() method of python module sys:
import sys
print(sys.path)
# Add /usr/lib/python3/dist-packages/ to PYTHONPATH if the output of print(sys.path) does not mention it.
sys.path.append("/usr/lib/python3/dist-packages/")
In this documentation, we chose to use pip as a package manager.
The Python bindings of the C++ API rely on the pybind11 library (version >= 2.11.0).
Note
pybind11 is required only if you want to use the Python bindings of the C++ API. You can skip compiling these bindings by passing the argument -DCOMPILE_PYTHON3_BINDINGS=OFF during compilation (see step 3 of the compilation below). This allows you to skip installing pybind11, but you won’t be able to use our Python interface to the C++ API.
Unfortunately, there is no pre-compiled version of pybind11 available, so you need to install it manually:
wget https://github.com/pybind/pybind11/archive/v2.11.0.zip
unzip v2.11.0.zip
cd pybind11-2.11.0
mkdir build && cd build
cmake .. -DPYBIND11_TEST=OFF
cmake --build .
sudo cmake --build . --target install
Prerequisites for the CV module
To compile the XYT application from the CV module. You’ll need to install Ogre3D, a graphic engine for 3D rendering.
sudo apt install libogre-1.12-dev libimgui-dev libfreetype-dev
Prerequisites for the CV3D module
To use the CV3D module, you need to install a third-party Sophus library that is required to handle geometric transformation problems:
You need to install version 1.22.10 of Sophus:
wget https://github.com/strasdat/Sophus/archive/1.22.10.zipUnzip and go to the Sophus directory:
unzip 1.22.10.zip
cd Sophus-1.22.10
mkdir build && cd build
Compile and install:
cmake -DSOPHUS_USE_BASIC_LOGGING=ON ..
cmake --build . --config Release
sudo cmake --build . --target install
Prerequisites for the ML module
To use Machine Learning features, you need to install some additional dependencies. If you have some Nvidia hardware with GPUs, you can optionally install CUDA and cuDNN to leverage them with PyTorch and LibTorch. Make sure that you install a version of CUDA that is compatible with your GPUs by checking Nvidia compatibility page.
Note
At the moment, we don’t support OpenCL and AMD GPUs.
LibTorch for C++
To compile and run the ML C++ samples that leverage the Torch library, you need LibTorch (PyTorch’s C++ frontend):
Download the LibTorch version corresponding to your CUDA version (or take the CPU version if you don’t have CUDA):
Unzip the archive as a new folder
LIBTORCH_DIR_PATH. For example, for the CPU version:unzip libtorch-cxx11-abi-shared-with-deps-2.9.1+cpu.zip -d ${LIBTORCH_DIR_PATH}LibTorch is delivered with a copy of libgtest libraries. Those should be removed to avoid conflicts:
rm ${LIBTORCH_DIR_PATH}/lib/libgtest.a
rm ${LIBTORCH_DIR_PATH}/lib/libgtest_main.a
Finally, you need to add to add LIBTORCH_DIR_PATH/lib in
LD_LIBRARY_PATH(which you may add to your~/.bashrcto make it permanent):export LD_LIBRARY_PATH=$LD_LIBRARY_PATH:${LIBTORCH_DIR_PATH}/lib
ONNX Runtime for C++
Optionally, you can install ONNX Runtime to run ML samples providing ONNX models:
Download the archive for v1.23.2:
Extract the archive to any location (referred to as ONNX_FOLDER). The folder should contain include and lib directories.
You can then use the -DUSE_ONNXRUNTIME=ON and -DONNXRUNTIME_DIR=${ONNX_FOLDER} flags in the cmake command to configure the project with enabled ONNX Runtime.
Prerequisites for standalone apps
To be able to compile Metavision Studio, you need to install NodeJS. You can either follow the full NodeJS install guide of execute the following commands:
sudo apt-get update
sudo apt-get install -y ca-certificates gnupg
sudo mkdir -p /etc/apt/keyrings
curl -fsSL https://deb.nodesource.com/gpgkey/nodesource-repo.gpg.key | sudo gpg --dearmor -o /etc/apt/keyrings/nodesource.gpg
echo "deb [signed-by=/etc/apt/keyrings/nodesource.gpg] https://deb.nodesource.com/node_16.x nodistro main" | sudo tee /etc/apt/sources.list.d/nodesource.list
sudo apt-get update
sudo apt-get install nodejs -y
Warning
Metavision Studio is only compatible with amd64 (x64) architectures at the moment. If you try to compile/run it on other platforms (e.g. arm64) it will not work without modifications that we did not explore yet.
Compilation
To compile SDK, now follow those steps:
open the
MV_SDK_SRC_DIRdirectory
cd MV_SDK_SRC_DIR
Create and open the build directory
mkdir build && cd build
Generate the makefiles using CMake:
If applicable, make sure your virtual environment is activated (
source /tmp/prophesee/py3venv/bin/activate)cmake .. -DCMAKE_BUILD_TYPE=Release -DBUILD_TESTING=OFF -DUSE_SOPHUS=ON -DUSE_TORCH=ON -DTorch_DIR=<LIBTORCH_DIR_PATH>/share/cmake/Torch/You can modify the installation command to suit the specific modules you wish to include or exclude. Here are some common adjustments you can make:
to exclude the CV3D module, remove the Sophus option from the command
to exclude the Machine Learning (ML) module, remove the Torch options from the command
to exclude Metavision Studio, add
-DCOMPILE_METAVISION_STUDIO=OFFto the commandNote
If you want to specify to cmake which version of Python to consider, you should use the option
-DPython3_EXECUTABLE=<path_to_python_to_use>. This is useful, for example, when you have a more recent version of Python than the ones we support installed on your system. In that case, cmake would select it and compilation might fail.
Compile:
cmake --build . --config Release -- -j `nproc`
Configuration and deployment
Once the compilation is done, you have two options: you can choose to work directly from the build folder
or you can deploy the SDK files in the system path (/usr/local/lib, /usr/local/include…).
Option 1 - working from
buildfolder
To use the SDK directly from the
buildfolder, you need to update some environment variables using this script (which you may add to your~/.bashrcto make it permanent):source utils/scripts/setup_env.shProphesee camera plugin is included in the SDK, but you still need to copy the udev rules files in the system path and reload them so that your camera is detected with this command:
sudo cp <MV_SDK_SRC_DIR>/hal_psee_plugins/resources/rules/*.rules /etc/udev/rules.d
sudo udevadm control --reload-rules
sudo udevadm trigger
Option 2 - deploying in the system path
To deploy the SDK, launch the following command:
sudo cmake --build . --target installNote
You can also deploy the SDK files (applications, samples, libraries etc.) in a directory of your choice by using the
CMAKE_INSTALL_PREFIXvariable (-DCMAKE_INSTALL_PREFIX=<METAVISION_INSTALL_DIR>) when generating the makefiles in step 3 of the compilation. Similarly, you can configure the directory where the Python packages will be deployed using thePYTHON3_SITE_PACKAGESvariable (-DPYTHON3_SITE_PACKAGES=<PYTHON3_PACKAGES_INSTALL_DIR>).you also need to update
LD_LIBRARY_PATHandHDF5_PLUGIN_PATH(which you may add to your~/.bashrcto make it permanent):export LD_LIBRARY_PATH=$LD_LIBRARY_PATH:/usr/local/lib export HDF5_PLUGIN_PATH=$HDF5_PLUGIN_PATH:/usr/local/hdf5/lib/plugin # On Ubuntu 22.04 export HDF5_PLUGIN_PATH=$HDF5_PLUGIN_PATH:/usr/local/lib/hdf5/plugin # On Ubuntu 24.04
Note
If you are using a third-party camera, you need to install the plugin provided
by the camera vendor and specify the location of the plugin using the MV_HAL_PLUGIN_PATH environment variable.
Running tests
Running the test suite is a sure-fire way to ensure you did everything well with your compilation and installation process.
The more modules you add the more tests will be run when you do this step.
Download MV SDK files by clicking on the
Download Allbutton to retrieve an archive of all the files necessary to run the tests. Please be aware that the archive you’ll receive is approximately 5.4 Gb in size.Extract and put the contents of this archive into
<MV_SDK_SRC_DIR>. For instance, the correct path of sequence gen31_timer.raw should be <MV_SDK_SRC_DIR>/datasets/openeb/gen31_timer.raw.Regenerate the Makefiles with the test options enabled:
cd <MV_SDK_SRC_DIR>/build
cmake .. -DBUILD_TESTING=ON
Compile again:
cmake --build . --config Release -- -j `nproc`
Make sure you launched the
utils/scripts/setup_env.shmentioned before, and run the test suite:ctest -C Release
Get started!
You are now ready to use Metavision SDK. The best way to start getting familiar with the event-based technology is to open an event-based camera with Metavision Studio to begin data collection and visualization. You can choose to dive directly in the SDK by following a getting started guide or looking at a Code Sample.