
Model 3D Detection and Tracking using Python
The Python bindings of Metavision SDK CV3D provide algorithms to detect and track a 3D object for which the geometry is known.
The sample metavision_model_3d_tracking.py shows how to:
load a 3D model from a file, the 3D object being described using a simple JSON format
use algorithms to detect and track the object from the events stream
dynamically adapt the size of the time slices to suit the algorithms’ needs
visualize the tracked object in the events stream
Thanks to the simple 3D object representation, the algorithms are also capable of detecting and tracking fiducial markers that are widely used in AR/VR applications.
The source code of this sample can be found in <install-prefix>/share/metavision/sdk/cv3d/python_samples/metavision_model_3d_tracking
when installing Metavision SDK from installer or packages. For other deployment methods, check the page
Path of Samples.
Expected Output
Setup & requirements
The tracking algorithm relies on the capacity to track the edges of an object. As a result, here are some conditions that are important to fulfill to be able to robustly track that object:
the edges defined in the 3D model JSON file should precisely match those of the object
the contrast at the edges should be strong enough to trigger events in the event-based sensor
there should not be too much texture or other edges near the object’s edges (both in the background and on the object itself)
How to start
To run this sample, you will need to provide:
a RAW file containing a sequence in which the 3D object to be tracked appears (offline mode),
a JSON file containing the description of the 3D object
a JSON file containing an initialization camera pose (pose from which the detection algorithm will try to detect the object),
a JSON file containing the calibration of the camera used for the record (or the camera used in live mode)
Optionally, you can also provide a BIAS file when the sample is executed in live mode
Note
The description of the 3D object must contain:
a list of all the 3D object’s vertices
a list of all the 3D object’s edges, an edge being a pair of two indices pointing to its vertices
a list of all the 3D object’s faces that themselves consist in:
a list of indices pointing to each edge of the face,
the face’s normal in the object’s coordinate system
Note
Take a look at one of the Sample Recordings provided with this sample for more details about these files.
To start the sample based on the live stream from your camera, run:
python metavision_model_3d_tracking.py -i <base_path>/object
where <base_path> is a path to a folder containing the following files:
.
└── <base_path>
        ├── calibration.json
        ├── model_init_pose.json
        └── object.json
If you want to start the sample using a RAW file, run:
python metavision_model_3d_tracking.py -r <base_path>/object.raw
where <base_path> is a path to a folder containing the following files:
.
└── <base_path>
        ├── calibration.json
        ├── model_init_pose.json
        ├── object.json
        └── object.raw
To check for additional options:
python metavision_model_3d_tracking.py -h
Note
If tracking gets lost sometimes, you can try to adjust those tracking parameters:
--n-events N_EVENTS: number of events after which a tracking step is attempted. (default: 5000)
--n-us N_US: amount of time after which a tracking step is attempted. (default: 10000)
Note that smaller n-events or n-us makes algorithm more robust to higher speed motion but slower (latency increases)
as well. So to make it faster, make sure your sensor biases are tuned correctly for your application, and you might want to filter out
events with activity filter or trail filter for example.
The tracking algorithm is not compatible with spherical objects because they don’t provide “true physical edges”. Meaning that the 3D location of their edges is never the same as it depends on the view point from which they are observed. Hence, the tracking algorithm can only be used to track 3D objects for which true edges exist.
The detection algorithm can take more time with a large number of faces or high background noise. In this situation, you should try to use the most simplified 3D model possible (but still with accurate true edges). The more faces you use, the less efficient the detection and tracking algorithm will be.
The same holds for the background noise: you should try to reduce it as much as possible. Indeed not only noise makes the algorithms slower but also it makes them less robust, especially the tracking algorithm which is very sensitive to noise. Depending on the speed of your objects (especially for high-speed objects), you might have to tune the sensor biases to get better data. Using some filtering and/or Region of Interest (ROI) may help to speed up the detection algorithm and reduce the latency.
Code Overview
Processing Pipeline
Before detecting and tracking a 3D object, the first step is to load its 3D representation. This is done using the
metavision_sdk_cv3d.load_model_3d_from_json() function:
# Load 3D Model
model_3d = mv_cv3d.load_model_3d_from_json(args.model_path)
if not model_3d:
    print("Impossible to load the 3D model from " + args.model_path)
    exit(9)
Then the metavision_sdk_cv3d.Model3dDetectionAlgorithm and metavision_sdk_cv3d.Model3dTrackingAlgorithm
can be instantiated with:
a reference to a
metavision_sdk_cv.CameraGeometryinstancea reference to a
metavision_sdk_cv3d.Model3dinstancea reference to a
metavision_sdk_core.MostRecentTimestampBufferinstance that they will fill with the input events buffers
# Detection and Tracking algorithms
detection_algo = Model3dDetectionAlgorithm(camera_geometry, model_3d, time_surface, detection_params)
tracking_algo = Model3dTrackingAlgorithm(camera_geometry, model_3d, time_surface, tracking_params)
This sample implements the following basic state machine:
Both algorithms process time slices of events and output the new camera’s pose in case of success. Those time slices can be created according to different strategies (i.e. fixed number of events, fixed duration or a mixed condition). Each of these two algorithms has a more appropriate way of receiving events.
The metavision_sdk_cv3d.Model3dTrackingAlgorithm is meant to track an object while the user is moving very
fast. To track that object during fast motions the algorithm relies on the camera’s high temporal resolution which makes
the object very close from its previous location from one step to another. This hypothesis enables the implementation of
very efficient methods (that still remain valid for slow motions). As a consequence, to work correctly, this
algorithm has to be called at a high frequency when the user is moving fast but can be called at a very low frequency
when the user is moving slowly. One way to get this behavior is to feed the algorithm with time slices having a fixed
number of events. By doing so, the output camera poses frequency automatically adapts to the camera’s speed.
In contrast to the metavision_sdk_cv3d.Model3dTrackingAlgorithm, the
metavision_sdk_cv3d.Model3dDetectionAlgorithm algorithm is meant to detect an object that is not necessarily
very close from its initialization pose while the user is moving relatively slowly. The former point implies that we can
no longer rely on the close locality hypothesis and thus have to rely on more costly methods to detect that object.
However, the latter point implies that the algorithm can be called at a relative low frequency which compensates its
extra cost. As a result, big fixed duration time slices (e.g. 10ms) are well suited for this algorithm.
To address this, the algorithms could have been implemented in an asynchronous way, each producing its result (i.e. calling the asynchronous output callback) according to its configuration (i.e. N events, N us or mixed), but this would have made the synchronization between them complicated during state changes.
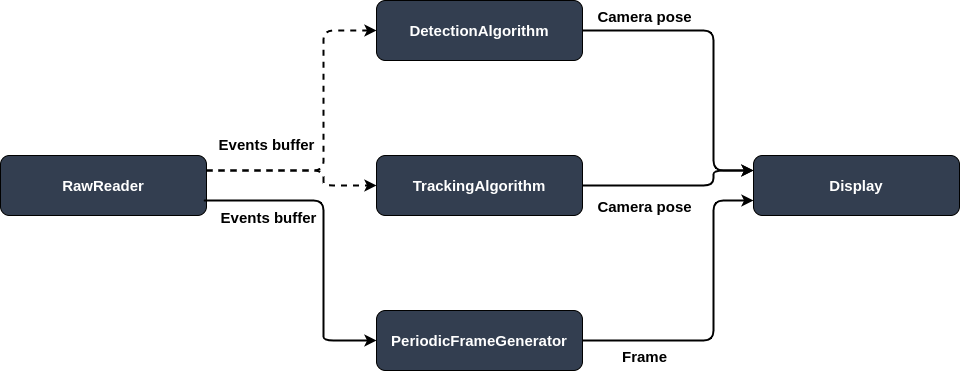
Instead, the problem is solved upstreams by using a metavision_core.event_io.RawReader instance. Indeed,
this class allows us to change the configuration of the time slices at runtime when a state change is detected (i.e.
switching from detection to tracking and vice versa). Here is the pipeline implemented in the sample:
And here is what the full processing loop looks like:
# Process events
reader.seek_time(args.process_from)
while (not reader.is_done()) and (args.process_to is None or reader.current_time < args.process_to):
    # Dispatch system events to the window
    EventLoop.poll_and_dispatch()

    prev_is_tracking = is_tracking

    if is_tracking:
        evs = reader.load_n_events(args.n_events)
        is_tracking = tracking_algo.process_events(evs, T_c_w)
    else:
        evs = reader.load_delta_t(args.detection_period_us)
        success, visible_edges, detected_edges = detection_algo.process_events(evs, T_c_w)
        if success:
            # We wait for several detections before considering the model as detected
            # to avoid false positive detections
            n_detection += 1
            is_tracking = (n_detection > args.n_detections)

    # The frame generation algorithm processing can trigger a call to show which can trigger
    # a reset of the tracking if the space bar has been pressed.
    events_frame_gen_algo.process_events(evs)

    if prev_is_tracking != is_tracking:
        if is_tracking:
            set_tracking_params(evs["t"][-1])
        else:
            set_detection_params()
Note
We can note from the code that we do not switch to the tracking state as soon as the object is detected. Instead, we
wait for N successive detections to reduce false positive ones.
Note
In the sample, the tracking can also be reset by pressing the space bar key
Both the detection algorithm and the tracking algorithm proceed as follows:
visible edges of the model are recovered,
points are sampled along each edge, called support points,
matches for each support point are searched for in the timesurface,
the associations of points and matches are used in a Gauss-Newton optimization to compute the pose of the camera in relation to the model.
Matches are determined by searching, along the normal of the edge, for the pixel with the latest timestamp. Point-match associations are weighted in relation to the most recent timestamp in the lot. Default weights for the most recent and oldest timestamp can be changed in the pipeline parameters.
Tracking step during an overall vertical movement
The timesurface is pseudo-colored from most-recent timestamp (red) to oldest allowed timestamp (dark blue). A pink line is drawn for each support point, representing the area of search. Green points denote good matches and red points denote no match.
For the detection step, matches are further confirmed by checking that the optical flow at those locations matches the expected flow determined by the edge normal.
Note
If you experience latency in your tracking you can try to reduce the parameter --tracking-search-radius to limit the search for matches to closer pixels, or increase the parameter
--tracking-support-point-step to increase the inter-distance between support points, and therefore reduce their overall number. That could however make the tracking less robust.
Reciprocally, if the tracking gets lost, you can try to increase the parameter --tracking-search-radius to expand the search for matches to more pixels, and/or reduce
the parameter --n-events so that less events are processed between tracking steps and so the marker would have moved a lesser distance. That could however increase
the latency of the overall pipeline.
Display
For the display we use the metavision_sdk_core.PeriodicFrameGenerationAlgorithm asynchronous algorithm which
generates frames from events at a fixed frame rate. When a new frame is available we draw the model’s edges on top of it
using the last known camera’s pose. When the pipeline is in the detection state, tracked and non tracked edges are
drawn using different colors:
# Periodic Event Frame Generator
def periodic_frame_gen_cb(ts, cv_frame):
    nonlocal is_tracking
    nonlocal visible_edges
    nonlocal detected_edges

    cv2.putText(cv_frame, str(ts), (0, 10), cv2.FONT_HERSHEY_DUPLEX, 0.5,
                (0, 255, 0) if is_tracking else (0, 0, 255))
    # Be careful, here the events and the 3D model are not rendered in a tightly synchronized way,
    # meaning that some shifts might occur. However, most of the time they should not be noticeable
    if is_tracking:
        visible_edges = mv_cv3d.select_visible_edges(T_c_w, model_3d)
        mv_cv3d.draw_edges(camera_geometry, T_c_w, model_3d, visible_edges, cv_frame, (0, 255, 0))
        cv2.putText(cv_frame, "tracking", (0, 30), cv2.FONT_HERSHEY_DUPLEX, 0.5, (0, 255, 0))
    else:
        mv_cv3d.draw_edges(camera_geometry, T_c_w, model_3d, visible_edges, cv_frame, (0, 0, 255))
        mv_cv3d.draw_edges(camera_geometry, T_c_w, model_3d, detected_edges, cv_frame, (0, 255, 0))
        cv2.putText(cv_frame, "detecting", (0, 30), cv2.FONT_HERSHEY_DUPLEX, 0.5, (0, 0, 255))
    window.show_async(cv_frame)
    if args.out_video:
        video_writer.write(cv_frame)
Warning
As pointed out in the code, the background frame and the 3D model’s edges may not be perfectly aligned. However this should be imperceptible in practice.